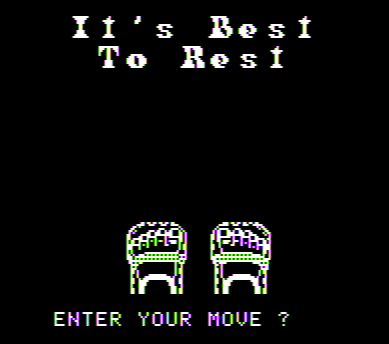
You are given a score based on amount-you-followed-Federation-ideals when playing; ex: don’t randomly shoot aliens if you can help it. Sometimes there will be a dilemma where you *can* shoot past aliens to solve a particular puzzle. Maybe there’s another way? But if there is, you have to come up with a plan and enact it, there isn’t a morality button you can just press to do the right thing.
The idea hovers around my beef with modern “moral choice” games in that they lay out the options clearly on a platter, when in real life even working out what the options are is murky.
The finale of Zork II does something spectacular with moral choice.
Last I posted, I was stuck on a wall of ice and a dragon. The solution (which I did need to look up) was to combine the two. You can ATTACK DRAGON to annoy it and it will follow you, then ATTACK DRAGON again to keep it annoyed, until reaching:
Ice Room
This is a large hall of ancient lava, since worn smooth by the movement of a glacier. A large passage exits to the east and an upward lava tube is at the top of a jumble of fallen rocks.
A mass of ice fills the western half of the room.
As the dragon enters, he sees his reflection on the icy surface of the glacier at its western end. He becomes enraged: There is another dragon here, behind that glass, he thinks! Dragons are smart, but sometimes naive, and this one has never seen ice before. He rears up to his full height to challenge this intruder into his territory. He roars a challenge! The intruder responds! The dragon takes a deep breath, and out of his mouth pours a massive gout of flame. It washes over the ice, which melts rapidly, sending out torrents of water and a huge cloud of steam! You manage to clamber up to a small shelf, but the dragon is terrified! A huge splash goes down his throat! There is a muffled explosion and the dragon, a puzzled expression on his face, dies. He is carried away by the water.
When the flood recedes you climb gingerly down. While no trace of the dragon can be found, the melting of the ice has revealed a passage leading west.
Your sword is no longer glowing.
I was foiled somewhat by visualization issues. I assumed that the dragon was very large, too large to really follow after the player. (Or at least, the locations along the way were too small to let a dragon through.) It did cross my mind that dragon + ice would be very interesting, so I’ll still call this a failure on my part rather than the game’s. Can’t win them all.
…
Continuing the theme of failure on my part, my eternal nemesis of missing an exit returns.
Argh! The south exit isn’t even hidden, it is right there in the room description. It’s a fun puzzle, at least.
Dingy Closet
This is a dingy closet adjacent to a larger room to the north. Chiselled into a wall are these words:
Protected by
FROBOZZ
Magic Alarm Company
(Hello, footpad!)
There doesn’t seem to be any footpad here, however.
There is a robot here.
There is a beautiful red crystal sphere here.
>get sphere
As you reach for the sphere, a solid steel cage falls from the ceiling to entrap you. To make matters worse, poisonous gas starts coming into the room.
Cage
You are trapped inside a solid steel cage.
>robot, lift cage
The cage shakes and is hurled across the room. It’s hard to say, but the robot appears to be smiling.
I think there’s a potential parser meta-frustration in that it isn’t clear you can still communicate with the robot while in the cage. The general rule for CHARACTER, DO SUCH-AND-SUCH requires the player and character to be in the same room; the cage is technically “the same room” I suppose but that’s still a potential dodgy space. (The very first release of Zork II had even more parser trouble here; I played the last version, since the bugs in earlier versions are well-documented.)
…
Zooming back to the dragon, past where it originally lurked was a room with a princess.
Dragon’s Lair
You are in the dragon’s lair, where the rock walls are scarred by flame. A blackened doorway leads to the south.
A rotten old wooden chest is in one corner among the debris. A beautiful young woman, wearing a dirty and bedraggled gown, sits on a rock in the corner. Her hair is unkempt and she is oblivious to your presence, almost in a trance.
The princess walks all the way to the garden, befriends the unicorn, and rides off, leaving the key behind.
Shyly, a unicorn peeks out of the hedges. It notices the princess and seems captivated. It approaches her and bows its head as though curtseying to her. Around its neck is a red satin ribbon on which is strung a delicate gold key. The princess takes the ribbon and uses it to tie up her hair. She looks at you and then, smiling, hands you the key and a fresh rose which she plucks from the arbor. “You may have use of such a thing,” she says. “It is the least I can do for one who rescued me from a fate I dare not contemplate.” With that, she mounts the unicorn (side-saddle, of course) and rides off into the gloom.
Your sword is no longer glowing.
So that’s another puzzle solved without any extra effort on my part — the puzzle I was stuck on really was the hinge for quite a few things.
…
Past the ice wall is a volcano which I remember from Zork mainframe.
Volcano Bottom
You are at the bottom of a large dormant volcano. High above you light enters from the cone of the volcano. The only exit is to the north.
There is a large and extremely heavy wicker basket here. An enormous cloth bag is draped over the side and is firmly attached to the basket. A metal receptacle is fastened to the center of the basket. Dangling from the basket is a piece of braided wire.
Part of the way up the volcano is a box which requires explosives to open.
Dusty Room
You are in a dusty old room which is featureless, except for an exit on the north side.
Imbedded in the far wall is a rusty box. It appears to be somewhat damaged, since an oblong hole has been chipped out of the front of it.
>examine hole
The oblong hole has been chipped out of the box, probably by someone wanting whatever is inside the box. The attempt was a pathetic failure, however.
Flying even higher leads to the most colorful death in the game.
The balloon floats majestically out of the volcano, revealing a breathtaking view of a wooded river valley surrounded by impassable mountains. In a clearing stands a white house. You drift into high winds, which carry you towards the snow-capped peaks. Oh, no! You crash into the jagged cliffs of the Flathead Mountains!
Honestly, even though I didn’t remember it from before, the volcano was straightforward and fun, which was a relief after banging my head on everything else.
…
Getting the key from the unicorn led me into the Wizard’s Lair, and the endgame.
From the Zork User Group map again. Unlike the later Invisiclues version, there are drawings of the characters, including the sea serpent shown that I will discuss shortly.
The centerpiece is a “wizard’s Workroom” with “three stands – ruby, sapphire, and diamond – which form a triangle.”
I realized immediately the spheres would be useful. I had a red sphere already (for the ruby stand) and a blue sphere (for the sapphire stand), but the third sphere was still elusive. I knew from seeing it on the other side that it was a “blurry” scene, and I also knew I had mostly exhausted the Zork II map otherwise, so it led me to zero in on an aquarium in the Wizard’s habitat.
Aquarium Room
Here a dark hallway turns a corner. To the south is a dark room, to the east is fitful light.
Filling the northern half of the room is a huge aquarium.
The aquarium contains:
A baby sea serpent
Breaking the aquarium revealed a “clear sphere”. The first time around I had to die in the process.
>break aquarium with sword
The elvish sword shatters the glass wall of the aquarium, spilling out an impressive amount of salt water and wet sand. It also spills out an extremely annoyed sea serpent who bites angrily at the elvish sword, and then at you. He is having difficulty breathing, and he seems to hold you responsible for his current problem. He manages to rend you limb from limb before he drowns in the air.
I guess you were too careless.
Upon resurrection I walked back to find the sphere, so I knew I was on the right track. (Technically I could have kept going and finished the game, just with a reduced score.) A reload and a little thought later led me to throwing the sword rather than swinging it.
>throw sword at aquarium
The elvish sword shatters the glass wall of the aquarium, spilling out an impressive amount of salt water and wet sand. It also spills out an extremely annoyed sea serpent who bites angrily at the elvish sword, and then at you. He is having difficulty breathing, and he seems to hold you responsible for his current problem. He tries to slither across the stone floor towards you. Fortunately, he expires mere inches away from biting off your foot. A clear crystal sphere sits amid the sand and broken glass on the bottom of the aquarium.
Poor baby sea serpent! But I had the third sphere.
As you place the clear crystal sphere in the diamond stand, a low humming noise begins, and you can feel the hairs on the back of your neck begin to stand up. The three spheres begin to vibrate, faster and faster, as the noise becomes higher and higher pitched. Three puffs of smoke, one red, one blue, one white, rise up from empty stands. The spheres are gone! But in the center of the triangle formed by the stands is now a black stand of obsidian in which rests a strange black sphere.
…
I was right that the demon from the afterlife was to come into play in the endgame. The black sphere I obtained from the previous scene went in a black circle nearby.
A cold wind blows outward from the sphere. The candles flicker, and a low moan, almost inaudible, is heard. It rises in volume and pitch until it becomes a high-pitched keening. A dim shape becomes visible in the air above the sphere. The shape resolves into a large and somewhat formidable looking demon. He looks around, tests the walls of the pentagram experimentally, then sees you! “Hmm, a new master…” he says under his breath. “Greetings, oh master! Wouldst desire a service, as our contract stateth? For some pittance of wealth, some trifle, I will gratify thy desires to the utmost limit of my powers, and they are not inconsiderable.” He makes a pass with his massive arms and the walls begin to shake a little. Another pass and the shaking stops. “A nice effect… I find it makes for a better relationship to give such a demonstration early on.” He grins vilely.
This is a lovely way to justify treasure-hunting — arguably the best I’ve seen. The demon demands treasures, and it happens to be all the treasures available in the world of Zork II. He helpfully tells you when you’re getting closer to the right number. Fortunately, I had already found all the treasure by this time, so I got to move on to being able to control the demon.
>give violin to demon
“This will do for my fee. ‘Tis a paltry hoard, but as you have done me a small service by loosing me from this wizard, it will suffice.”
>demon, kill wizard
The demon grins hideously. “This has been my desire e’er since this charlatan bent me to his service. I perform this deed with pleasure!” The demon forms himself back into a cloud of greasy smoke. The cloud envelops the Wizard, who waves his wand fruitlessly, mumbling various phrases which begin with “F”. A horrible scream is heard, and the smoke begins to clear. Nothing remains of the Wizard but his wand.
The genie departs, his agreement fulfilled.
Satisfying! The wizard leaves behind his wand, which led me to resolve one of the last lingering puzzles.
>wave wand at menhir
The wand grows warm, the enormous menhir seems to glow dimly with magical essences, and you feel suffused with power.
>say “float”
The wand glows very brightly for a moment.
The menhir floats majestically into the air, rising about ten feet. The passage beneath it beckons invitingly.
The “F” was a pretty good hint signal that I needed to wait until I could cast spells, so I didn’t waste much time at the menhir before this. Good job, Blank/Lebling. (This is somewhat canceled by the syntax being finicky — you have to put “float” in quotes.)
Behind the menhir was a dog collar, which I could take to the final stretch: nearby is the oddly-angled room maze I’ve already discussed in depth, and past that is a room with a Cerberus.
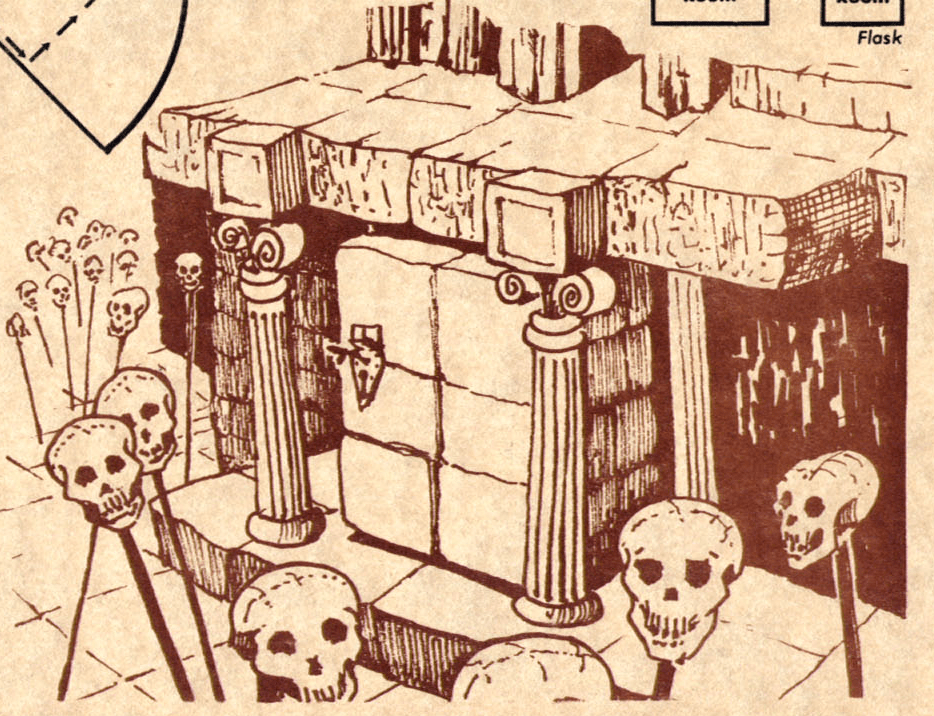
Cerberus Room
This is the entrance to a huge crypt or tomb. A marble stairway leads up from a gateway arch.
There is a vicious-looking dog guarding the entrance. It is more or less your usual dog, except that it has three heads and is the size of an elephant.
I had a slight hiccup here because I first typed GIVE COLLAR TO DOG
>give collar to dog
The huge dog snaps nastily at you.
and assumed that meant I couldn’t put it on him.
>put collar on dog
The creature whines happily, then the center head licks your face (which is roughly like experiencing a sandpaper washcloth). The other two heads look about, as though the monster felt a sudden need to find a pair of slippers somewhere. Its huge tail wags enthusiastically, knocking small rocks around and almost blowing you over from the breeze it creates.
>pet dog
The dog is now insanely happy, slobbering all over the place and whining with uncontained doggish joy.
Confirmed: In Zork II you can pet the dog.
Past the Cerberus was a crypt and the final challenge.
Crypt
The room contains the earthly remains of the mighty Flatheads, twelve somewhat flat heads mounted securely on poles. While the room might be expected to contain funerary urns or other evidence of the ritual practices of the ancient Zorkers, it is empty of all such objects. There is writing carved on the crypt. The only apparent exit is to the north through the door to the anteroom. The door is open.
>read crypt
“Here lie the Flatheads, whose heads were placed on poles by the Keeper of the Dungeon for amazing untastefulness.”
I have heard report if you let your lamp run out (and have enough points overall) the Wizard casts “Fluorescence” on you and causes you to permanently glow. That’s great for getting close to the end, but robs you of final victory, because here you need the lights off.
>turn off lamp
The lamp is now off.
It is dark, but on the south wall is a faint outline of a rectangle, as though light were shining around a doorway. You can also make out a faintly glowing letter in the center of this area. It might be an “F”.
>open secret door
The secret door opens noiselessly.
>light lamp
The lamp is now on.
>s
Landing
Beyond the door is a roughly hewn staircase leading down into darkness. The landing on which you stand is covered with carefully drawn magical runes like those sketched upon the workbench of the Wizard of Frobozz. These have been overlaid with sweeping green lines of enormous power, which undulate back and forth across the landing. The wand begins to vibrate in harmony with the motion of the lines. You feel yourself compelled downward, and you yield, stepping onto the staircase. As you pass the green lines, they flare and disappear with a burst of light, and you tumble down the staircase!
At the bottom, a vast red-lit hall stretches off into the distance. Sinister statues guard the entrance to a dimly visible room far ahead. With courage and cunning you have conquered the Wizard of Frobozz and become the master of his domain, but the final challenge awaits!
(The ultimate adventure concludes in “Zork III: The Dungeon Master”.)
Sweet, sweet, victory. But I wasn’t done yet.
…
I started this post off with the title The Death of a Wizard trying to parallel my Zork I finish with The Death of a Thief. As I got typing, I started to wonder: do you really need to kill the wizard? There isn’t much left in the game after he’s eliminated.
Yes, it is indeed possible to avoid killing the wizard; you can ask the demon to get his wand for you instead.
>demon, give wand to me
“I hear and obey!” says the demon. He stretches out an enormous hand towards the wand. The Wizard is unsure what to do, pointing it threateningly at the demon, then at you. “Fudge!” he cries, but aside from a strong odor of chocolate in the air, there is no effect. The demon plucks the wand out of his hand (it’s about toothpick-size to him) and gingerly lays it before you. He fades into the smoke, which disperses. The wizard runs from the room in terror.
(!!) The rest of the game proceeds as mentioned above. You are still told your courage and cunning helped you “conquer” the wizard but note that’s different than “killing” him.
This was a moral choice without even announcing a moral choice was happening. Again: when I first finished, I thought DEMON, KILL WIZARD was the only solution. All that really needed to happen is the removal of the wizard as a threat (the wand he uses).
This could have gone the other direction in terms of hidden choice. Both Jimmy Maher and Joe Pranevich asked for the wand on their playthroughs; it appears it never occurred to either one to just request that the demon kill the wizard.
What makes the ending even more fascinating is a third moral choice, but what turns out to be a wrong one. You can ask the demon to GET MENHIR, bypassing needing the wand to get the collar. This is enough to get you right to the end, where you fail in spectacular enough fashion I’ll quote the whole thing.
Landing
Beyond the door is a roughly hewn staircase leading down into darkness. The landing on which you stand is covered with carefully drawn magical runes like those sketched upon the workbench of the Wizard of Frobozz. These have been overlaid with sweeping green lines of enormous power, which undulate back and forth across the landing. The green curves begin to vibrate toward you, as if searching for something. One by one your possessions glow bright green. Finally, you are attacked by these magical wardens, and destroyed!
**** You have died ****
Now, let’s take a look here… Well, you probably deserve another chance. I can’t quite fix you up completely, but you can’t have everything.
Room of Red Mist
You are inside a huge crystalline sphere filled with thin red mist. The mist becomes blue to the west.
You strain to look out through the mist…
You see only darkness.
>w
Room of Blue Mist
You are inside a huge crystalline sphere filled with thin blue mist. The mist becomes white to the west.
You strain to look out through the mist…
You see only darkness.
>w
Room of White Mist
You are inside a huge crystalline sphere filled with thin white mist. The mist becomes black to the west.
You strain to look out through the mist…
You see only darkness.
>w
You follow a corridor of black mist into a black walled spherical room. The room is empty. A huge face looks down on you from outside and laughs sardonically. It doesn’t look like you’re getting out of this predicament!
Your score would be 360 (total of 400 points), in 516 moves.
This score gives you the rank of Master.
Killing the wizard works, disarming the wizard works, but the moral choice of ignoring the wizard means he gets you in the end (you need his wand to get by the magical traps).
Now, I fully acknowledge there’s a game design issue here when nobody notices the choices available even after the fact (this could be alleviated by some more specific ending text) but this is still far more advanced plotting than I would have expected in 1981.
How does this compare with Zork I? The first game had a much tighter geography with multiple methods from the underground back into the house, and I still found the thief superior to the wizard. I could believe Zork I’s sprawl was a real environment, whereas Zork II’s hub structure felt like a loosely connected set of mini-areas (even though there were some crossover elements, like the princess walking all the way to the garden). And while Zork I had some frustrations (like the egg) Zork II trumped them (including two puzzles that live in infamy today).
So if I was applying numerical ranking, sure, Zork I would score higher, but Zork II’s intent was rather different; being meant more as a blanket challenge for those sturdy enough to beat the first game, with less attention paid to geography but more coherence behind needing a treasure hunt. For what it tried to be, it succeeded, and is still worthy of the Infocom library.
…
I haven’t fully decided what I’m playing next, but sometime next week I will show off another discovery I’ve unearthed not chronicled on any gaming site: a missing branch in the chain of adventure game history.
I was planning on doing some save file hacking and finding out what was at the missing corner of the map.
Although I worked out the exact space on the disk that stores the location of the player (00011e01 if you’re curious), I think it’s possible the corner just doesn’t have a location at all. Immediately below the corner is FF 01, and immediately below that is FE 01. (This is in hexadecimal, so FF is the largest possible number; 255, one byte.) You would think based on the pattern the next value would be either 00 02 or 01 02, but modifying the save file to that number just puts the player somewhere random.
I should incidentally say “below” because my map is technically upside down; there’s an automap in the game (not a very helpful one) and I realized only about 3/4 in I was out of synch.
That is, the upper left corner on my map is the lower right corner on the screenshot.
It ends up not affecting anything unless there’s something literal about the map placement.
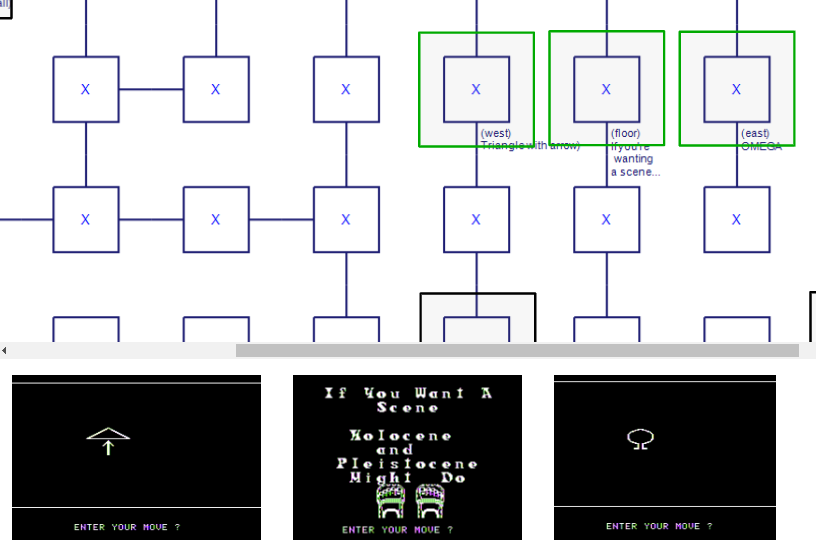
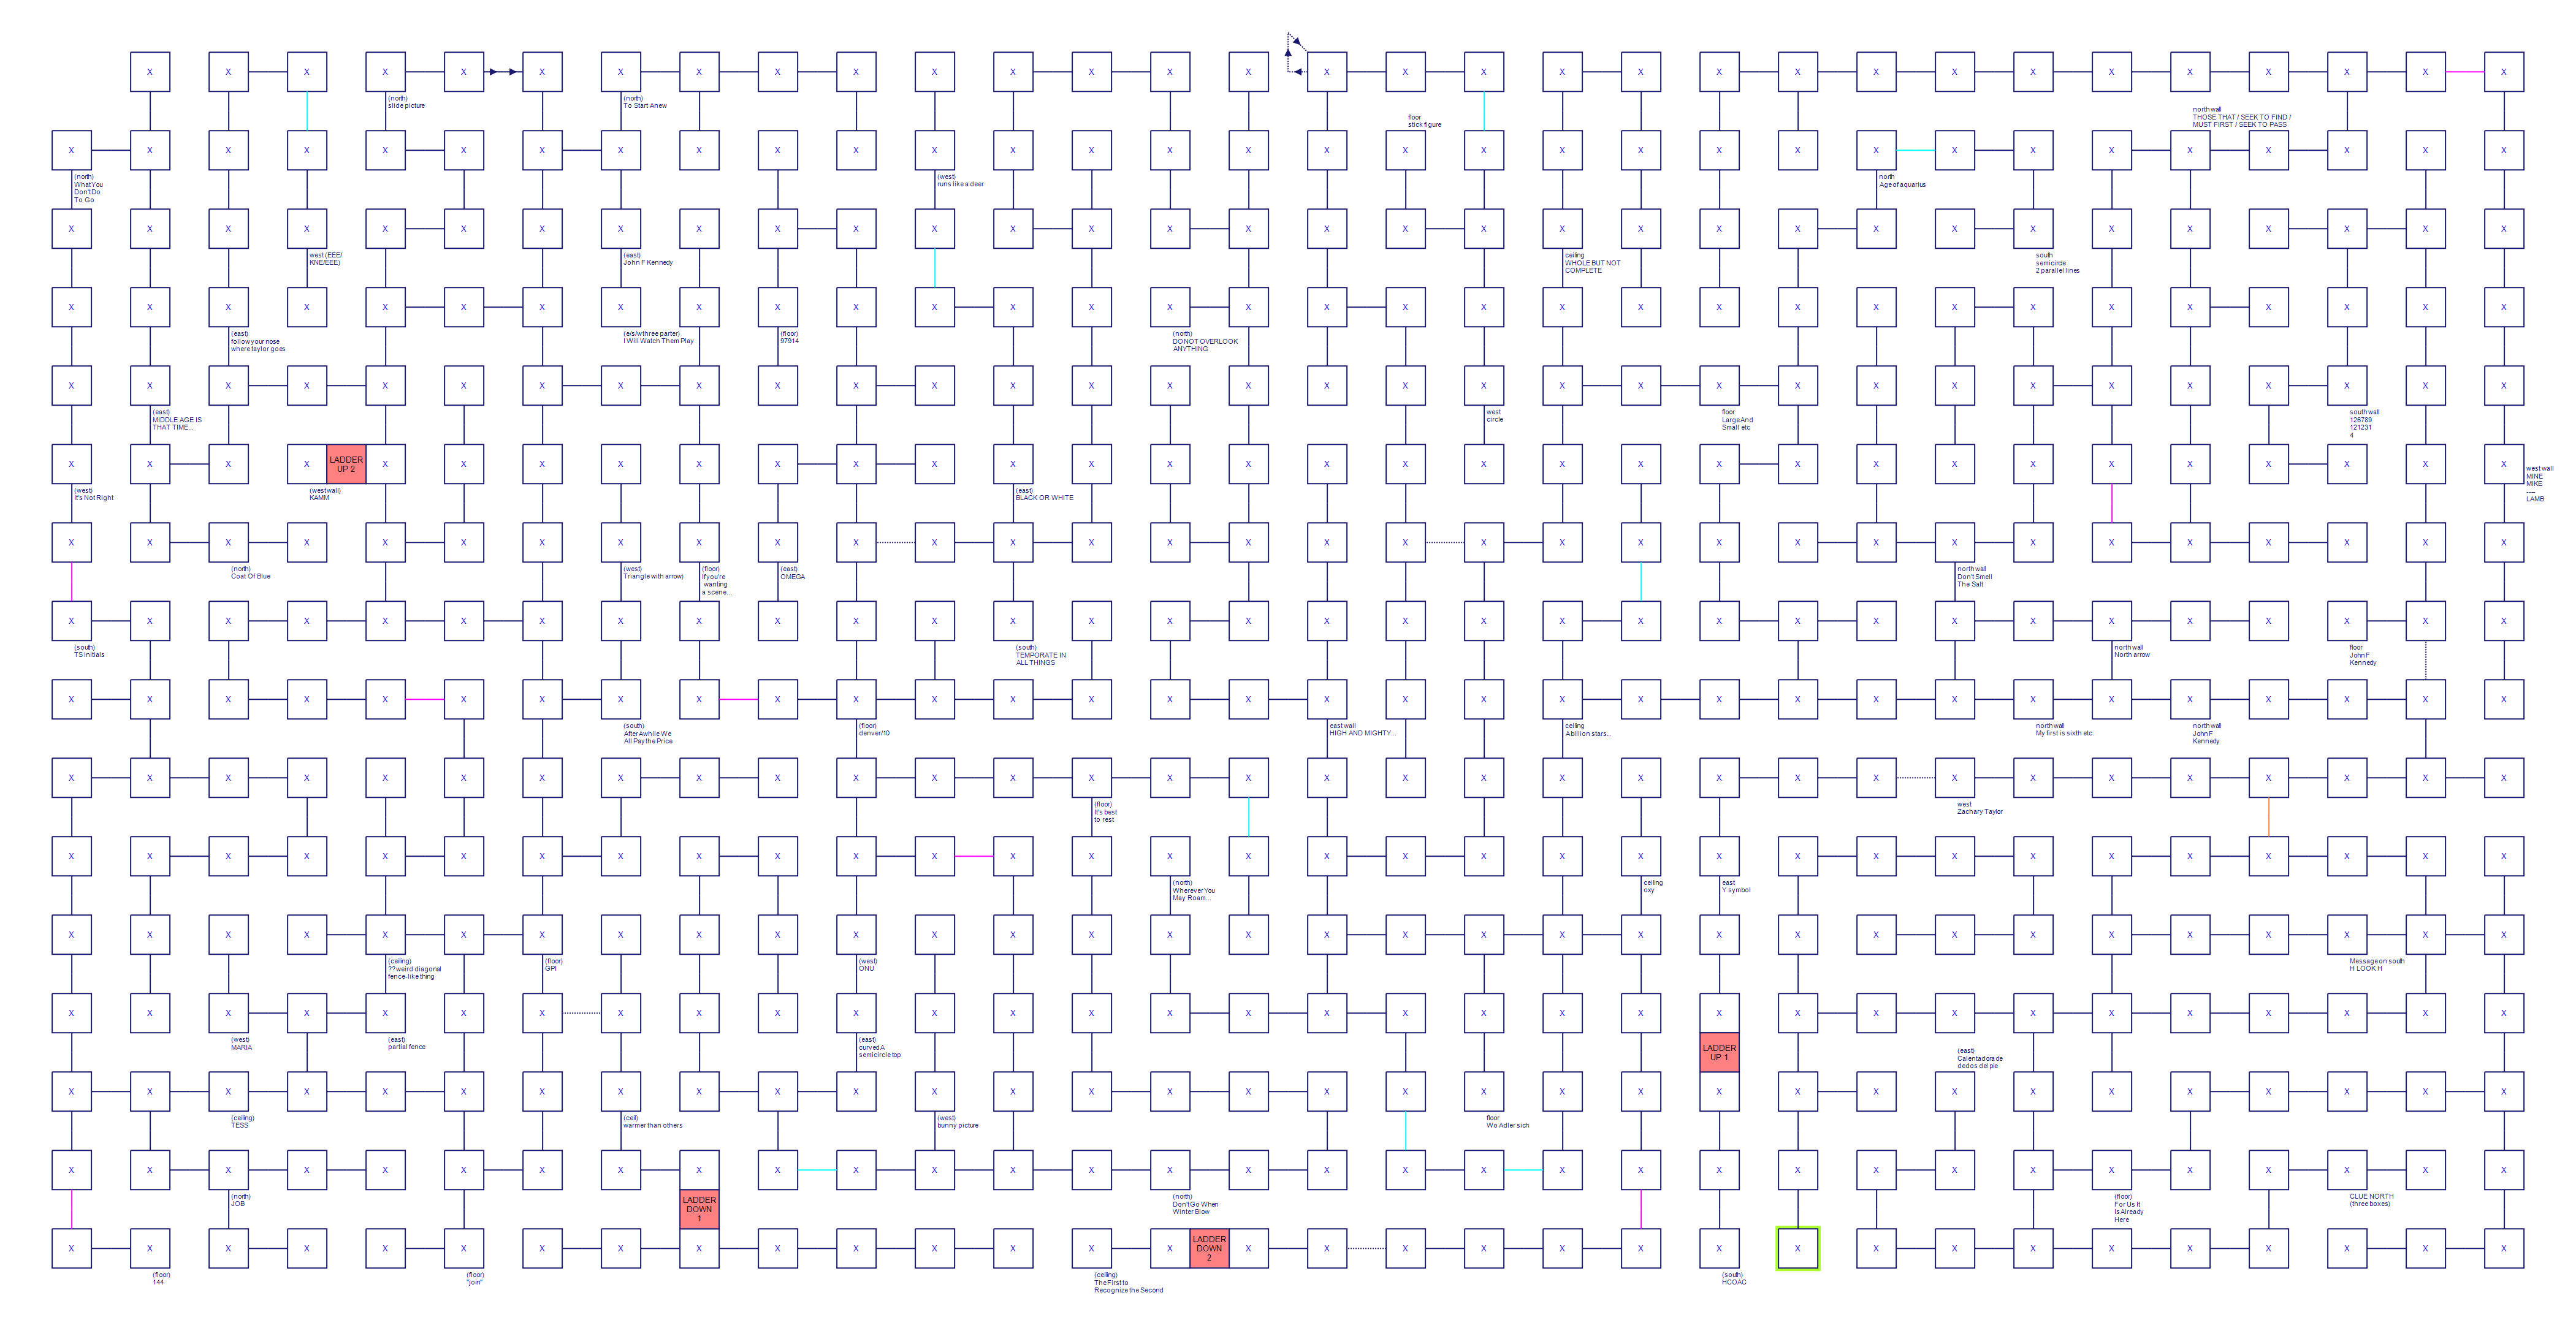
Speaking of map placement, Casey Muratori made an interactive version of the map. You can click on a square and have the corresponding clue come up.
I have no idea if these being adjacent is significant. I have been running the theory the middle clue refers to the DC Natural History Museum. The thing I’ve previously noted as an “omega” symbol might just be a picture of a tree. It’s drawn imbalanced for an omega.
I wish I had more to update on; the only “solving” I did was realizing “DENVER/10” has a good chance of meaning “a tenth of a mile” (Denver being the Mile High City). I originally tried zip codes, phone codes, and all sorts of shenanigans before it struck me as likely a distance, but of course I have no confirmer to work with yet.
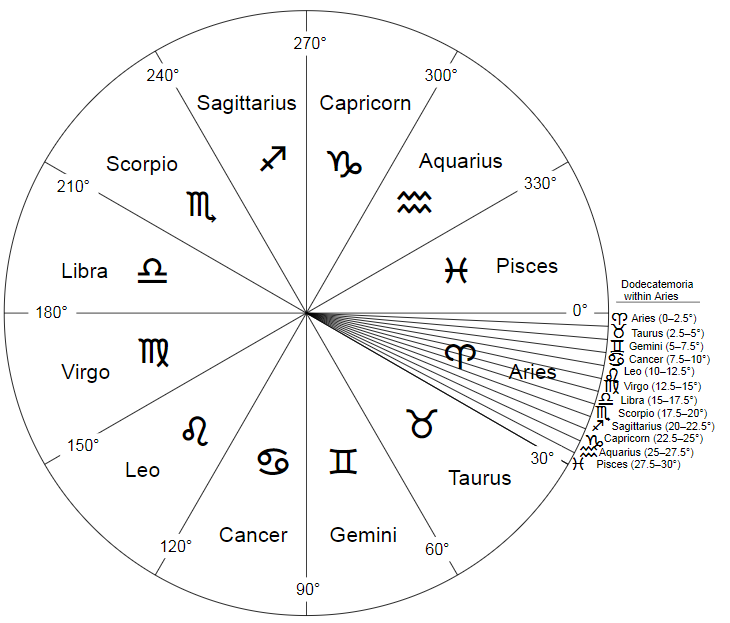
I might as well throw out the Zodiac angle-thing I’ve hinted at possibly being relevant.
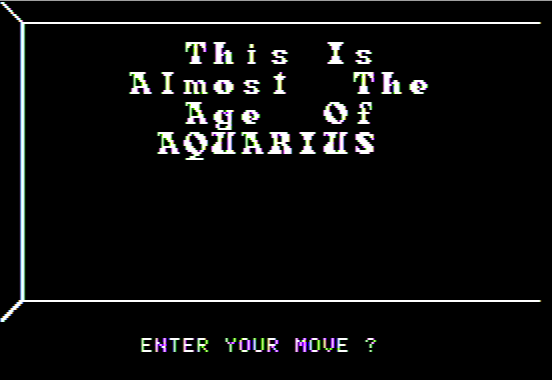
There’s been a direct reference to Aquarius, and a symbol that looks like Sagittarius (although turned on its side).
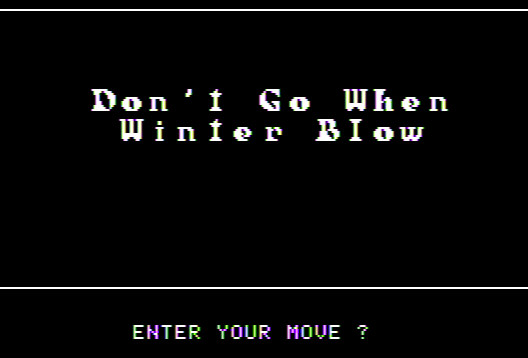
My theory is an angle is indicated somehow by combining the two, but unfortunately, astrology charts are all over the place and there doesn’t seem to be a consistent “up/down/left/right” to the angle chart shown above. I can say potentially the “avoid winter” hints indicate we want Sagittarius
to be the primary symbol (Aquarius starts in February, Sagittarius starts in November) but again, this is flailing without some kind of confirmation.
So I mainly have nothing at all to report, but Casey’s map is so slick you really should give it a look. I’m still keeping an eye on this one and will do at least one last stab with a mad-conspiracy-theory style chart with lots of arrows.
I’ve pulled the title to this one from a comment by Voltgloss. I’m not sure how to precisely measure such things but I do think the Oddly-Angled Rooms beat out the Bank of Zork.
I don’t think it’s a good puzzle, but for reasons rather different than everyone else gives.
From the Apple II blister pack first release, via Mobygames.
But first, the setup: it starts by feeling like a standard maze.
> S
Stairway
A marble stairway leads down into the gloom and a passage leads north.
> D
Oddly-angled Room
This is a room with oddly angled walls and passages in all directions. The walls are made of some glassy substance.
A marble stairway leads upward.
Your sword is glowing with a faint blue glow.
> E
Oddly-angled Room
This is a room with oddly angled walls and passages in all directions. The walls are made of some glassy substance.
On the floor is a very small diamond shaped window which is flickering dimly.
A long wooden club lies on the ground near the diamond-shaped window. The club is curiously burned at the thick end.
Your sword is no longer glowing.
> EXAMINE CLUB
The words “Babe Flathead” are burned into the wood.
However, we’re dealing with an odd structure but not a classical maze; there is an entrance but no exit. Attempting to drop items to map the rooms out leads to scenarios where clearly the exits are working at random (starting at a room with a necklace, going west one time led to a place where I dropped my sword, and another time a room where I dropped a metal box).
Most prominent is the “very small diamond” that seems to brighten and darken at random.
Oddly-angled Room
This is a room with oddly angled walls and passages in all directions. The walls are made of some glassy substance.
On the floor is a very small diamond shaped window which is dimly glowing.
> se
Oddly-angled Room
This is a room with oddly angled walls and passages in all directions.
The walls are made of some glassy substance.
On the floor is a very small diamond shaped window which is flickering dimly.
One route to solving is to realize that brighter = good and keep track of the pattern.
This particular bit of map was made by saving, testing out an exit, and restoring. It’s the easiest way to figure things out but you can approach roughly the same idea by testing out movement sequences.
Once the light gets bright enough a “strange rusty squeal” occurs and the light switches to glowing “serenely”. If you go back to the entrance there is now a stair going down. The correct route is a diamond, just like the window.
What makes this very different from other mazes at the time is the game is tracking the movements of the player rather than just the room they are in so some lateral thinking is required.
…
Now, assuming you weren’t familiar with the puzzle before the above might leave you wondering why it’s considered so awful. Coming up with the above pattern is a bit difficult and I suspect most people either read the official Invisiclues for the game, or found out the solution from someone else who did.
(7 hints left) > If you solve this without any help at all, my cap is off to you!
(6 hints left) > The maze was meant to confound maze mappers.
(5 hints left) > There are nine rooms. Almost all of the room connections are probabilistic – sometimes they work and sometimes they don’t. (If you repeat any direction often enough, you’ll travel through all the rooms.)
(4 hints left) > Have you noticed all of the baseball clues: the Babe Flathead bat, “You’ll never get past first base at this rate…”?
(3 hints left) > The glowing diamonds are baseball bases – the brighter they glow, the further you’ve progressed.
(2 hints left) > Left-handed pitchers are sometimes called “southpaws.”
(1 hint left) > The solution is to walk in the directions of a standard baseball diamond, starting from home plate (where the bat is): southeast, northeast, northwest, southwest. (It is admittedly a very difficult puzzle – apologies to non-American Zorkers).
Yes, the clues indicate you’re supposed to spot the baseball references and use that to make a path. This of course assumes the player not only lives in a country where people know baseball but that they personally know baseball. (The “apologies” text I’m fairly sure only comes from a later version of Invisiclues rather than the original sold in the early 1980s, but I haven’t been able to find a copy to verify.)
A depiction of Babe Flathead from the manual for Zork Zero (1988). “When he reached college age, Babe selected Mithicus Province University from amongst many eager suitors. At MPU, Babe was a 43-letter man, leading his team to championships in every existing college sport and several nonexistent ones as well.”
However, you might notice that the solution I gave made no references to baseball. Despite it being the go-to example for requiring cultural knowledge to solve a puzzle (it’s even called out specifically in Graham Nelson’s Craft of Adventure), no baseball knowledge is required to solve the puzzle.
Really, it’s just “make the glowing get brighter”. Lots of games — even casual ones — use the idea of a code needing random testing and keeping track of some sort of meter which indicates if the guess was right. Here, the “code” is actual navigation, so it’s a little harder to pick up on what’s going on, but it isn’t over-the-top absurd to solve either.
I’m still not very happy with the puzzle. You can be at the correct start place of “flickering dimly”, head (for example) west to have the light still be flickering dimly, but then southeast will no longer cause the increase in brightness (in fact, I’m still a little puzzled as to the mechanics of this).
Additionally, the path is sometimes blocked at random
Oddly-angled Room
On the floor is a very small diamond shaped window which is flickering dimly.
Your sword is glowing with a faint blue glow.
> nw
There is no way to go in that direction.
which makes testing out possibilities more frustrating than fun. Commenter Lisa also notes “even when I know what the right movements are the game doesn’t always respond to them in the way I expect, and getting the puzzle to reset so I can try again is a pain that seems to require just wandering in random directions.”
So in summary: making a maze depending on movement rather than position, interesting and workable concept. Actual implementation: too messy and confusing. And since everyone knows about the puzzle as “the baseball maze”, anybody inquiring of hints will get the legend passed on (without any notion of the alternate solution I showed earlier).
The puzzle hence still deserves awkward side-glances, but maybe isn’t The Worst of All Time?
I’ve made progress, but it hasn’t felt like great progress insofar as it’s been puzzles I remember from Zork mainframe (or in one very special case, when I last played Zork II back in the 1980s). I’m stuck on what seem to be all the “new” puzzles.
The Wizard of Frobozz is like the thief from Zork I (and mainframe); he can appear anywhere to antagonize you.
A huge and terrible wizard appears before you, as large as the largest tree! He looks down on you as you would look upon a gnat!
The Wizard draws forth his wand and waves it in your direction. It begins to glow with a faint blue glow.
The Wizard, in a deep and resonant voice, speaks the word “Float!” He then vanishes, cackling gleefully.
Slowly, you and all your belongings rise into the air, stopping after about five feet.
There’s a large variety of spells, large enough I’m not sure I’ve seen them all. In addition to Float as shown above, there’s Fence, Freeze, Filch, Float, Fear, Ferment, Feeble, Fantasize, and Fireproof.
Most of the ones above are self-apparent — Filch steals an item, for instance — but I’m not sure what Fantasize does, and Fireproof actually helps the player. (I think? I’ll bring it up again when I talk about the dragon.)
The Wizard draws forth his wand and waves it in your direction. It begins to glow with a faint blue glow.
The Wizard, in a deep and resonant voice, speaks the word “Freeze!” He then vanishes, cackling gleefully.
Your limbs suddenly feel like they have turned to stone. You can’t move a muscle.
I can understand why the Wizard is here — the thief was such a strong aspect of the first game it would have felt wrong to have some sort of replacement — but I find the thief stronger in a ludic sense. You can engage the thief in combat any time you like; there’s a constant sense of danger but it’s a consistent danger. Sometimes when the thief appears he does nothing, but there’s still the feeling like he’s scouting you. The wizard also sometimes does nothing — usually via a misfired spell — and it comes off as comedic.
To put it more directly, if the wizard fouls up my game, usually I just restore a recent save, because I know I’ll likely get through on a second encounter; I never contemplated doing the same for the thief.
I still anticipate the possibility of an interesting showdown, especially based on the scene from dying:
>jump
This was not a very safe place to try jumping.
Geronimo…
**** You have died ****
Now, let’s take a look here… Well, you probably deserve another chance. I can’t quite fix you up completely, but you can’t have everything.
Room of Red Mist
You are inside a huge crystalline sphere filled with thin red mist. The mist becomes blue to the west.
You strain to look out through the mist…
You see a small room with a sign on the wall, but it is too blurry to read.
>w
Room of Blue Mist
You are inside a huge crystalline sphere filled with thin blue mist. The mist becomes white to the west.
You strain to look out through the mist…
You look out into a large, dreary room with a great door and a huge table. There is an odd glow to the mist.
I have found a blue sphere in the game; it starts in the “large, dreary” room as described above and so the death scene is seeing from the other side.
>w
Room of White Mist
You are inside a huge crystalline sphere filled with thin white mist. The mist becomes black to the west.
You strain to look out through the mist…
A strange blurry room is barely visible.
>w
You follow a corridor of black mist into a black walled spherical room. As you enter, a huge and horrible face materializes out of the mist.
“What brings you here to trouble my imprisonment, wanderer?” it asks. Hearing no immediate answer, it studies you for a moment.
“Perhaps you may be of some use to me in gaining my freedom from this place. Return to your foolish quest! I shall not destroy you this time. Mayhap you will repay this favor in kind someday.” The face vanishes and the mist begins to swirl. When it clears you are returned to the world of life.
I honestly don’t remember what’s going to happen, but I suspect that I’m going to find a black sphere sometime and release whatever is inside — and the only thing around with a power level to match would be the Wizard of Frobozz himself.
The first puzzle I solved
Southeast of the Carousel I wrote about last time is a riddle room
Riddle Room
This is a room which is bare on all sides. There is an exit down in the
northwest corner of the room. To the east is a great open door made of stone.
Above the stone, the following words are written: “No man shall pass this door
without solving this riddle:
What is tall as a house,
round as a cup,
and all the king’s horses
can’t draw it up?”
Circular Room
This is a damp circular room, whose walls are made of brick and mortar. The roof of this room is not visible, but there appear to be some etchings on the walls. There is a passageway to the west.
There is a wooden bucket here, 3 feet in diameter and 3 feet high.
I won’t go into detail again here, although this time I needed to pour water in via a teapot; I used the bottle from Zork I last time. It felt like an echo of an alternate past.
>POUR WATER
There is now a puddle in the bottom of the wooden bucket.
The bucket rises and comes to a stop.
This is followed by a robot you can command via ROBOT, GO EAST and the like (there’s fortunately a paper that gives exact parser directions) and I used to turn off the Carousel. (I don’t remember much from when I played this 30+ years ago but I do know it took me a long time to turn off the Carousel.) Also nearby:
Tea Room
This is a small room containing a large oblong table, no doubt set for afternoon tea. It is clear from the objects on the table that the users were indeed mad. In the eastern corner of the room is a small hole (no more than four inches high). There are passageways leading away to the west and the northwest.
There is a large oblong table here.
Sitting on the large oblong table is:
A cake frosted with red letters
A cake frosted with orange letters
A cake frosted with blue letters
A cake frosted with green letters
Eating the green cake lets you shrink and get into a “pool room” and find a flask with poison gas (no idea what to do with it yet) and some candy (which I’ve bring up again later). Eating the blue cake lets you grow big again.
The second puzzle I solved
On the opposite corner of the map from the riddle room I found the Bank of Zork.
Again, I wrote about this one in detail, but rather much less fondly than the well puzzle. The big difference between the mainframe and commercial versions is an extra paper added as a hint.
The paper is barely readable. You can only make out “… valuables are completely safe … advanced magic technology … impossible to take valuables from the depository … either teller’s … Many customers faint … teller pops in … seems to walk through … walls …”
It still suffers roughly the same problem as the original.
> N
Safety Depository
This is a large rectangular room. The east and west walls were used for storing safety deposit boxes, but all have been carefully removed by evil persons. To the east, west, and south of the room are large doorways. The northern “wall” of the room is a shimmering curtain of light. In the center of the room is a large stone cube, about 10 feet on a side. Engraved on the side of the cube is some lettering.
> ENTER CURTAIN
You feel somewhat disoriented as you pass through…
Small Room
This is a small, bare room with no distinguishing features. There are no exits from this room.
Namely, that while the curtain is a clearly prompted item and “ENTER CURTAIN” is a logical player command (and if the player just tries to go NORTH, the response “There is a curtain of light there.” nudges in the right direction) there is no equivalent help trying to go back the other way around.
>S
You can’t go that way.
This is absolutely the standard response on any invalid direction; one the player most likely has seen many times by this point. In order to get back out, you need to ENTER SOUTH WALL. I realize the idea was to enforce the player really “solving” the puzzle, but I’m still unclear as to the functional difference of walking into a wall intentionally versus accidentally.
Jason Scott commented (back in 2011 when I wrote about this) that he had footage of Dave Lebling apologizing for the Bank puzzle.
Okay, at least there was an improvement attempt. Apology accepted.
The third puzzle I solved
I don’t want to write about it yet. It needs its own post. (For those familiar with the game: it’s the Oddly-angled Room area.)
Things I am stuck on
Having cleared out the puzzles I could do (basically by already knowing the answers) has led me to 135 out of 400 points and total stuckness.
Southwest of the Carousel is a room I can’t open.
Guarded Room
This room is cobwebby and musty, but tracks in the dust show that it has seen visitors recently. At the south end of the room is a stained and battered (but very strong-looking) door. To the north, a corridor exits. Imbedded in the door is a nasty-looking lizard head, with sharp teeth and beady eyes. The lizard is sniffing at you.
> give candy to lizard
The guardian greedily wolfs down the candy, including the package. (It seemed to enjoy the grasshoppers particularly.) It then becomes quiet and its eyes close. (Lizards are known to sleep a long time while digesting their meals.)
Northwest of the Carousel is an Ice Room I can’t get past. An equivalent room in Zork mainframe was solved via a torch which doesn’t exist in this game. (I’ve tried making a torch, but no luck.)
Ice Room
This is a large hall of ancient lava, since worn smooth by the movement of a glacier. A large passage exits to the east and an upward lava tube is at the top of a jumble of fallen rocks.
A mass of ice fills the western half of the room.
Close to both the Ice Room and Bank is a dragon.
> n
Dragon Room
A huge red dragon is lying here, blocking the entrance to a tunnel leading north. Smoke curls from his nostrils and out between his teeth.
Your sword has begun to glow very brightly.
> attack dragon with sword
Dragon hide is tough as steel, but you have succeeded in annoying him a bit. He looks at you as if deciding whether or not to eat you.
The dragon continues to watch you carefully.
> attack dragon with sword
You’ve made him rather angry. You had better be very careful now.
The dragon continues to watch you carefully.
> attack dragon with sword
That captured his interest. He stares at you balefully.
The dragon tires of this game. With an almost bored yawn, he opens his mouth and incinerates you in a blast of white-hot dragon fire.
**** You have died ****
Having FIREPROOF active (via the Wizard) makes one immune to the dragon here. It still doesn’t help in getting by, though.
East of the Carousel is a garden with a unicorn.
North End of Garden
This is the northern end of a formal garden. Hedges hide the cavern walls, and if you don’t look up, the illusion is of a cloudy day outside. The light comes from a large growth of glowing mosses on the roof of the cave. A break in the hedge is almost overgrown to the north. A carefully manicured path leads south. In the center of a rosebed is a small open structure, painted white. It appears to be a gazebo.
There is a beautiful unicorn eating roses here. Around his neck is a red satin ribbon on which is strung a tiny key.
The unicorn bounds away if I try to approach. I suspect the key goes to the lizard room.
South of the Carousel is a menhir.
Menhir Room
This is a large room which was evidently used once as a quarry. Many large limestone chunks lie helter-skelter around the room. Some are rough-hewn and unworked, others smooth and well-finished. One side of the room appears to have been used to quarry building blocks, the other to produce menhirs (standing stones). Obvious passages lead north and south.
One particularly large menhir, at least twenty feet tall and eight feet thick, is leaning against the wall blocking a dark opening leading southwest. On this side of the menhir is carved an ornate letter “F”.
I managed to get an explosion off (using a brick with a string that happens to have been in mainframe Zork) but the game just says:
The explosion appears to have had no effect on the menhir.
The room is cluttered with debris from an explosion. The walls seem ready to collapse.
You can do an explosion in any room in the game. I haven’t found it useful, even on the ice wall. (Rather colorfully, the room really does collapse after a few turns and you can no longer enter — it’s like using the bomb in Spelunker where you can cause permanent change to the geography of the map.)
I don’t otherwise have a lot to work with.
lamp, sword, brick, string, teapot, grue repellent, matchbook, letter opener, newspaper, mat, blue sphere, violin, pearl necklace, bills, portrait, cakes, club, steel box, flask
I suspect I’m stuck on something simple that will break a couple puzzles open once I figure it out, but Infocom itself advertised Zork II as “Advanced Level”, so I may just be overly hopeful.
By mid-1981 Infocom was preparing to release Zork II (they signed a contract in June) but Personal Software’s VisiCalc spreadsheet software hit such big sales that they decide to drop publishing games entirely. This led the founders of Infocom to decide to become their own publishers. By the end of the year they had released Zork II in time for Christmas.
The manual for Zork II gives credits to Marc Blank and Dave Lebling. It includes some of the material cut when Zork mainframe was ported to Zork I, but is still very much its own game, most notably for replacing the thief antagonist with the Wizard of Frobozz. From the back of the package:
EXPECT THE UNEXPECTED WHEN YOU TAKE ON ZORK II: THE WIZARD OF FROBOZZ.
As you explore the subterranean realm of Zork, you’ll continually be confronted with new surprises. Chief among these is the Wizard himself, who’ll constantly endeavor to confound you with his capricious powers. But more than that, you’ll face a challenge the likes of which you’ve never experienced before.
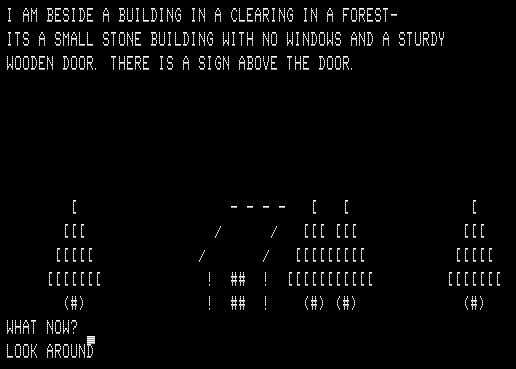
Inside the Barrow
You are inside an ancient barrow hidden deep within a dark forest. The barrow opens into a narrow tunnel at its southern end. You can see a faint glow at the far end.
A sword of Elvish workmanship is on the ground.
A strangely familiar brass lantern is lying on the ground.
I appreciate the “old friend” feel of having the lantern and sword awaiting.
Path Near Stream
The path follows the south edge of a deep ravine and heads northeast. A tunnel heads southwest, narrowing to a rather tight crawl. A faint whirring sound can be heard in that direction. On the east is a ruined archway choked with vegetation.
>sw
Carousel Room
You are in a large circular room whose high ceiling is lost in gloom. Eight identical passages leave the room.
A loud whirring sound comes from all around, and you feel sort of disoriented in here.
Here I reach my first quibble with Zork II compared to Zork I — I really dislike this room. Trying to leave sends the player in a random direction.
>e
You’re not sure which direction is which. This room is very disorienting.
Topiary
This is the southern end of a formal garden. Hedges hide the cavern walls and mosses provide dim illumination. Fantastically shaped hedges and bushes are arrayed with geometric precision. They have not recently been clipped, but you can discern creatures in the shapes of the bushes: There is a dragon, a unicorn, a great serpent, a huge misshapen dog, and several human figures. On the west side of the garden the path leads through a rose arbor into a tunnel.
The opening of Zork I had a wide airy space, the iconic house, a slow entry, and an intriguing mystery with the trap door being locked behind the player. The RNG spinner here is essentially the first element of Zork II, and I don’t think I’m too fussy in saying it’s less compelling.
Still, I remember Zork II being fine otherwise, but it’s been a long time since I’ve played, and while no doubt some puzzle solutions are identical to Zork mainframe (which I do mostly remember thanks to me writing about it) I’m likely in for some surprises.
Micro-80 was a magazine published in Australia (from Goodwood, a suburb of Adelaide) starting in December 1979.
The System 80 and Video Genie mentioned on the cover are both TRS-80 clones.
Each issue endeavored to give source code for a selection of programs that would work on 4K and 16K models. The April 1981 issue (cover above) had an adventure game by Graeme Moad titled either Adventure in Murkle or An Adventure in Level I depending on where in the magazine you looked; I went with the more distinctive title. (It’s hard to find and I originally thought I was going to have to type it in, but this collection from New Zealand has it.)
I’ve discussed games with low memory requirements before — Haunted House was in 4K by being split into two parts — but we never had one that entirely fit in 4K. So I was very, very surprised upon booting the game up to find not only is an adventure that fits in 4K, it’s a graphical adventure that fits in 4K.
Now, you might quibble that the animation above and screen below don’t represent “graphics” — it’s just drawing things with ASCII characters — but I wouldn’t call it just “text” either.
In order to fit, the game simply jettisons the parser. All commands are given via numbers. 0 = HELP, 1 = NORTH, 2 = SOUTH, 3 = EAST, 4 = WEST, 5 = LOOK, 6 = OPEN, 7 = GRAB, 8 = READ, and finally 9 = DIG. (I think the commands may have been intended to be displayed on the bottom but I was having an emulator error; in my play experience I could see them by just hitting ENTER but only temporarily.)
Now, having said all that, this is neither long nor a shining hidden gem of a lost game, but again, we’re working with 4K here. It’s essentially just a maze.
I initially didn’t quite understand it was a standard maze — the trees are randomly placed in each forest room, so my early attempts to draw where they landed were stymied and I assumed I was supposed to navigate somewhat at random.
Picking action #8 (READ) reveals that the sign says “DANGER — DO NOT OPEN DOOR.”
After about half an hour of flailing I buckled down and mapped the thing, albeit having to use “reference directions”; for example, once I found a particular place where going west led to the building shown above, I assumed if I encountered a room where going west led to the building that I was dealing with the same room.
As small as it looks, this was quite a difficult map to make, and I had to check the source code after I was done to make sure I was accurate.
After realizing I likely had the full map, I tested LOOK around until I found a shovel.
Then tried the shovel in every room I could find
then took the key back to the building with the “Do Not Open” sign. Upon opening it, the game said
OH NO, IT’S THE HOOGLY!
and ended with this screen:
And … that’s it! That’s the only ending. Did we just die? Mission: Asteroid kind of had a bad ending but it was only an unintentional coding error, here it’s clearly quite intentional.
This could potentially be the first “forced bad ending” adventure. I think given this was essentially just a trifle, the author didn’t feel obliged to clarify further. It reminds me of how Nellan is Thirsty had the first mini-map because it was written for children and the author didn’t feel obliged to force navigational difficulty; in this case, there’s so little room for plot the author just made do with what he could fit and perhaps accidentally innovated in the process.
The game had two clever moments left before the ending.
Both moments felt simultaneously like advances in storytelling and steps back in game design. The game design issue has an easy fix, but it’s something that hadn’t been invented yet when this game was written.
I haven’t been able to find any physical copies of Flagstone, but here’s their logo as printed on The Gambler (a poker game they later published). From sairuk on Twitter.
Last time I predicted I was stuck on what was intended as “easy” puzzles; this was mostly correct. I mostly wasn’t applying MOVE to enough things.
Either here…
>MOVE COBWEBS
O.K.
There’s writing on the wall behind the cobwebs.
It says: “The second is 8”.
…or moving a bed, finding a can opener…
>MOVE BED
O.K.
I see something.
…or moving a chest, finding a rope.
The other thing I missed was I only slept in bed once; I generally was dying before reaching the third day, or resetting and consolidating my previous actions. Eventually, I did finally get round to a second sleep, where I had a dream informing me to leave the wine bottle in the study overnight.
Doing so led to an empty bottle as shown above, but no other apparent effect. Finally, I realized that PRESS PANEL (which previously didn’t work) now had an effect; a secret panel opened to a new area.
I think the intent is that the ghost of Arthur Flagstone (who you’ll meet in a moment) came up to drink the wine, somehow unlocking the panel in the process. I’m not that entirely makes sense plot-wise because the ghost is also the one who kills you if you sleep without locking your door (and you hear chains clanking the first night, so you know he’s out there). If I stretch hard enough I could imagine the ghost accidentally triggering something while they’re indulging their post-death affection for alcohol.
>FEED MOUSE
O.K.
The mouse grabs the cheese
and disappears into a small hole.
I hear a click.
The wall moves aside.
Here’s the aforementioned ghost. The combination lock puts together information found throughout the Manor:
“The first is 3” from a paper hidden in a painting
“The second is 8” from cobwebs
“The third is 7” from a book
You need to have eaten some garlic before approaching the door. Otherwise, the ghost kills you for trying to enter (there’s a hint in a diary that Flagstone hates garlic breath).
Past the ghost is the only treasure of the game.
If you try to take the gold bars out, the ghost goes into overdrive.
The ghost, outraged at seeing me with his gold,
overcomes his dislike of garlic… and THROTTLES me!
This moment is what I meant about an advance in storytelling being accompanied by a step back in gameplay.
The idea of the ghost being so protective of his wealth even after death was oddly human; that it was accompanied by a previous puzzle solution being ignored made it more powerful.
In a gameplay sense, this was a cheap shot; the game gives the impression the player is protected, when suddenly they aren’t — but I don’t think this event would be as effective any other way. A more modern “rewind to the previous mistake” (either automatic or with an UNDO command) would dance around the problem neatly, but that particular innovation wasn’t invented yet (except for maybe in Hezarin).
Speaking of cheap shots, here’s what happens if you try to PULL RING:
A large stone crashes from the roof… and CLOBBERS me!
Ow. But! … this is again a clever moment of plot, because the right solution is to tie a rope, step outside the room (requiring leaving the gold bars, temporarily) and pull the rope. This breaks the roof which turns out the be the flagstone from the very first room of the game.
This is what the flagstone looks like at the very start. I thought at the time perhaps it was meant as just an atmospheric red herring.
This sort of return-in-importance is especially rare for the TRS-80 games of the time; I can’t think of another example offhand.
The Secret of Flagstone Manor was a strong start for a prolific adventure-writer. I’m looking forward to trying more of the Brian J. Betts library, but we have to wait until 1982 before we reach any.
In the meantime, let’s investigate another candidate for First Australian Commercial Text Adventure Game, one I thought was going to be mundane but ended up shocking me.
Brian J. Betts is most famous for a series of C64 games with distinctive character graphics published by his one-man outfit Mountain Valley Software (based in Victoria, Australia), but he started in 1981 with a bog-standard TRS-80 game.
Given the weirdness of what I’ve played lately, I could use some bog-standard. This does have the possible distinction of being the first commercial text adventure from Australia, with the caveat there is at least one other candidate from 1981 we will get to (similar to how Planet of Death might be the first commercial text adventure from the UK).
The parser is in a Scott Adams style, up to the point I suspect the author was referring to the original source code.
The death screen, for instance, is identical.
Upon entering the manor, you find a suit of armor with an axe. This is what happens when you TAKE AXE.
(EDIT: I previously asserted the likelihood Betts in part rewrote his BASIC from Scott Adams code since the “look” is very similar. Now that I finished the game and studied further I’d say Betts cloned based on looks but not on code; Adventureland in BASIC, for instance, uses DATA statements for nearly everything, whereas the Flagstone code uses a lot of one-off PRINT statements. See the comments on my other Flagstone post for more detail.)
The primary design inspiration seems to be The Count.
Now, I’m not just meaning this game is in the Spooky House family, but there’s a day-night cycle. It’s isn’t too long in when darkness starts falling. I originally thought this was a tight time limit (if darkness falls, the axe fellow mentioned earlier chops you up), but the intent is for you to find the bed and SLEEP which causes time to move on to the next day. (If nothing else, it’s good for atmosphere; if you forget to lock the door behind you when going to bed, someone strangles you in the night!)
There’s also no treasures so far. I don’t have whatever instructions the game came with so I don’t know what the goal really is, but since I’ve found lots of items but no *TREASURES* I suspect the objective is to defeat a spooky enemy of some sort.
The gameplay mostly consists of finding secrets.
There’s a library, with a lamp you can TURN causing the bookcase to move, revealing a “Hidden Cellar” with a skeleton and some garlic. The library also has a book on Ghost Stories with the note “the third is 7”.
There’s a lounge with fireplace and firewood and lighting the fire (with matches from another room) reveals a “Hidden Room” with cobwebs and a ladder.
There’s a dining room with a “small panel” where PRESS PANEL reveals some keys. The keys let you in two locked doors (including the previously mentioned bedroom).
There’s a “portrait of old Arthur Flagstone” where “The eyes are watching me.” Finding a KNIFE in a nearby clock and using CUT PAINTING causes a scream, revealing a piece of paper which says “the first is 3”.
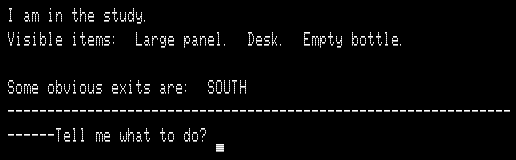
There’s a study with a DESK that has an ASHTRAY and a LARGE PANEL. I suspect the LARGE PANEL can open just like the smaller one did because there’s a custom “How?” message when I try to OPEN PANEL, but this is one place I’m stuck.
Notice the “It’s getting dark.” messages. That means I need to head up to the bedroom soon if I want to live.
The only other lingering puzzle I have is a CAN I can’t open. I get the intuition this is supposed to be an “easy game” yet I’m stuck just as much as I would be on a hard game. It doesn’t help there’s likely a secret passage I haven’t unlocked yet but I have no idea where it is (that is, I’m missing a so-called “secret puzzle” which I’ve written about before).
There’s a point I’ve made before, but is doubly relevant for treasure hunt puzzles, so it’s worth repeating with a different example.
Suppose I wanted to give a message to decrypt.
DDZRQDK DGS ZLKRKZ
You might try approaching as a straight cryptogram and realize (even with a search program) that it doesn’t correspond to anything. You might try anagramming letters and get nowhere.
The correct approach is to try both. First, shift every letter forward one step in the alphabet…
EEASREL EHT AMLSLA
…then anagram the result.
RELEASE THE LLAMAS
I can see from the perspective of an author how they might consider this “simple”. One-step Caesar ciphers, no problem! Anagrams, sure! But when combined together, they form a second-order puzzle where two entirely different steps are needed with no confirmation between the two that one is on the right track. Both cryptograms and anagrams might be “easy” puzzles, but they can become vastly harder to solve when combined together because they are only two forms of wordplay out of an immense variety. (This particular puzzle is borderline fair in that when eyeballing the alphabet shift it looks close enough to English that the anagram seems natural.)
With most treasure hunts I’ve seen there is a strong and almost necessary temptation to have second-order, third-order, or ludicrous-order puzzles. If a treasure hunt is well designed there will be “confirmers” along the way, other clues that help let the player know they’re on the right track.
This raises the question: is Alkemstone well-designed in that sense? I don’t know yet. I do know it likely suffers a related problem common for treasure hunts — spurious solutions. The wide-open unmoored nature of the puzzles — a bunch of clues with no given categories — lends itself to multiple plausible ways to interpret clues.
Another made-up example: suppose I gave the phrase
Absent Tithed Hue
You might find the combination of words strange, and do an anagram…
Thine Debate Thus
…and maybe think it was indicating the site of a famous debate. Or maybe it is
Beneath Hides Tut
indicating an Egyptology theme, or
Behind The Statue
with a more literal location.
The only “solution” so far that I’m safe in saying is a slam dunk involves two new clues (I posted them early in the comments of a thread).
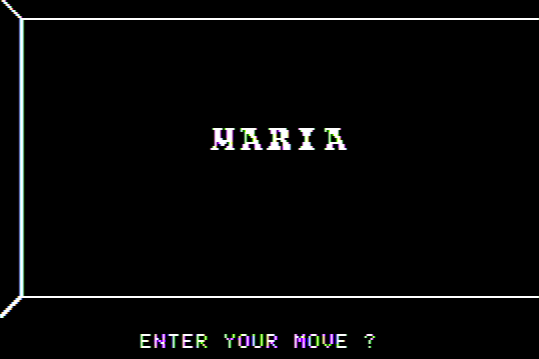
Roger Durrant pointed out that both names appear in the song They Call the Wind Maria from the musical Paint Your Wagon.
A way out here they got a name for rain and wind and fire the rain is Tess the fire’s Joe and they call the wind Maria
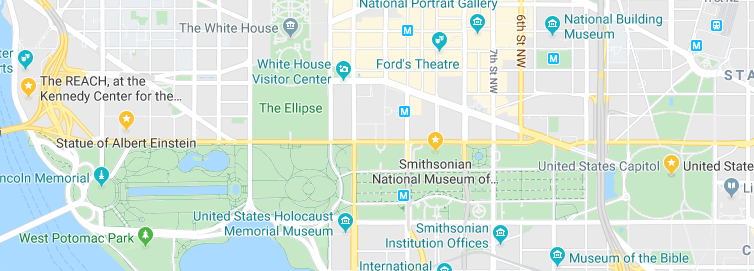
Both rooms are immediately adjacent to each other on the overall map.
Also adjacent to TESS and MARIA is a room with the word JOB, which suggests the author misspelled the actual song word (which apparently is either JO or JOE based on where you get the lyrics from).
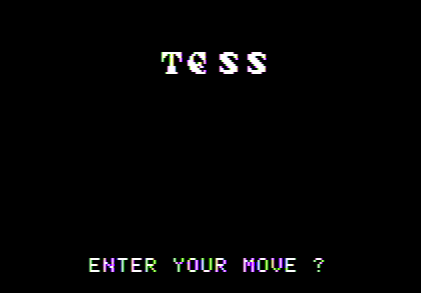
These two pictures are also placed close (although not immediately adjacent).
I’m extremely curious about the second, which looks like it’s a close-up of … something? It incidentally was very hard to get a screenshot of; when it appeared during the game it only came up very briefly, and I had to resort to using recording software and then pause the video I made on the exact right frame.
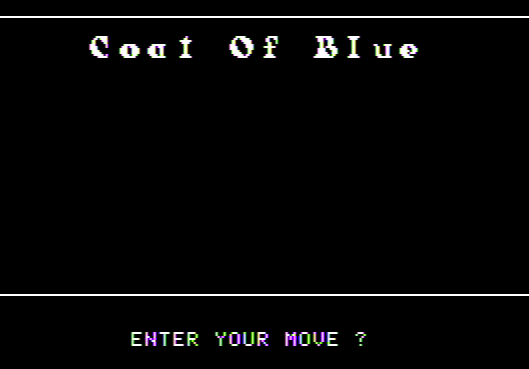
Speaking of songs, Matt W. noted the clue above suggests the song Faded Coat of Blue, a song by J.H. McNaughton associated with the Union side of the American Civil War.
Sticking with finding Washington, D.C. spots, that definitely suggests Arlington Cemetary which is quite close to everything else. Let me also add marks for the Smithsonian National Museum of American History, possibly referencing the ruby slippers from Wizard of Oz (which have been there since 1979)…
I finally found this one in-game (I previously only had the Mobygames screenshot). I still never found the -ION clue anywhere. My theory regarding the gap in the upper left corner of the overall map is that all other clues need to be found first before it opens, although it could just be a bug.
…the Washington Monument, associated with the death of Zachary Taylor, and the Lincoln Memorial, where Martin Luther King Jr. made his famous I Have a Dream speech. (Both of these were clues from previous posts.)
I’m finally going to put in the D.C. War Memorial for long-shot reasons, but I do have some logic to it.
There’s a “144” clue which possibly references the fact that with 12 zodiac signs you can pair them with another 12 to get 144 angles. There’s also one direct zodiac reference (“this is almost the age of AQUARIUS”) and one actual sign (Sagittarius, but drawn so the arrow points upright). The War Memorial has a domed building with a 12-direction arrow directly on the floor.
I found this by hunting around for domes in DC, based on this clue from an earlier post.
There’s also this clue which faintly suggests looking between columns.
We’ve also had month and seasonal references to go along with the Zodiac ones.
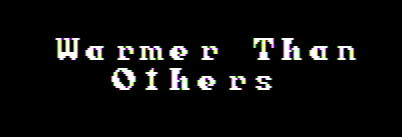
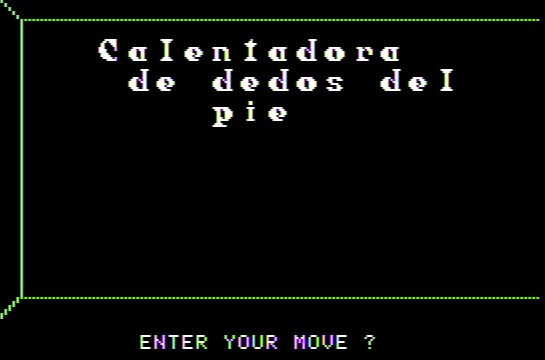
“Toe warmers”, probably just meant to reference winter again.
Maybe T.S. Eliot, “April is the cruelest month.”
Without any kind of confirming puzzle, I still feel like I’m chasing shadows. It’s possible all of this is a coincidence, especially since I can’t fit the Paint Your Wagon reference at all, nor a riddle solution Jake Wildstrom came up with.
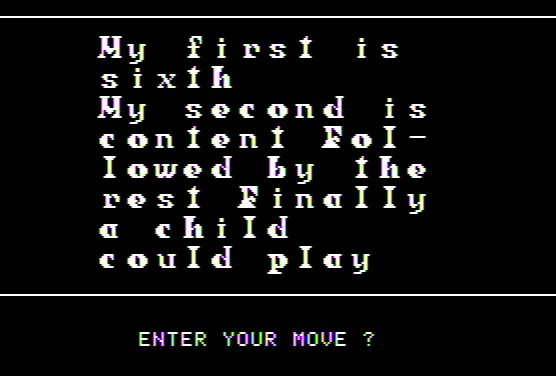
My First Is Where I Live
My Second Will Be Upon
My Third A Thought Of You
My Last How Far I May Go
And When I Get There
I Will Watch Them Play
The first two on the “three linked clues” you give feels a lot like it’s cluing to “Home on the Range” (so “them” would be deer and antelope, I suppose). “Home” is “Where I Live”, of course. “On” is another word for “Upon”. “Range” is (in the sense of a travel range) indeed “How Far I May Go”. I have no idea how “A Thought of You” would become “The”, but a clue for a definite article might be opaque in ways I don’t understand (is “You” somehow connected to the letter “U”, and some sort of character-level transformation from “A Thought of” gets us to the three letters “the”? This is mostly trying to back-solve a justification because the other three clues really fit the answer well).
Matt W. followed up with noting “you” could be “thee”.
I’m tentative about this one, just because it originally suggested to me the categories clues could fall in (that the D.C. references were all My First Is Where I Live, the number-type references might be How Far I May Go, etc.) but a traditional riddle is quite possible, and of course Home on the Range goes together nicely with the Paint Your Wagon reference.
Three more new clues to round things off…
…and then let me state that I’m going to delve back into traditional adventures now, and only give the occasional Alkemstone update. I (and hopefully others) will still be active in the comments, so the search for the Alkemstone continues.
One open question I’d really like resolved is the meaning behind this clue:
It has had no comments but I think it might be a straight self-contained riddle? I’m pretty bad at riddles, so I don’t know.
I’m slowing down a little on finding clues just because being thorough is incredibly tedious. My procedure when checking a particular room is to
a.) look at each wall and pause for about five seconds, then repeat 3 or 4 or 5 times
b.) look at the ceiling and slowly turn three full circles, pausing about 4 seconds each step
c.) repeat with the floor
and even then I have come near to missing things.
Let me bring out two theories posited in the comments last time:
1. Continuing from the idea that “Albert” is the Albert Einstein statue in Washington, D.C. (it was unveiled only two years before the game was made; the timely connection makes it more rather than less likely) I noted two JFK-associated locations and the natural history museum (there’s a reference to the Pleistocene).
These nearly form a line, especially because the JFK center extends south a little from where Google has marked it. Still easily could be a coincidence, but given the repeated JFK references and the mention of Zachary Taylor I’d say the chances this is the area we want are at least over 50%.
2. I need to explore this more, but note one of the clues read “144”. There are 144 angles across the sky that can be found by combining two astrological symbols, and there are two specific symbols mentioned (Sagittarius as the symbol itself, Aquarius in words) in addition to a reference to “billions of stars may show you the way”. This is combined with multiple temperature references (like “Warmer Than Others”) to suggest that we *don’t* want to use the dead of winter (since Zodiac signs represent both a time of year and an angle).
I haven’t sat down and fully worked out how this would play out on the map, though, so if anyone wants to go wild in the comments, feel free.
Here are the clues I’ve found since last time.
I am suspecting the assorted word fragments need to be joined and anagrammed. This was used at the start of Kaves of Karkhan, Level-10’s previous game.
You may wonder why the color is different here. This is from the opening area, a 6 by 10 rectangle on the lower-right corner of my map. Everywhere else has the white walls.
Are these signed initials?
Sometime next week I am going to get back to playing regular adventure games and intersperse these posts. I’d like to finish at least one thorough pass through Arkemstone looking for clues, first.


