With the exception of one very difficult puzzle and one slightly odd action (I needed hints for both) this wasn’t terribly hard; perhaps the most interesting thing about the game (other than the technical aspects I’ve already remarked on) is the main quest itself, which involves taking a sword only a small distance from one place to another. There is something sanctified about the act.
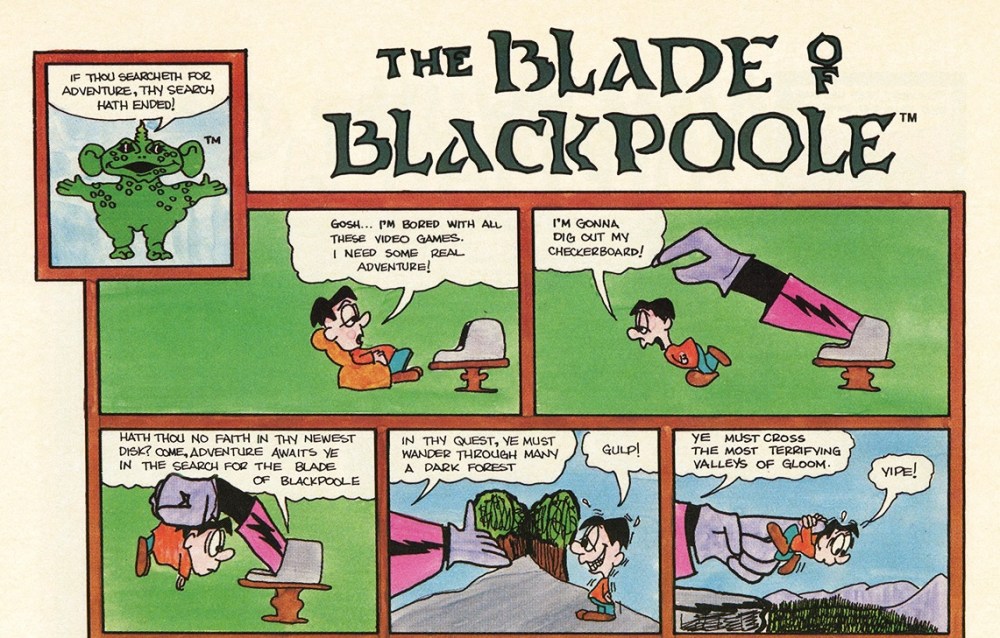
The comic writer for the ad is confused here: you’re not “bringing back” anything, just restoring the sword to its rightful place.
Continuing directly from last time, I had a monster in a river, and I was quite stuck.
Moving forward another hour, I was still stuck. The game has a built-in HELP feature so I tried it and the game told me to keep the monster smiling. Moving forward yet another hour, I was still (still) stuck. It was time to unleash outside-the-game hints.
I found out that I had missed one item. Back at the tavern at the start you can spend one gold coin to buy some ale. This means, incidentally, you can’t buy all the items in the shop (to recap, that’s knife, staff, lamp, pole, honey) but need to leave at least one off. Since I had already used the other items, I restarted and avoided buying the knife, and spent 1 gold coin on the ale instead.
The ale is still somewhat tricky to deliver — GIVE ALE TO MONSTER just has the game claim the monster is too far away. The trick it to simply pour the ale into the river, which works (!?).
I feel zero guilt about spoiling this puzzle.
Fortunately, the rest of the game went much smoother. I was able to get the boat out to a lake with an island in the middle. I still had the magic book and the prayer (SOLOCIN) I hadn’t used, so it was not hard to find the first right action.
The second right action which I did not find on my own — but I’ll just explain here to save time — is that you are also supposed to GIVE BOOK to the statue, and you’ll get a key in exchange. I’m not sure if this is unfair or not.
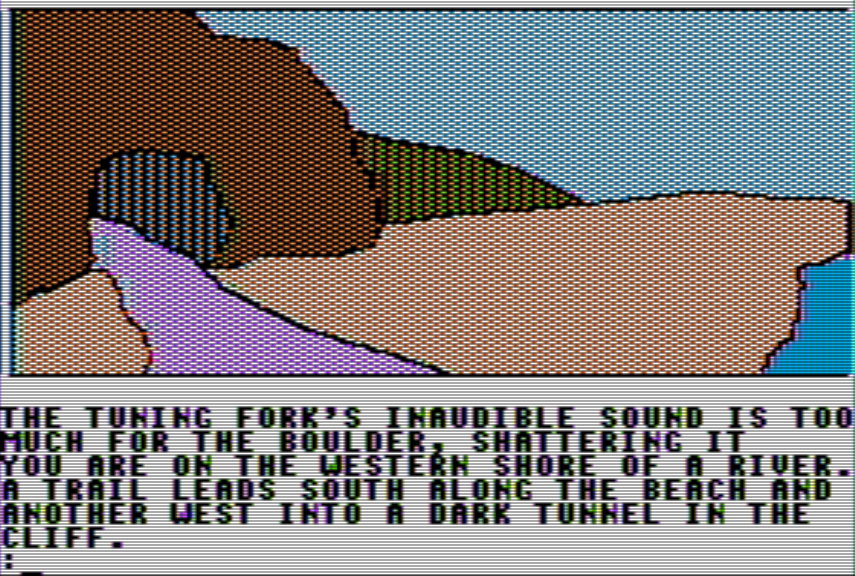
Going back to the clue from saying SOLOCIN, I think what it is cluing is a boulder not too far from the island which you can break open by hitting it with a tuning fork (found nearby the start of the river).
Dale Dobson somehow solved the puzzle by accident without realizing the tuning fork was causing the boulder to implode; he had just tried to GO WEST and the action happened automatically. This is interesting in a theoretical sense, since using the item automatically ought to be helpful and more friendly to the player, but if the jump is too much it could lead to a player having a puzzle solved for reasons they don’t understand, which is arguably a worse situation.
Inside the cave is a spot for a sword, and a maze.
Nearby there is a sign that says SPEAK NOT THE NAME MYRAGLYM UNTIL SHE IS HOME.
This is where the sword goes. I just had to find the actual sword, but it was not far away. I initially assumed it was in the maze, but random walking through the maze (not even mapping, I was tired) yielded a scroll with two magic words, and a longbow. (One of the words on the scroll, incidentally, causes all items to disappear — that is, it softlocks the game.) I thought maybe I still needed to search the maze and actually map it, but first I combed around the lake to make sure I hadn’t missed something, and I had.
Going DOWN (not SWIM or any permutation thereof) lands you in a place with a lizard.
One of the words on the scroll caused a magic arrow to appear. I dropped the scroll (as seen above) switched to the arrow, using it to SHOOT LIZARD.
With the lizard dead, I found the Sword of the quest, took it back to the shrine I had seen earlier, and spoke the word MYRAGLYM.
This teleports you outside, fortunately back to before getting taken away by the bird. You then are extremely hungry, and I hope you left your honey from the start of the game in a convenient spot, otherwise game over. (I had, by luck.) Then you need to return to the tavern which already knows of your achievement:
In an evaluative sense, the game went up to “pleasant diversion” but only had one really clever puzzle (the boat) which more or less got canceled by the terrible puzzle right after (getting drunk from river water). The most fascinating aspect was the quest itself, where a sword gets moved from one place to another, as it isn’t like some terrible wrong is otherwise being averted, or evil madman being thwarted. Temple of the Sun is the only other adventure of this era that I know of that has a remotely comparable arcane-ritual-as-quest.
Interesting on a secondary level is the number of influences. We can trace all these games back to Crowther/Woods Adventure, and Apple II graphics games to Mystery House — here specifically, the “biome journey” of Wizard and the Princess — but we also now have the third major influence of Zork. By late 1981 the sales of Infocom were starting to make them a serious force in adventure games; by contrast, in late 1980 they had only had a smattering of sales.
Despite roughly an comparable number of unexciting puzzles on a surface level to other games at the time, the slight edge of polish was enough that the game never felt “janky”, even when pointing out in an objective sense how verb difficulties like with the quicksand should never have happened in the first place. There is a sheen of professionalism from mimicking some of the aspects of Infocom that it gives sufficient warmth to override other qualities.
…
I have a decent notion of what I’m going to play for the next few games, but one thing I haven’t done lately is take requests. I can’t make promises, but if there’s a 1982 game that you really want bumped higher on the queue, I might consider it. (The reason Planet of Death and Inca Curse kicked off 1981 is because frequent commenter baltasarq requested it. I do pay attention, even to the people who keep valiant hope up that I might go back and do some more Eamon games.)
1.) Would you like to listen to me talk about text adventures (and interactive fiction in general) for an hour and a half? A new episode of The Memory Machine Podcast just dropped, as hosted by Nathaniel Lockhart.
For this episode of the podcast, Nate has on Jason Dyer to talk about the wide and wonderful world of interactive fiction, from its nascent period with “game books” all the way up to present day interactive fiction competitions.
2.) There was an early prototype of Infocom’s follow-up to Hitchhiker’s Guide, The Restaurant at the End of the World, with work by Stu Gallery. It was a very early prototype without much available if you just compiled the code.
Adam Sommerfield has gone and made the game slightly more playable, taking some of the partial-code bits and filling them in:
Also partly coded was the restaurant itself (Milliways); referred to as the Pub (likely just a partial copy and paste from the first game). You can access this room by typing “pub” and pressing Enter, you will jump to the Pub but it is a one-way trip and you will need to restart to get back to the ship.
I want to stress that this remains 80% Stu Galleys original code, it’s just been connected up and i’ve added a more fleshed out ship as originally intended (based on available plot descriptions).
3.) Speaking of Hitchhiker’s, long-time readers may remember my write-up of the knock-off game Galactic Hitchhiker from 1980, written for the rather obscure UK101 system. The game holds the current record for first newly-written commercially published text adventure game in the UK.
Jim Gerrie later did a “fixed” port which is playable online, and smooths over some of the rough edges in terms of interaction.
However, if you’d like to play online but still want complete authenticity, Anthony Hope now has the version for you: Link here. He ported it to BBC Micro, which has the same machine language (6502) as the original machine, so managed to make it more or less a one-to-one conversion.
Sirius Software, founded by Jewell and Terry Bradley, was one of the more prominent Apple II publishers of the early 1980s as they were joined early by the legendary Nasir Gebelli. Nasir was born in Iran and went to the United States in 1979 after the Revolution (his family was connected to the royal family) and ended up getting a reputation as the best Apple II programmer alive; he later went to Japan as a contractor with Square and worked on games like Ridge Racer, Final Fantasy, and Secret of Mana.
This game — and their three other text adventures from 1982 — have nothing to do with Nasir. Specifically, in 1982, Bob Blauschild cranked out Critical Mass and Escape from Rungistan, and Tim Wilson wrote Kabul Spy and today’s selection.
The Object of the game is to recover the magical sword MYRAGLYM and return it to the altar from whence it was stolen. Rumors speak of a secret chamber near Blockpoole in which the sword is said to lie.
There’s a couple remarkable technical things to comment on straight off the bat.
First, if you compare with, say, one of the On-Line games, or anything from Highland, you’ll notice the font/picture layout is somewhat different. This is because both the On-Line games and many others from the time used Apple’s built in graphics mode which naturally put four lines of the system-font text on the bottom. This made it hard to have much length to text. This game instead has a custom-created font that is displayed in graphics mode (rather than as raw text) to get more textual real estate.
Additionally, we’re finally at a phase where developers can be influenced by Infocom. It uses LONG and BRIEF as ways of changing room descriptions (to either always show a full-text room description each time, or only have a shorter version of revisits) and allegedly — according to the manual, at least — has a full parser system which not only allows for indirect objects but combination commands like GET ROCK AND SHIELD.
The game lays out a whole bunch of items to start with, five of them being from a shop (you start with 50 gold, and each item costs 10, so there’s no reason not to just buy all of them):
a rock
a hammer
a long staff
a jar of honey
some rope
an old lamp
a knife
a shield
One of the common themes through the game is a tight inventory limit (6 max. although in practical circumstance you have to leave some room to pick up more items) which constantly had me shuffling what I was holding; later, there is a “one way pass” where I’ve just been having to guess what’s useful. On one hand, the limit forces a little more thought as to what item goes to what puzzle, but constantly shuffling back to piles feels slightly less like having an adventure and more like being a delivery driver.
Attached to the shop is a tavern where you can get the plot, assuming you skipped the brief mention in the manual:
Any permutation I’ve tried of TALK TO MEN works. Despite the manual acting like there’s a lot of possible dialogue content, you can’t go Infocom-level deep and ASK MAN ABOUT (specific topic).
The opening otherwise has you pretty trapped in; the main way out is blocked by a carnivorous plant which will chomp you if you try to go through, and none of the items on that starting list work to get by it.
I thought for a while I’d be making one of my “intro to the game but I haven’t gotten very far” until I finally worked out what was going on with another obstacle, some quicksand.
I assumed the goal here was to escape in some fashion so I was trying to use a rope to lasso things, and crucially, the verb SWIM didn’t seem to do anything.
YOU ARE SINKING INTO THE QUICKSAND
I finally realized that if you attached a direction to the verb SWIM, it would work; that is, you could SWIM WEST or SWIM NORTH to get out, or progress farther with SWIM EAST. (This is one of those stopping points I suspect the author didn’t even think of; the verb ROW shows up later, also with consistent use of direction, so with SWIM they likely didn’t even process what a misleading response there was when SWIM was used on its own.)
Swimming leads by a white potion (yoink!) and this place:
For everything in the game so far (and everything past this point) ever item or creature you can refer to is mentioned in the text description, but here the bees are entirely unmentioned in the text. You can only see them in the picture. Assuming you have the honey you can GET BEES, then take them back to the carnivorous plant and feed it (who will then be happy enough to let you pass).
Before moving on to the next section of the game, I should mention there’s also a.) a hermit looking for a particular jewel that you find hiding behind a tree, b.) a boat in a river that can only row back and forth and seems to be purposeless, although it is a setup for a nifty puzzle later and c.) the white potion shrinks you down and kills you.
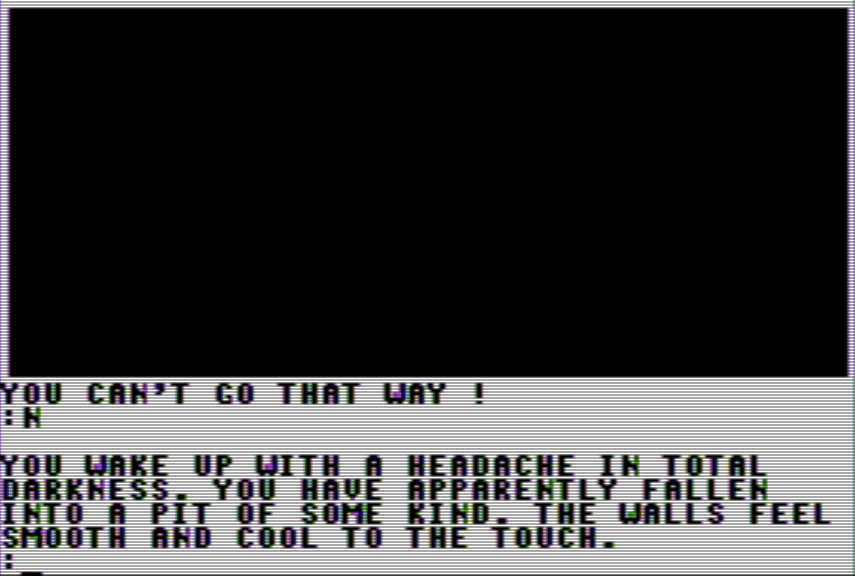
Moving on past the plant, there’s yet more forest, and one place in particular which is too dark and you fall…
…but somehow in complete darkness can still tie a rope and climb up.
Once past the pit you can find a torch which then you can light a lamp with. This lets you return past the dark area and find an amulet, which turns out to be the jeweled item that the hermit was looking for.
The book gives a “dangerous” prayer (I still haven’t been able to use it yet, but I assume when I find either the magic sword of my quest or the shrine it goes to it comes into play) but the riddle is more immediately important: it indicates that there’s one spot (near a large bird nest) where you can SING and get picked up.
This is the “one-way” moment I mentioned earlier. I assume you eventually will be able to loop back to the main map, but for now I’m having to just guess what the character’s inventory ought to be.
There’s yet more forest and a cliff you can apply the rope (again) on — and yes, I didn’t have the rope the first time so had to restore my game — and then (after picking up a tuning fork I haven’t found a use for) comes a fairly neat puzzle involving a river.
The setup reminded me of the boat from the start which was stuck in a lake with nowhere interesting to go. However, the boat was too big to carry. What if the white potion which killed me earlier also worked instead on items?
Very slick! Taking the miniature boat in hand, I was able to drop it in the northern river — it popped back to regular size. I then discovered I forgot the staff (from all the way back in the shop) that I needed to use as an oar, d’oh.
Another restored game later, I had both the boat and “oar” at the river, and pushed my way up to a river monster.
This is a good place to pause, not only because it makes a nice dramatic cliffhanger, but because I haven’t solved the puzzle yet (at least with the items I had handy). Despite my quibbles this game been a reasonably fun so far; the custom-font as opposed to system-font and at least slight nod to parser convenience has made the package feel more “professional” than many other pre-1982 games. This is a vague and hard-to-nail-down concept but I’ve often felt like I was playing a “straight from the coder’s bedroom” product — even when this wasn’t literally true — and a stray typo or graphical bug could happen at any moment (and they sometimes did). Here, even though I did spot one typo early, and even given the slightly crude art style, this feels like a game I could see come out of professional packaging.
Mikro-Gen, formed in 1981 by Meek and Andy Laurie, is mostly known for the Wally Week series, including the action-adventure games Pyjamarama (1984) and Everyone’s A Wally (1985).
The first screen of Pyjamarama for C64. I do like this kind of game but it really falls in a different genre than the ones for my All the Adventures list. One thing I’ve idly been wondering is if any of the platformer-adventures popular on British computers in the 80s really count more as pure adventures; that is, the action elements are so minimal it really becomes about bringing the right items to the right places. The closest I can think of is the Mikro-Gen game The Witch’s Cauldron, which is a regular text adventure, but the pictures have the side-view from arcade platformers.
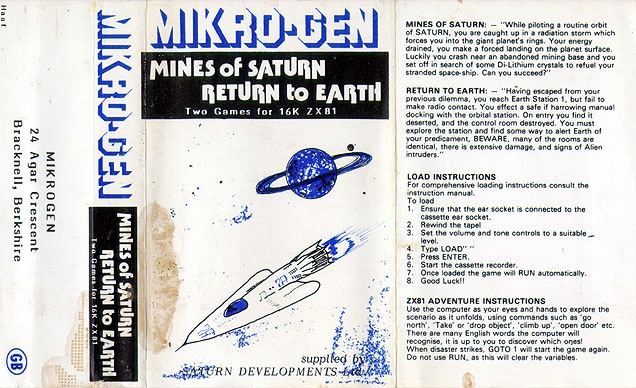
They also dabbled a bit with text adventures by republishing today’s two-part series by Saturnsoft aka Saturn Developments, which appears to be simply a one-person label of the author of the games, Chris Evans.
From Every Game Going.
Saturn Developments came out with two more games published directly by Mikro-Gen, Mad Martha 1 and 2, which we will get to eventually (both seem to be satirical absurd text adventures with mini-games jammed in?); in fact, Mad Martha ended up being oddly integral to the history of Mikro-Gen, but that’s a story for another day. We’re instead left with this humble offering, which started on ZX81.
From a German eBay auction. This graphic was too awesome not to share. One thing I always keep in mind with ZX81 games is the finicky keyboard, meaning an slower expected input rate; I’ve noticed with every emulator I’ve tried that I have to slow down my usual typing speed as if I’m dealing with a chiclet keyboard. Fine for playing text adventures, I’d hate to type source code with it.
I can tell you, now having suffered, do not play it on ZX81.
The opening screen. There’s something hidden here in a way I’ve never seen in any other adventure game; I’ll be getting to that.
There are two issues, one minor, one major:
The minor issue is that it tries to compensate for a lack of apostrophes on the ZX81 with using a comma instead (“DID,NT” and “WAS,NT” respectively). I can understand just leaving out apostrophes as a sort of machine shorthand, but comma substitutes are grammar murder. (The ZX Spectrum version actually adds more of these substitutes so I suggest running away screaming.)
Rather more seriously, it is literally impossible to win without changing the source code. I only found this out after a long amount of play; fortunately I did not resist hints for any longer, for I found out the issue I was trying to solve was literally impossible. To the south of the starting place there is a fragile bridge.
You’re supposed to be able to cross it at least once, but something broke in the code so it always breaks.
This doesn’t seem to be a single-character fix, either. I’m not sure what the issue is, but here’s the offending line.
2970 LET OK=((INT (RND*100)+1) <= N)
The fix is just to set the variable equal to zero as opposed to try something random. As I was having difficulty with ZX81 commands I just said forget it and hopped to the C64 port instead, which has the bonus of proper word wrap, lower case letters, the bridge working as intended (?) and also some random ASCII graphics as a bonus.
Enough setup: the premise of the first game (Mines of Saturn) has you piloting a ship that, due to a radiation storm, needs to make a crash landing near an abandoned mining base. You need to find dilithium crystals to fuel your ship.
The game really is quite small otherwise and straightforward, other than few extra instant-deaths other than that bridge one. What’s really interesting in the setup — and I can’t think of any other game from this era offhand that does this so consistently — is it strongly hints at what you missed if you die. For example, early on you can find a boat and try to USE BOAT to cross canal. The game kills you but says you needed oars.
The oars are on the other side of that bridge I mentioned, but it was an interesting response to see in that I didn’t waste any time trying other methods of crossing: I knew I was missing an oars object and just had to wait for it (well, normally I would, except the solution here was just switching to C64).
This general niceness (after switching over) led to a relatively short and easy experience, except for one spot near the end. You’ve just zapped some spiders with a ray gun (obtained by using boat + oars, and make sure you charge it up first)…
…and then you need to go up. Trying to do so kills you, and the game openly ponders about the ladder that was part of your original ship.
THE SIDES OF THE POTHOLE ARE AS SMOOTH AS GLASS,YOU WILL HAVE TO GET A LADDER,PITY…WAS,NT THERE ONE ON YOUR SHIP ?
The thing is that the ship is not mentioned in the initial room of the game! You’re just supposed to assume it is there even though it is essentially invisible, and that there is a “ladder” object you can pick up.
Opening screen again for reference. What’s simultaneously interesting and unfair is that there really is no way to know about the ladder without first having the death, so the “official” ludic narrative essentially includes both the death and reviving and trying again, as opposed to the death being “smoothed out” of the real narrative.
After taking the hidden ladder to the right area, you can climb up to a crystal, use a hammer, and win the game.
If I had started with the C64 version this would have been a relatively smooth and inoffensive experience; short and feeling a bit like a type-in, but it’s honestly OK for a game to be short?
RETURN TO EARTH: “Having escaped from your previous dilemma, you reach Earth Station 1, but fail to make radio contact. You effect a safe if harrowing manual docking with the orbital station. On entry you find it deserted, and the control room destroyed. You must explore the station and find some way to alert Earth of your predicament, BEWARE, many of the rooms are identical, there is extensive damage, and signs of Alien intruders.”
For the follow-up game on the opposite side of the tape I went directly for the C64 version, not wanting to risk getting burned again.
Unfortunately, while the planet of the first game had a little atmosphere, this is set in a boring-halls style space station. At least Death Dreadnaught went all-in with gruesome descriptions, this really has very little going on:
There’s a sequence here where you get an axe, to break open a medical chest to get a serum, to cure a spider bite, to find a battery and some keys; additionally, you need some “nerve gas” to defeat another set of spiders.
Even the deaths are less creative.
The whole point is to get the keys and the battery to be able to open the cabinet at the start and activate a radio, which lets you call Earth for help and win the game. Except … the C64 version is broken and you can’t activate the radio!
No, TAKE RADIO and TAKE SET don’t work either.
I checked with a walkthrough and found that the game here does indeed seem to be broken, so rather than painfully go back to the ZX81 (not a long game, but I’ve already dealt with enough jank on this tape thank you very much) I just looked up the winning message in the source code.
CONGRATULATIONS, THE RADIO IS NOW WORKING, AND A RESCUE TEAM IS ON THE WAY
Ok, there’s one fun death: there’s a pistol and if you try to use it there’s a hole broken in the station hull and you die from air escaping. (Really, it’s a little hilarious at least.) I think it safe to say my experience with the first games of Chris Evans was a crash and burn.
But the absurd thing is–
I said I was going to save the Mad Martha story, but let me tell it now. Indirectly, this game started the relationship between Chris Evans and Mikro-Gen, so it really is the first domino in a very important relationship: that between Mikro-Gen and Crash Magazine, one of the big Brit-mags of the 80s. Let me just quote Retro Gamer’s profile here:
One of the ways in which it tried to secure talent was by going to the many computer fairs that were dedicated to specific machines in the 1980s. In August 1983, Mikro-Gen appeared at the ZX Microfair in London’s Alexandra Palace and it had a stand very close to a small mail order company called Crash Micro Games Action. The two companies soon began to talk and the conversation ended with Mikro-Gen handing over a copy of Mad Martha and being delighted at being given a good review. Little did anyone know that six months later, Crash Micro Games Action would become Crash magazine and the two companies continued the relationship it had built up. This ultimately helped Mikro-Gen to become known to programmers and gamers, which helped as the bosses tried to secure a winning team.
In other words, if it weren’t for this janky two-game tape, we wouldn’t have Mad Martha, and without Mad Martha, Mikro-Gen wouldn’t have become big, and then we likely wouldn’t have later classics like Equinox.
Previously, I ended on a puzzle I was tantalizingly close to solving, although I had only theorized a connection: a room giving the names of explorers and trying to reach a Snark without being vaporized. The wall messages were randomized and there were eight of them:
Peary
Captain Scott
Columbus
Marco Polo
Peary and Columbus
Peary and Marco Polo
Scott and Columbus
Scott and Marco Polo
Eight possibilities, and eight directions, where four of them list two things: this was listing north, south, east, and west with the combinations being NE/SE/SW/NW. I originally had looked at the letters of the names themselves, but I then realized the explorers were associated with particular directions. North for arctic explorer Peary, south for Scott, west for Columbus, and east for Marco Polo. So that message was just a code for a single direction.
You are in a small room with exits to the southeast and northwest. The whole of one wall is taken up with a large painted mural, which shows the explorations of Peary.
So the description above means: go to the Snark area, take the north direction, then go all the way down.
In the room there is a Snark burbling frumiously to itself. As you approach, it gives you an uffish look and then disappears completely. You are in a large cellar with walls of Lewis coral which has obviously been designed as a home for some exotic beast. There is a narrow exit upwards.
There is a box of sapphires here!
From The Hunting of the Snark.
Speaking of close-to-solving parts, I had last time theorized the piece of wood was a boomerang, but when the response to THROW WOOD was underwhelming I just assumed it wasn’t. I still decided, perhaps, I could attract the attention of a flying jackdaw which held something shiny, maybe it would try to play “chase the stick” or build something out of it (crows are known for using tools like sticks).
You are at the eastern end of the great court.
There is a jackdaw flying around in circles far above you.
Something it is carrying in its beak glisters in the sunlight.
> THROW WOOD
The boomerang catches the jackdaw a passing blow, knocking it to the ground, dead. The weapon itself continues in flight.
Erf. Unexpected violence, but at least that’s resolved.
I poked around with more confidence at the remaining issues. I had a creature (a “baby hexapod”) that was crying for its mama, and pondering my verb list I had gathered, I noticed I hadn’t used FEED yet, so I decided to try it.
> feed creature
The hexapod gobbles up the steak greedily after which it calms down considerably, only occasionally burping and saying “Mama?”
I hadn’t specified the steak, the game did that for me automatically because I was holding it. (Sort of a minor variant of point-and-click adventures having puzzles solved by clicking in the right spot but not knowing beforehand want the action will be. Brief plug for Joey Jones writing about the slow evolution of verb-full to verb-less in Lucasarts games.)
I still needed to find Mama, and I was rather short on places to go. I had, in full:
a forest area that caused sleep
a cave blocked by undergrowth that a dragon was able to burn, except I couldn’t get by the dragon’s fire after
a regular wall of fire
a rocky plain where going in direction caused death
a pit with a “furry arm” that comes out and kills you if you try to go by
a “fish room” with pictures of fish
a room full of dust (I thought at the time it might be decoration, although it isn’t)
a statue too heavy to move
The only plausible location seemed to be the rocky plain, so I managed to get success on my first try:
You drop the hexapod to the ground. It runs off to the south.
OK.
Following the hexapod leads to the parents:
The baby hexapod runs into the arms of a much larger isomorphic creature, obviously its parent. In a similar high-pitched voice this creature squeaks “We thank you for seeing our little Alpha Centauri home safely to us. Pray accept this reward – such baubles are of no interest to us but we understand that they are highly regarded by humanoids.” She then drops a string of pearls at your feet and the two of them disappear down a hole in the ground, which at once closes after them.
You are on the rocky plain.
There is a string of pearls here!
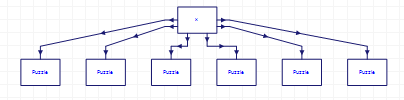
Again, another very self-contained puzzle. So self-contained, that the overall game meta structure was starting to look like this:
This doesn’t hold completely — the vampire had documents which led to the vault, for instance, and the egg/dragon setup has a second part to completely solve the puzzle — but the generally flat structure made still made me suspicious about one item in particular, a bottle with a djinn.
> OPEN BOTTLE
A huge djinn appears from the bottle with a WHOOSH. He says sonorously “Many thanks, oh effulgent one! I will help thee if it be in my power.” He then vanishes and reappears after a short while, saying “I have done thee service to the best of my powers, oh lustrous one! Farewell!” The djinn then vanishes for good.
I had been trying in various places to use the djinn in the bottle as the solution to a puzzle, but maybe the djinn doesn’t really do anything at all other than provide the bottle it was in! Thinking in those terms, I burned the djinn somewhere random (I did mark my save game with an X as a branch in reality in case this was wrong) and then used the bottle to scoop up some water. This is sufficient to defuse both the dragon and the wall of fire. (ADD: Paul points out in the comments that the djinn moves the tapestry from the start of the game to the vault. I didn’t even notice that! I will gladly still take a right solve for wrong reasons.)
You are in the forest. There are paths to the west, northwest and southwest. To the east is the entrance to the cave. There seems to have been a fairly large fire here recently.
There is a baby dragon here, breathing fire towards you.
> THROW WATER
You throw the water at the baby dragon, whose flames are thoroughly quenched. It gives you a reproachful look and then flies off into the distance.
The wall of fire quenching led to a jeweled helmet (another treasure) and getting past the dragon led to a cave with a first folio of Shakespeare (yet another treasure) and nothing else. The flat structure arises again.
This left me rather stuck. I really didn’t have anything for the statue, but I could try the creature in the pit some more.
As you reach the edge of the pit a large furry arm reaches out and pulls you into the murky depths. There are horrendous sounds of snarling and your body is wrenched to pieces and then eaten.
I was able to throw it things and have them get eaten, so I strongly suspected I needed to poison it somehow, but I didn’t find anything on the map that remotely seemed like poison. I’m still honestly a touch puzzled here — did I miss a clue? — but the key was the room of “dust” which I guess is something a bit stronger:
You are in a small chamber the floor of which is covered by a thick layer of white dust. There are exits to the west and southeast.
You can poison something (I tried the bird I had killed earlier with the boomerang) and toss it in.
You throw the jackdaw into the pit.
There are sounds of roaring and threshing in the pit.
Suddenly there is an almighty screech followed by silence.
This lets you get by and pick up some “dilithium crystals”, another treasure, and yes, another “dead end” in terms of structure.
Going back to my list, this left
a forest area that caused sleep
a “fish room” with pictures of fish
a statue too heavy to move
The forest and statue are connected. Specifically, you’re supposed to eat a piece of cheese that I had been toting around, thinking I’d give it to an animal. Somehow the cheese causes a dream in the sleepy area.
> EAT CHEESE
Well, you weren’t really hungry, but you eat the cheese all the same. Don’t blame me if you get indigestion.
> S
You enter a luxurious grove in which the atmosphere is so heady that you fall asleep almost at once. The cheese you ate so recently gives you terrible nightmares, from which you are glad to awaken. The most vivid one is about a stone statue and a man calling out “NOMET”.
I’ve never had food-induced nightmares before, but I’ve heard it is a Real Thing. What was interesting here is how it played against my adventurer tendency to Avoid Consuming Items — that is, having something disappear by eating it is often the wrong move. Someone less experienced in adventures would be more likely to come across the solve early here.
You can take this word over to the statue — fortunately there were so few puzzles left this seemed like an obvious choice — and speak it, and this will cause the statue to come alive and walk its way over to the vault for you.
Finally, there’s the fish room, which seems to follow no logic at all to this solve, and I just had to have the hints tell me what to do:
You are in a square room whose walls gleam with pictures of fish of every description… turbot, halibut, you name it. A passage leads back to the north.
> OFF
On the western wall the word SWAMP seems to stand out from the surrounding blackness, as though produced by a thousand glow-worms.
I guess this happened in Acheton once — you had to turn the lamp off in a room — but here it really seems completely unclued. Again I wonder if I missed something.
Unfortunately getting SWAMP gets you nowhere, there’s a second trick. SWAMP indicates a magic word, but it is in code: encoded by the same code as THE PASSWORD IS (something) from much earlier.
ABCDEFGHIJKLMNOPQRSTUVWXYZ

R      I   SEA H  OT  P DW
At least the O’GRAM bit signaled the code being significant, but SWAMP is a word and the “decryption” isn’t:
> OPREH
A concealed exit in the south wall silently slides open.
> S
You are in a small cupboard south of the fish room.
The lost ruby of Hamil is here!
Not a fan. But that’s the last of the treasures, so it’s on to the endgame, which is one turn exactly.
You are in the vault.
There is an elegantly carved boomerang here!
There is an antique silver goblet here!
There is a richly bejewelled helmet here!
There is an enormous tapestry here!
There is a diamond ring here!
The ancient crown of the Kings of Hamil is here!
There is a platinum bust of Sir Arthur Conan Doyle here!
There is a string of pearls here!
There is a box of sapphires here!
There is a first folio of Shakespeare here!
There is a huge marble statue by Michaelangelo here!
The lost ruby of Hamil is here!
There is an oil painting by Van Gogh here!
There are some emeralds here!
There are some priceless dilithium crystals here!
There is a golden crozier here!
Suddenly a narrow crack in the wall begins to widen. You rush for it and manage to squeeze through, leaving your possessions behind in the vault, before it closes again. On looking at your new surroundings, you find that…
You are in the departure lounge for Valhalla, a spacious room filled with riches of every kind. There are a dozen dancing maidens standing in one corner of the room, looking expectantly at you. Heavenly sounds fill the air. On the wall there are three notices, which read ZPNT NAM TPMHA SAYMAL? ZPNT ZNL TPM WPANLM? and ZPNT HL TPM LMT, LSATMY?
The encrypted messages (same system as before) are asking
WHAT ARE THEIR ORDERS

WHAT WAS THE PHRASE

WHAT IS THE SET, SORTED
and I sort of had to right idea and set to work trying to anagram the letters R I SEA H OT P DW. I had reached 299/300 points by now so I was past my patience point. It is possible if I hadn’t been anxious I might have realized on my own there was an alternate perspective: to list out the plaintext letters and write what the corresponding encrypted letters are (rather than the other way around).
ABCDEFGHIJKLMNOPQRSTUVWXYZ

N  YM  PH     SW ALT  Z
So to win you have to type NYMPHS WALTZ.
> NYMPHS WALTZ
The nymphs burst into a round of applause, a hidden orchestra plays the Blue Danube, and you waltz the night away. After this you all embark on the ship for Valhalla and set sail, watched by a cheering crowd of hobgoblins, orcs, hexapods and many other exotic beings.
You scored 300 points out of a maximum of 300.
Perhaps you really are quite clever. Well done!
This game was fascinating as a sort of mini-version of all the evil Phoenix games that had come before. Simplified in structure, condensed in size, smoothed out in difficulty, with a few rough edges (like the fish room, which I still don’t understand) remaining.
I can’t say I “immersed myself” in a world the same I did with, say, Deadline. The narrative is clearly not the point; attacking this was definitely more akin to tackling a puzzle from a magazine or newspaper which happened to give feedback to actions. This clearly fed to something in the British taste because these games allegedly sold quite well for their time, and we have, of course, a plentitude more to look forward to.
I can say while this certainly didn’t have the ambition of the prior games, even given the “don’t stay in the same room or you’ll die by aardvark” timer, it was in its own way the most pleasing.
(Incidentally, I did finally find a safe zone — you can hang out at the fountain at the court as long as you want without getting killed. Makes a decent base for storing objects so you can sort through inventory and think without getting gutted.)
Erect and sublime, for one moment of time,
In the next, that wild figure they saw
(As if stung by a spasm) plunge into a chasm,
While they waited and listened in awe.
From the original printing of The Hunting of the Snark.
To continue directly from last time, I need to do a slight correction, as Paul Ingerson pointed out I missed a hint. I thought the wand’s effect was unclued, but it is described as having “mystic runes”, and you can READ it:
The runes on the wand say:
“Though bold in name
They flee in shame!”
Since kobold has the letters “bold” in the name, that is supposed to hint at the wand’s effect being to make kobolds run in fear.
As Hamil is a game without an EXAMINE verb, I wasn’t thinking of getting more information off a particular object. (Also, “mystic runes” I usually don’t think of as English letters!)
Now, let’s rewind to the start, where I had found a slab written with O’GRAM, and dropped into a crypt…
…as Paul (again) surmised, this was meant to hint at CRYPTOGRAM. (This is a puzzle I solved last time but I wanted to see where it was going before I reported in.) Specifically, the crypt looks like this:
You are in a crypt below the chapel, a dank and musty chamber. Sinister passages lead to the east and west, and there is a hole in the south wall. There are some steps up here, but they lead nowhere.
On the wall is scrawled the following legend:
TPM WNLLZSAY HL YAMNY
That’s a rather short cryptogram to solve straight out (and I confirmed there was no simple Caesar shift going on) and in fact I ran about the map a bit before coming back to it, but I found that just to the east there was a major hint:
> E
You are in a short passage, which enters from the west and terminates in a large metal door with no obvious means of opening. The door bears the legend
HE WHO WISHES TO PROCEED FURTHER MUST SPEAK THE PASSWORD
This was a major enough hint I immediately realized the message had to be THE PASSWORD IS … something. Y was D, A was R, M was E, and N was A, so the word was DREAD, and saying it caused the door to open. This word is incidentally randomized on new playthroughs.
This led to a room where, oddly, the only thing I could find was a large tapestry (too big to carry, even) where picking it up opened a window to the sun outside.
You pull down the tapestry from the wall, exposing a small window, far above your reach, through which the sun is shining and a refreshing breeze is blowing.
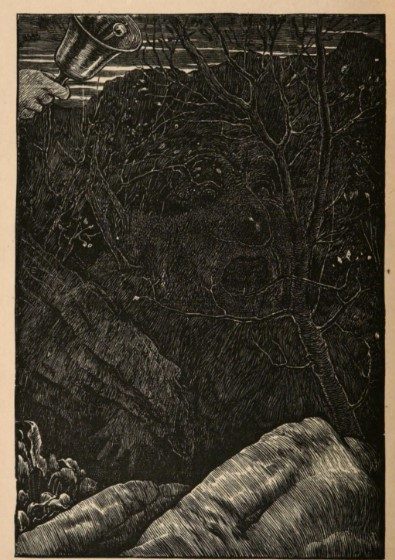
Where realization struck is that not far off was a coffin with a vampire (the one depicted on the cover above).
You lift the lid of the coffin to reveal an elegantly dressed corpse.
Its eyes snap open and it smiles thirstily at you. The vampire (for such it is) then leaps from the coffin, drops something it was carrying, and moves towards you with fangs bared.
The vampire starts chasing you. The trick is to having the password-room open but have not yet pulled the tapestry; then get the vampire chasing, lead him to the sunlight room, and let him have the full blast.
A ray of light hits the vampire, who emits a ghastly screech and then literally crumbles into dust, which is dispersed by a draught from the window.
Heading back to the vampire’s coffin, I found some documents in a language my avatar couldn’t read, and the documents were notably not a treasure. I stashed them away and merrily did some more mapping / puzzle solving before running across their use more or less by accident. I happened to have them in my inventory when I was exploring an open court next to a “museum”.
You are at the western end of the court. There is a portal leading out at this side,above which are inscribed the words:
THE RIGHTFUL HEIR TO THE KINGDOM OF HAMIL
WILL BE KNOWN BY HIS DEEDS
A lowered portcullis blocks the exit.
> W
The sentries see at once that you are carrying the deeds to castle Hamil, bow respectfully to you, and raise the portcullis.
You are in the entrance hall to Castle Hamil, which is filled with knights who greet you as their lord. To the north there is a passage into a small vault.
The vault is where the treasures go, although for some curious reason, there’s a garlic stashed there already (not a treasure, and I’ll explain where it’s useful later).
The whole court/museum area is pretty dense with interesting items and puzzles.
Location 1 has a huge egg which hatches into a dragon; there’s a forest area to the south with a cave blocked by “an impenetrable mass of undergrowth” and you can deposit the egg there, and find later the dragon has hatched (and burned away the undergrowth) but won’t let you by. You can alternately be there when the egg hatches and find the dragon wants to be friends with you, except that being friends is also fatal:
Suddenly the egg you are carrying gives a loud CRACK, the shell splits, and a baby dragon emerges. It purrs happily at you, unfortunately giving you third degree burns in the process. In fact the dragon’s attempt to make friends merely results in your demise.
My suspicion is that being at the cave with egg hatching is correct, but you need to survive friendship (at which point the dragon will let you by into the cave), but that’s only 60% confidence or so.
Location 2 has a talisman which says OBLIVION. OBLIVION is an understood verb but I haven’t gotten it to do anything (with or without the talisman). The talisman also has the odd effect of randomly being “left behind” when you go a particular direction, meaning you need to backtrack and pick it back up if you want to keep it. I’ve found two uses for it I’ll get into later.
Location 3 has a hard-to-pick-up treasure
There is a huge marble statue by Michaelangelo here!
where getting the statue indicates “You can’t take that!” I assume the hugeness is the issue here. Perhaps some magic will allow transport into the vault, or perhaps it can be shrunk down? I don’t think this is a puzzle I’m ready to solve yet.
Location 4 has a easy-to-pick-up treasure
There is a large curved object here, elegantly carved by skilled craftsmen from the wood of the sacred tree of Hamil!
and it may just be there for stuffing into the vault, but it feels mystical enough I get the intuition this doubles as a useful object somewhere. (It does not seem to be secretly a boomerang, or at least, THROW WOOD doesn’t do anything out of the ordinary.)
Location 5 has a jackdaw flying around with a shiny object. I haven’t been able to grab its attention. (Also, in my current playthrough it is in the east court rather than center, indicating either I made a mapping mistake or there’s something random about the positioning.)
Location 6 leads down to the Snarks.
You are in an east-west passage. There is a sign reading “TO THE SNARKS” and an arrow pointing east.
> E
The passage comes to a dead end here, but there is a hole in the floor.
> D
You are in a curiously constructed room. There are steep passages leading down from here in all eight horizontal directions, each labelled “TO THE SNARK”. There is also a hole in the roof, through which you will have no trouble returning.
The directions all lead to downward stairs, where a message is revealed slowly, Burma-Shave style.
You are in a steep twisting passage. On the wall is daubed the word “UNFORTUNATELY”.
> D
You are in a steep twisting passage. On the wall is daubed the word “SNARKS”.
etc., leading to UNFORTUNATELY SNARKS HAVE TO BE KEPT DEEP IN THE GROUND. Going down one more time is then death.
> D
In the room there is a Snark burbling frumiously to itself. As you approach, it roars like a Bandersnatch. “Oh no, it’s a Boojum!” you gasp, as you softly and suddenly vanish away.
(I like how my spellcheck understands Boojum but not frumiously.)
The only major observation I’ve made is that all eight directions seem to lead to the same set of downwards stairs. Normally I would have trouble being sure of that, because dropping items cause them softly and suddenly vanish away, but the talisman from earlier is an exception: if it drops on its own, it doesn’t count as regular dropping, and then you can confirm by hopping into other directions that you’re going down the same set of stairs to reach it. (That doesn’t mean there isn’t some weird flag set by doing some trick with the eight directions, but resolving whatever is happening doesn’t get fixed by just being in a specific set of rooms.)
Speaking of the talisman, let’s get down to the other use I spoke of, which is at the same forest area as the baby dragon that can burn the entrance to a cave.
To the south is a sleepy-time grove. I don’t know what it’s useful for.
You enter a luxurious grove in which the atmosphere is so heady that you fall asleep almost at once. You awake shortly afterwards with no (apparent) after-effects.
You are in a luxurious grove which contains an abundance of beautiful plants. The sun is shining, birds twitter, bees hum… in fact the whole atmosphere is soporific in the extreme. Now awake, you find it difficult to remain so. The only exit is back to the north.
To the east is the previously mentioned cave, and to the west is the nastiest maze of the game I’ve yet encountered.
Three spirits appear in front of you. They claim to be the servants of the Maize Goddess, Mecohuatl, and promptly bear you away as a sacrifice to their deity.
It’s a maize maze, and for a long time I kept getting attacked by spirits as shown seemingly at random. After a lot of experimentation I finally realized the oblivion talisman gave protection, as long as you either carried it or it was in the current room. That means if you’ve dropped the talisman, you’re safe as long as you can go right back to where the talisman was. The maze, unfortunately, is the irregular kind where directions back are not obvious, and you can’t even use the in-game command BACK (“I’m afraid I’ve forgotten how you got here!”).
It’s hard to convey how distressing the whole experience was. Some exits jump back in the “path” by two or more rooms, so you really want to be dropping extra objects in rooms so you can keep track of Room 1, Room 2, etc. Also, the only way to save is to backtrack out of the maze entirely.
Let’s just say an “enormous” number of clone bodies were sacrificed before I reached the end, which was just a treasure (a Van Gogh painting). Once you actually have it settled, the procedure is to try to walk through with the talisman, and every time you drop it, go back to the previous room and pick it up.
There’s still also a few other scattered puzzles through the map, either addressed or unaddressed. In one room an enchanter seduces (?) you, Odysseus style, but kills you in the process. The proper procedure is to eat garlic beforehand (remember from the vault?) so she is repulsed, and then you can grab the emeralds she leaves behind.
Other random bits and bobs include: a six-legged creature who is crying for their mother, and who you can pick up; a “fish room” with “pictures of fish of every description… turbot, halibut, you name it”; a wall of fire; a bottle with a “djinn” that offers to help “if it be in my power” when set free, but I’ve yet to see an effect; a pit with a “furry arm” that comes out and kills you if you try to jump over; a rocky plain that is “heavily cratered” and trying to walk in any direction results in the earth opening up and swallowing you.
Then there’s this bit, which quite irregularly has a bicycle wheel, and more ominously, has randomization:
> SE
You are in a small room with exits to the southeast and northwest. The whole of one wall is taken up with a large painted mural, which shows the explorations of Columbus and Peary.
There is a bicycle wheel here.
> SE
As you leave the room, a disembodied voice whispers ‘Do not pause!’
You are in the large orbicular chamber.
The mural in particular is randomized. It changes the explorers upon entering the room, or even just has one explorer; it could be, for example, Captain Scott and Marco Polo. In a 90s game I might think this was just a way to add flavor, but in a Phoenix game, this is most definitely some kind of hint, probably connected with “do not pause”. I’ve tried to connect this even with the snark but still haven’t had any luck.
Another Hunting of the Snark picture for good measure.
One last piece of irritation before I close out; it’s something I’ve run across since the beginning of the game, and have finally decided has no logic to it at all other than to kill me personally. If you stay in the same room too long you die.
While you are wondering what to do next, a giant centipede scuttles in and gives you a poisonous bite in the leg.
There are various other deaths, including via anteater. I thought things couldn’t be that simple and perhaps there were “safe zones” or the like, but no, this seems (as far as I can tell) to be a consistent effect found everywhere in the game. I guess the idea is to encourage moving forward, but usually when this was originally hitting I was just organizing my inventory or trying to test out room exits. I have learned now when checking exits (that is, double-checking going, say, northwest is really is blocked off, even though it’s not in the room description) to leave and come back to the room I’m testing every so often in order to stave off death by anteater.
In most normal play the death doesn’t come up, but my pattern of hanging out in a room and fiddling with each of my inventory objects in turn or just trying random verbs is usually what I do when I’m stuck, so the main effect of the feature is to throw me off my groove. Still, I’m managing to hang on without hints so far, but I suspect the latter half of the game will have at least a few demons as puzzle somewhere.
They formed their own ecosystem of sorts, where none of the games were yet visible to the commercial public. The were only played by the small group of mathematicians making them in the first place. 1982 is the year that self-containment changes, with works starting to be published by local company Acornsoft.
1982 was also the year that Johnathan R. Partington (who worked on Acheton) went on a prolific streak with three games in one year: Avon, Murdac, and our choice for today, Hamil.
This game is allegedly easier than the cranium-crushing puzzle-fests of the prior games, but given this is being assessed relative to the hardest quartet of adventures I’ve ever seen, “easier” might mean still on the medium-tough side.
Image from the Acornsoft version of the game, via Every Game Going.
While I’ll be sharing some images of commercial versions (the one by Acornsoft I’ve already mentioned, and one published later by Topologika) I’m playing the direct port of the mainframe version as ported into z-code. (Here’s a link for direct on-line play.) The major obvious difference between the earlier mainframe version and the commercial versions is in the intro, which in the original is short and enigmatic…
You have discovered that the outside world is dangerous. Pursued for many days and nights by hordes of hostile beings, you have arrived, breathless, at a sanctuary. It seems that you are trapped, as it would be foolhardy to venture outside again. However, there may be more to this place than you think…
You are at the western end of a primitive stone chapel. Light streams in through the windows, which are set high above your reach in the entirely featureless walls of the building. A plain arch leads northwards to the world outside which, as you know from experience, is extremely hostile.
…but the intro is rather elongated in the commercial versions, primarily to note that while you are the “rightful heir” of Hamil, and that “you have only just discovered your birthright.”
Silly things like “motivation” and “plot”, bah. Here, I like the enigma more. You start in a small, three room church, with just a bicycle lamp, a rod, and an ancient piece of steak (?) to keep you company.
You are in the middle of the chapel.
There is an extremely heavy stone slab set into the floor here.
It bears the name O’GRAM.
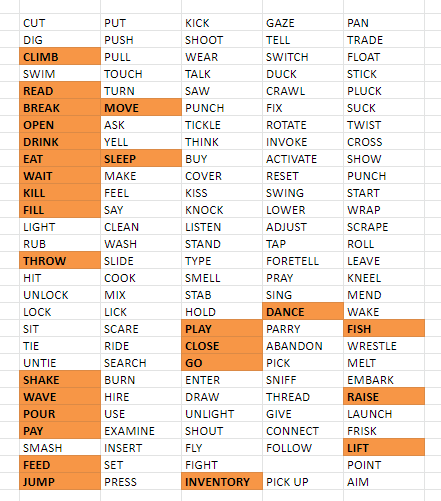
Knowing what I was up against, I went straight for my “try all the verbs off my standard list” method.
SHAKE and FISH seem to be referring to nouns, not verbs, but I marked them down anyway.
This was productive right from the start because (referring back to the O’GRAM slab) while you can’t GET SLAB, PUSH SLAB, PULL SLAB, MOVE SLAB, or HIT SLAB, you can LIFT or RAISE it. This is one of those “yes, I can see why you’d logically only take those two verbs, but you should still acknowledge the other ones” sort of moments.
You succeed in prising the slab from the ground with the aid of the metal rod. A flight of steps beneath is revealed, and you therefore prop the slab up with the rod, leaving a gap through which you should just be able to squeeze.
Going down leads to the rod snapping and the slab closing shut, leaving you underground in the world of Hamil.
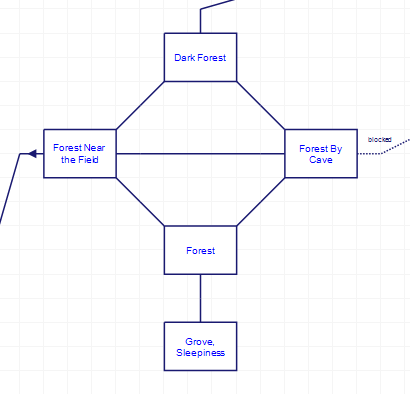
A most definitely incomplete map in progress. Starting room marked on top, the “hub” is the marked oval.
The design reminds me of Acheton, with a hub of sorts that branches into a plethora of relatively self-contained areas. (The hub room itself contains a magic wand, which we’ll get back to later.) The overall effect is sometimes akin to a “jukebox” puzzle game like The 7th Guest where an area is self-contained and exists primarily to dispense a treasure. (Oh yes: just like all the other four games, there’s treasures, although it is unclear yet what happens to them. I would assume if you gather them you’ve proved your heirdom, hurray, but I don’t know for certain.)
Here’s three puzzles I’ve solved as examples:
The simplest maze to start. The game intentionally forces you to ditch your inventory.
As you leave the room there is a violent earth tremor and a mighty rushing wind, which between them force you to drop all your possessions. Moreover a large rock falls, narrowly missing you and cutting off the way you came in.
You are in the Maze of Hamil. Light streams in through many gaps in the rocks. There is the constant sound of rockfalls, distant and not-so-distant.
The gimmick here is that there’s coins in each of the rooms, and you need to visit all of them before the end room (which I have marked as “fares please”). As you leave a room it gets destroyed, so you have to create your path to visit all the rooms before the exit.
You are in a small valley surrounded by unclimbable rocks. The only exit, to the west, is blocked. A mighty voice intones “FARES PLEASE!”
The whole purpose of this is to get a Crown of Hamil, a treasure marked with an exclamation mark (!).
You are in the Quaternion room. On the wall is scribbled a selection of obscure algebraic formulae, none of which seem particularly relevant at this juncture. There is a narrow exit to the south.
The ancient crown of the Kings of Hamil is here!
This one’s not hard once you realize the premise, but a second area that has a similar premise but ramps up the difficulty.
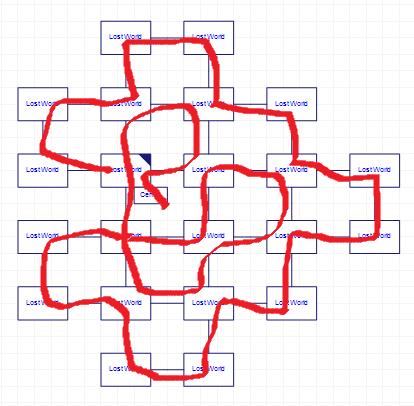
To get to the Lost World zone, you have to go back a sleeping T-Rex who then wakes up and starts chasing you.
As you pass the Tyrannosaurus, it stirs uneasily and then wakes, stands up and begins lumbering towards you. You run through the exit and find yourself on the slopes of the Lost World – a vast plateau criss-crossed by a network of boulder-strewn paths and populated by beings long thought extinct. From this point it is also possible to descend to the centre of the plateau, from which a large flock of pterodactyls is taking off in perfect formation. Meanwhile, the Tyrannosaurus is still galumphing towards you, having already caused a small avalanche which has blocked the path back into its cave.
There’s a specific number of pterodactyls taking off, and the idea is to kill enough time so that when you enter the center, it is pterodactyl-free. This means getting chased as long as possible, but this time the paths get filled up by earthquakes, not the rooms.
The T.R. follows, causing an avalanche to block the path you took.
You are in the Lost World.
A Tyrannosaurus Rex is lumbering towards you.
So our goal ends up being to visit every single path and return back to the center. In mathematician lingo the first puzzle is is a Hamiltonian path (visit all the rooms) and the second puzzle is a Eulerian path (visit all the edges connecting rooms). And yes, the name “Hamil” of the game does not seem to be coincidence.
Realizing the gimmick took longer than the solve, but still, this felt very much in The 7th Guest zone, of basically using the rooms like a giant board game with its own rules as opposed to being “in the universe” of the adventuring world.
Not like there still isn’t normal adventuring things — while you get a bust of Conan Doyle as a reward for solving this puzzle, you also get a whistle which helps solve a side puzzle off the hub.
You are in a small room which is furnished as a living room, though evidently for an inhuman being, to judge from the designs on the walls. These depict different ways of cooking human flesh. I hope you have more taste.
There is an antique silver goblet here!
There is an old lady here, sitting on a rock. Even in this light, there appears to be something odd about her.
> BLOW WHISTLE
Phthui!
An enormous alsatian appears, snarling and foaming at the mouth. It is about to set on you but sees the old lady as a worthier opponent and fights a fierce battle with her, eventually tearing her limb from limb. It then slopes off, exhausted.
There is an antique silver goblet here!
The mangled remains of an elderly female hobgoblin are here.
For the third area, it is a more “traditional” maze, and the old ultra-evil of the prior Phoenix games surfaces.
Specifically: going in any “wrong” directions results in meeting an enemy, like a dwarf with an axe, or a mummy. You then have a turn to react, followed by death.
You are in the labyrinth.
> N
You are in the labyrinth.
There is a mummy here, shambling towards you.
> KILL MUMMY
The mummy throttles you to death.
Oh dear! You seem to have passed away.
You scored 53 points out of a maximum of 300.
Do you want another game, oh heroic one?
It appears the majority of the enemies are entirely unkillable, and you’ll notice the pattern is to have two exits per maze room — you can drop items and do relatively speaking the normal mapping, except for having to die repeatedly as you test exits. (Also, the game disables saves while in the maze; fortunately you can drop items to help map it out, pop back out to save, then go back in again and nothing has happened to the dropped items.)
Where I got puzzled was the last room, which appeared to be a dead end — you could enter, but every exit had monsters, including a “kobold” which weren’t in prior exits. I vaguely suspected the usual pattern was being thrown off here, so I experimented with trying to kill the kobold, and notably using the wand:
> E
You are in the labyrinth.
There is an angry kobold here.
> WAVE WAND
The kobold suddenly shows signs of terror and runs away from you at top speed!
Yes, despite all the other enemies being unkillable (probably) there’s one that isn’t, and there’s also no indication that this is the wand effect in particular and the only way to find out is to test the wand. While I did technically solve the puzzle about the best way one could (I had nothing resembling an offensive weapon, so honestly the wand was the only thing that occurred to me as a possible solution) I can still mark this moment as thoroughly, unrepentantly evil.
The reward for solving the puzzle is a golden crozier which may end up not being useful (other than for stashing in some room I haven’t found yet).
I’ve only prodded lightly at other areas, like a museum that has a statue of Michelangelo’s that is marked as a treasure but is too big to carry, and some woods with a mysterious location that temporarily puts you to sleep, so I’ll write about them next time when I have a better grasp of what’s going on.
Oddly, despite its association with point-and-click games, humor has been very sparse in our journey so far. We’ve experienced some satire (“Hunter Thompson is here with eyeshade, cigarette holder, and intensity”) but I don’t think any games we’ve seen yet just tried to embrace being outright silly, or as the article that presents today’s game emphasizes, “zany”.
From 80-US Magazine, January 1982. Jon J. Waples is yet another one of those folks who wrote one and only one adventure game.
Hog Jowl Mansion brings back the type of game we got swarmed with in 80-81 and still hasn’t died out, the TRS-80 type in. However, this time the memory is doubled from 16K to 32K, so the game can be a little freer with the text (it is possible to squish everything into 16K by cutting all the spaces out of the source, but it is still interesting this is our first designed-for-32K TRS-80 game).
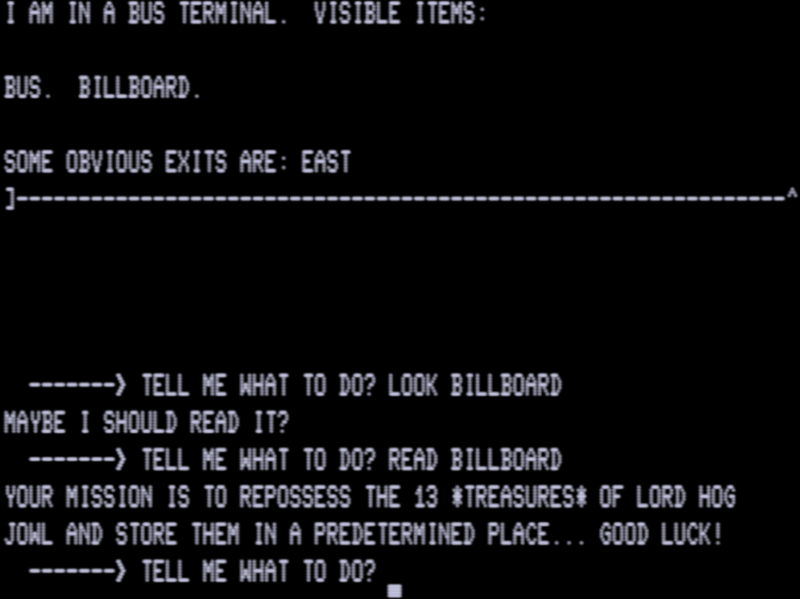
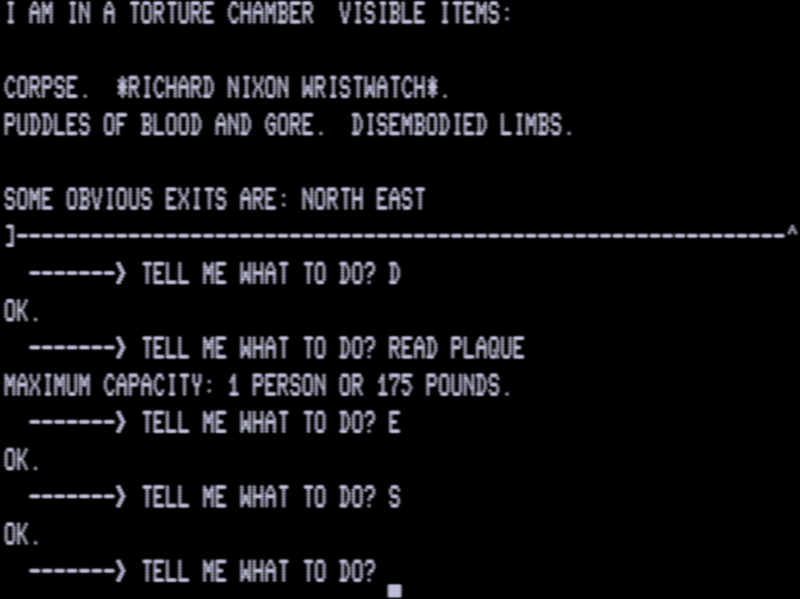
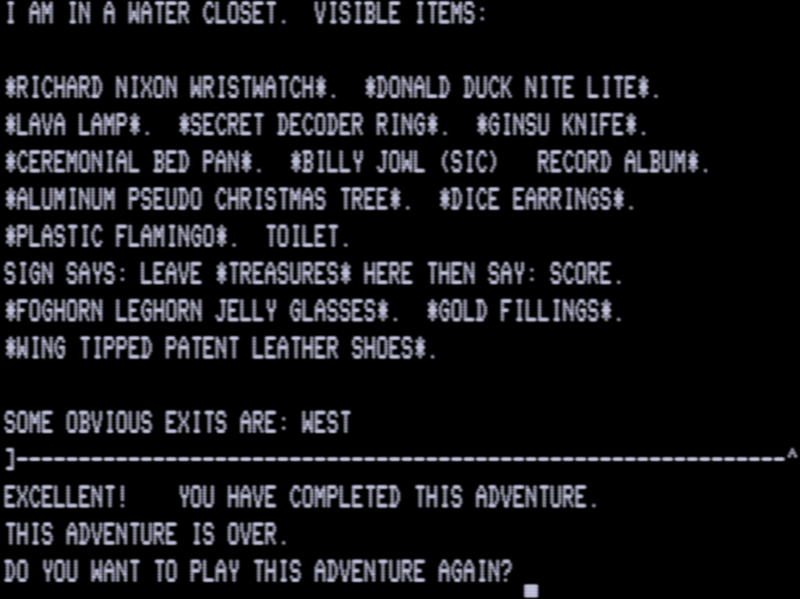
Our job is to gather 13 treasures and put them in a special place; so far, so typical. The catch here is that we’re actually a “repossessor”, come to collect on the debt of the defaulting Lord Hog Jowl, and treasures including a Ginsu Knife and a plastic flamingo.
The “special place” the treasures go is zany, indeed, although the game does the gimmick of not giving you access or even giving a hint as to where it might be at first.
The streetcar has been downgraded.
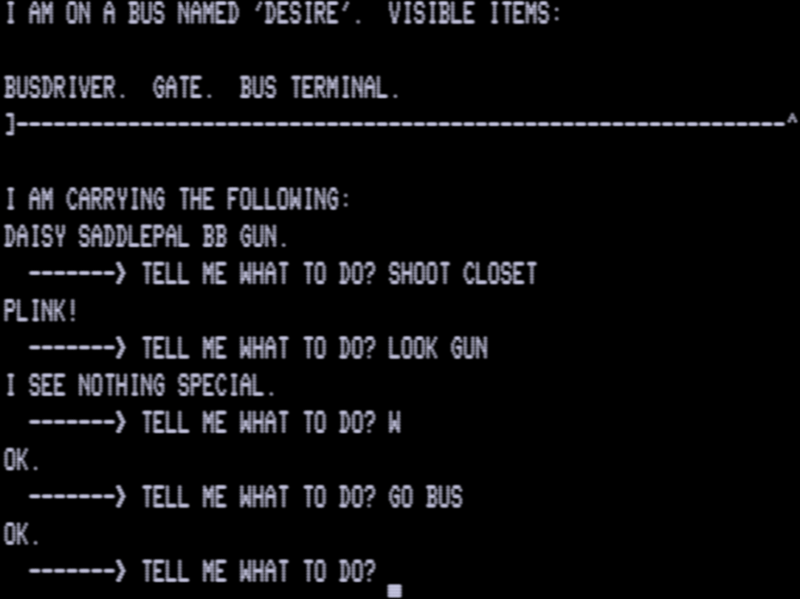
You can take the DAISY SADDLEPAL BB GUN and shoot the BUSDRIVER with it, getting a DEAD BUSDRIVER, but there’s otherwise no way to interact with them. The gun is more specifically useful in front of the mansion, where there’s a ravenous dog guarding it.
This happens with any item you happen to throw at the dog.
Sorry, dog lovers: the right move is just to shoot it dead with the gun. You can also poke in Lord Jowl’s mailbox and a “postage due” of 42 cents attached via paperclip to a postcard.
DEAR LORD,
HAVING A GREAT TIME, WISH YOU WERE HERE.
This is one of those open-treasure style hunts, where at least half of the 13 treasures are out in the wide open and you can gobble them up like Pac-Man (except, again, where to put them isn’t immediately obvious!)
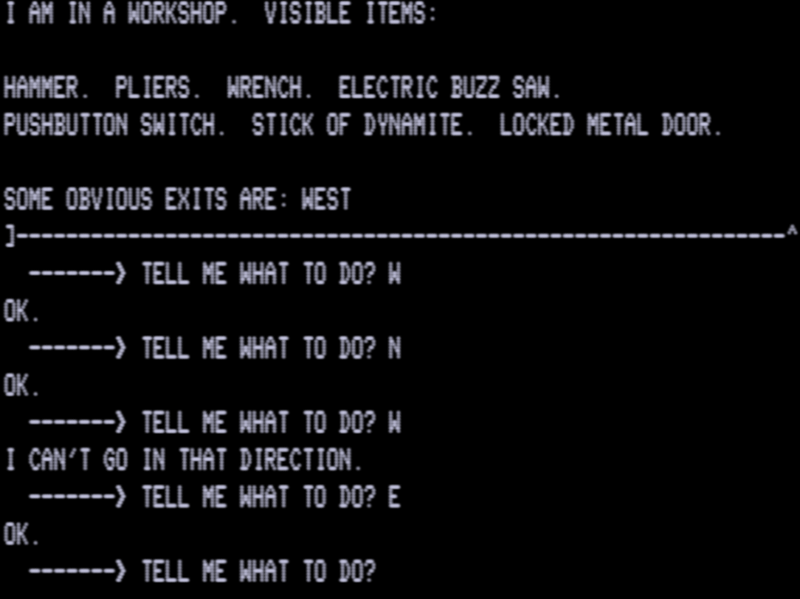
The structure has three floors, at least initially all available via dumbwaiter. The problem is that the dumbwaiter does not let you carry any items up or down.
Richard Nixon’s watch, as seen in the basement. You can’t take this back up the dumbwaiter.
What’s interesting is that the dumbwaiter is essentially a “preview vehicle” for seeing parts of the map early, because there are alternate ways to get both above and below.
For the upper floor, there’s a secret hatch that lets you find yourself at the top of a christmas tree on the ground floor. It turns out all along you could CLIMB TREE to get to the upper level, but that isn’t obvious at all before entering the other way.
For the lower floor, there’s a locked door you can find with the dumbwaiter, and it’s pretty clear the paper clip might help pick it, but even the paper clip is too large to take along with you on the trip down.
There’s a double-secret (first, move a bookcase, then, move a desk in the secret room you’ve found) that leads down to the door on the other side, and then lock-picking is possible.
Just to be clear about all this, here’s a meta-map:
This configuration allows most of the map to be open, while still requiring some puzzle-solving to fully travel the geography.
I’m reminded a little of the “map preview” you could take with Burglar’s Adventure by setting off an alarm and exploring anyway, but in this case it’s not a game over.
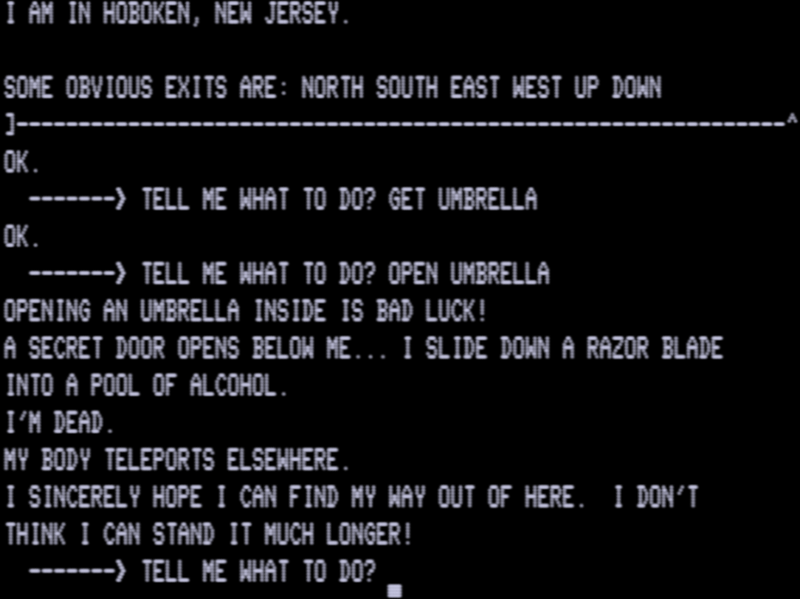
Speaking of game overs, this game has unlimited resurrection as long as you don’t go the wrong direction in New Jersey. I put the umbrella death at the top of this post; going North goes to safety. Going down, you find … Carl Sagan?
Did Mr. Waples find the series Cosmos upsetting?
You can also die in a refrigerator or blow yourself up with dynamite. I did the latter trying to get rid of a “elderly cow with morning breath”.
You can’t get through the door, this bit is a red herring, although I wonder if it’s more along the lines of “the author decided to stop” as opposed to an intentional move.
There’s a piggy bank with a dime that is not a treasure, but if you go all the way back to the bus terminal with a locked water closet, you can INSERT DIME and get inside. The toilet is where all the treasures go.
“Zany”. But also “grisly”. The gold fillings you get using pliers on a dead IRS agent that had been trapped behind a locked door upstairs.
In a historical sense — despite Jon J. Waples vanishing from adventure history as quickly as he came — this does indicate a wider familiarity with the treasure hunt genre, and a willingness to deconstruct to the point of absurdity as opposed to just copying the Crowther/Woods formula directly. A second-order copy, so to speak. This sort of humor eventually will get tiresome — by IFComp this sort of thing would deservedly land an entry in the bottom 5 — but this was relatively fresh and interesting by 1982 standards, even if a bit harsh on dogs, Richard Nixon, and New Jersey.
I’ve finished Deadline, and while I’ll give my usual disclaimer you should read all my posts in order, I will also disclaim since this is a mystery game, there are extreme spoilers. If what you’ve seen up to now makes you interested enough to try playing Deadline yourself, you should veer away now.
I’ll also make the disclaimer early I needed hints for two major points in the game. Picture from an eBay auction.
I think my major breakthrough was to stop thinking of this as a Poirot-type mystery, with all the clues being collected and assembled together in a final group scene (as gets parodied in Death Off the Cuff, where you are tasked with pulling off such a scene without knowing who the murderer is). No, the best model for a detective here is Columbo. The moment you get incriminating evidence, find the person it incriminates, pester them with it, ask them to explain what it means, and get them to fall off a mountain of their own lies and/or have them panic and make a mistake.
The sequence of interrogation can also matter — you want to give people a chance to walk into an inconsistent story. For example, last time I had come across a letter from a “Steven” to Mrs. Robner that indicated an affair and listened in on a suspicious phone call (“But we couldn’t have planned it better. You’re free.”) The next step was to confront Leslie Robner with both these things, but to make sure to ask about Steven before showing the letter with his name.
>ask robner about steven
“I don’t know who you mean. I have no friend named Steven.”
Then show the Steven letter and ask about the phone call.
>show letter to robner
“You have certainly stooped to a new low, Inspector. Opening people’s mail. I think there are laws against that sort of thing, but I guess you wouldn’t know. I suppose you also know that Steven is my lover and that we were planning to marry. Don’t look so melodramatic: I didn’t kill my husband. You think my talk of divorce may have driven him to it? Why don’t you leave me alone!”
>ask robner about call
“I guess you know it was Steven. I admit we were lovers, and we planned to marry if I could get a divorce from Marshall. He refused to consider it, the divorce I mean, even though he had no time for me anymore. He was married to the company, and he refused to see my side of things. Steven was suggesting that now we could marry. I told him I thought the timing was poor, or at least I would have if you hadn’t eavesdropped.”
If you show the letter first, without the extra lie adding spice, she’ll just talk about him as a “dear friend”.
Incidentally, all this means Mrs. Robner is a dead end — there’s nothing more to extract here. I still had threads leading to George (being written out of the will) and Mr. Baxter (with the business merger that it appears Mr. Robner didn’t want) to pull at. With George, I showed the calendar which I had flipped to the entry about sending a new will to Mr. Coates.
>show calendar to george
George tilts his head in thought (or perhaps surprise) but recovers quickly. “All I know is that Coates is my father’s personal attorney.”
The only reason this seemed notable is nobody else reacts to the calendar, including, oddly, Mr. Coates. (I was actually stuck for a while here due to the lack of reaction from Mr. Coates, but he doesn’t have reactions to much at all — he’s there to read the will and then leave again.)
If you do the showing, then George, which is normally happy and sedate at the will reading, gets somewhat disturbed.
George, now looking quite upset, starts for the door.
“I’ve…got to be going now. I’ll see you later,” George says. He starts to leave.
You can follow George upstairs. He ducks into his room, cranks up his stereo, then (assuming he doesn’t see you) goes into the library and:
George walks purposefully toward the bookshelves. He looks around, but you react before he can see you. When you peek out again, George is fiddling with the shelves. His right arm reaches into the shelf and, to your amazement, the unit of bookshelves on the left rotates away from the wall, revealing a darkened room behind. George enters it, trembling with barely controlled fear and excitement.
followed by:
A dim light in the hidden closet comes on. In the faint light, you can see George motioning with his right hand. All at once, the shelf swings shut!
I managed to get this first try because of my attempts to eavesdrop on Mrs. Robner’s call earlier; I knew the command HIDE was recognized even though it generally says there’s nowhere to hide, but in the library the game says “You might hide on the balcony.” Given the special status I figured there had to be a library-hiding scene, although I wasn’t expecting a secret passage out of it.
The part right after is where I got stuck enough to need the Invisiclues. Before I get into detail on that, I need to go back to the eavesdropped phone call briefly.
>listen to phone
You can hear Mrs. Robner and a man whose voice you don’t recognize.
I tried, after getting this scene, timing my phone listening in all sorts of different ways, and found no matter what minute I attempted (as long as I was in the game’s “window” of the call going on) I always had the same conversation. So I figured that was how the game worked: even though there was a “real time” element, there was a stretched window where you could accomplish certain tasks and they’d always come out the same way.
OK, back to the George scene. If you go back in and check, there’s a book that’s been moved revealing a black button. You can press the button to find George trying to get into a safe:
The leftmost shelf quietly swings out against the balcony window.
As the bookshelf swings open, you see George carefully dialing a combination into a large wall safe. He turns in panic and, with an exclamation, knocks you down and bolts out of the library.
I tested, just like the phone call, a few different timings, and the scene always ran this way: interrupting the safe-opening in progress. I figured that was that, and there was no better way to run the scene.
I was quite wrong about this: there’s a magic time — one specific minute, maybe — that you can catch George right when he has opened the safe, and he has the new will in his hands.
As the shelf swings open, George spins to face you. His expression, first seemingly wild with happiness, changes to one of panic and horror. He jerks around, trying feebly to conceal a piece of paper in his hands. He jumps toward you, then recoils in fear. Finally, sobbing, he crumples to the floor, clutching the paper beneath him. A large combination safe, imbedded in a wall, is lying open. You enter the hidden closet.
The new will entirely disowns George, as threatened. (The third way the scene can run is that you let George go through the whole process without interruption. George will then make a beeline for the lake and toss the will in. You can retrieve it but it then is just a soggy paper.)
Inside the just-opened-safe — and this is the only way to get at it, since George is the only one who knows the combination, there’s no secret piece of paper or word puzzle to solve —
Leafing through these papers, it becomes obvious that they incriminate Mr. Baxter in wrongdoings regarding the Focus scandal. They document funds which were embezzled by Baxter and tell how the scandal was hushed up. This evidence would be sufficient to convict Mr. Baxter in the Focus case.
Oh, this is a good time to go back to the fragmentary message on the pad:
I had trouble the first time, but I was trying too hard assuming the blank space would line up perfectly with the number of missing letters. Without that, you can get something like:
Baxter,
For the last time, I insist that you stop the merger with Omnidyne. Otherwise I will be forced to (show? produce?) the documents in my possession which implicate you in the Focus scandal. Stop before it is too late!
Marshall
This is enough to get a strong reaction out of Baxter, but not quite enough to nail him on the crime. He could have easily been the person with the ladder doing the swap with the cup (he said he was alone at a concert, but that could just be a lie). However, this doesn’t explain how the crime was able to happen in the first place.
(George isn’t ruled out here yet technically, but it didn’t make sense to me George’s plan would involve going outside with a ladder, it just didn’t fit the sequence of events that well.)
But!… speaking of the ladder, it was worth a second check at the holes and did SEARCH NEAR HOLES. And for some reason, rather than “tiny pieces of a hard, shiny, substance” I found a piece of porcelain! This must be the piece of cup I suspected Baxter dropped out on the way out. I think this didn’t actually happened for any timing reason, it’s just random what you find perhaps? Intensely frustrating, to be honest, but at least I worked it out.
Analyzing the fragment led to the knowledge that it had tea, but also some unknown substance the lab wasn’t able to figure out due to there being too many possibilities. I immediately jammed through my list of substances and kept sending the piece of cup to Duffy: Allergone, Sneezo, LoBlo, Ebullion. I got misses on the first two, but analyzing for LOBLO got a hit, and a full lab report.
Dear Inspector,
In response to your request for analysis of the ceramic fragment, we have found evidence of a drug called Methsparin, which is usually sold in this country under the name “LoBlo”. It is a blood pressure lowering agent used primarily in Europe, which explains the oversight in our blood analysis of the deceased. A double check reveals a high blood level of Methsparin. While the amount of Methsparin in the blood isn’t dangerous in itself, a strong reaction between it and various other drugs has been well documented. As you may have gathered, one of those drugs is Amitraxin (Ebullion). The effect of Methsparin is to displace Amitraxin from protein binding, leaving more free in the blood and simulating an overdose.
Your new evidence leads me to conclude that the cause of death was Amitraxin toxicity secondary to ingestion of Methsparin and Amitraxin in combination.
Sincerely,
Arthur Chatworth, Pathologist
Sweet! So somehow the LoBlo ended up in the tea, and then separately Baxter took away the evidence.
LoBlo’s perscription is to none other than … Ms. Dunbar, the secretary, who had not been on my radar previous to this point. Of course, following the Columbo Process™, the next step is interrogating her about the pills, and showing the report. She rather quickly tries to finger George:
>show report to dunbar
She seems stunned but recovers quickly. “He didn’t commit suicide, then?” she says. “But LoBlo, that’s a pill I take for my blood pressure.” She pauses. “I can tell what you’re thinking, but I didn’t, couldn’t have done it. Why should I? Someone must have taken them, maybe George. He knew I used them.”
I wasn’t able to get anything concrete, but I noticed that shortly after, Ms. Dunbar (who was resting in her room when I found her, and I knew from previous playthroughs normally hung out there for longer) suddenly started wandering the house. I did some following, sort of, but really just got lucky being in the same room as this happening:
>s
Front Path
You are at the Robners’ front door, which is open.
You can walk around the house from here to the east or west. To the south a rolling lawn leads to the entrance of the estate.
Ms. Dunbar spots you and stops. She reaches into her pocket and pulls out a cigarette. As she does so, what appears to be a ticket stub falls out of her pocket and floats to the ground. She checks her pocket again, apparently for a match, but finds none and puts the cigarette back in her pocket.
What was rather unlucky is I hit some sort of bug so the game didn’t recognize the ticket stub as being in the room. It took a restore and a bit of fussing about before I finally was able to get a hold of the stub that was dropped.
>ask dunbar about ticket stub
“Oh, I…well, I guess I should tell you. You see, Mr. Baxter and I, we go together to concerts, only occasionally, you understand. We went that night, the night Marshall died. Then he took me home and that’s it. I should have said something before, but I just didn’t think it was important, and, well, I didn’t think that the others should know we were seeing each other socially. Our…nobody knows about it, you know. Please don’t say anything!”
Ms. Dunbar eyes you nervously.
As long as you do this while Mr. Baxter is not present, running the same ticket stub by him gets a different story.
>show stub to baxter
“Ah, that must be Ms. Dunbar’s ticket stub. I should have told you earlier. Ms. Dunbar was with me at the concert on the night that Marshall killed himself. She became ill at intermission and hired a car to take her back home. You see, Inspector, I know that Ms. Dunbar appreciates classical music, so I occasionally ask her along to my subscription series. I really should have told the other detective, but I didn’t think it mattered.”
Gotcha! I had the motive — the business blackmail — and the method — getting Ms. Dunbar to poison the tea with LoBlo, which was easy since she was the one that gave it to Mr. Robner in the first place. I figured I could ARREST BAXTER, and… failure?
I am sorry to report that Mr. Baxter was acquitted yesterday of the murder of Mr. Robner. In speaking to the District Attorney, I gathered that the jury was almost convinced of Baxter’s guilt, given that he had both motive and a means to enter the house using the ladder. However, the theory had a number of serious flaws, including the means by which Baxter could have administered the drug either without Robner’s knowledge or without a struggle. I must confess that I too am baffled. I am convinced that Baxter is guilty, but I fear we will never know for certain.
I was deeply, deeply, puzzled here, and this is where I needed to reach for hints again (not even Invisiclues, a straight-up walkthrough). I had been assuming, upon arresting Baxter, that all the evidence I had connecting him with Dunbar would come up and her connection would be clear, especially since it seemed like ARREST PERSON was the only possible syntax. But no: it turns out you can arrest two people at once. I needed to have Robner and Baxter in the same room at the same time and then ARREST ROBNER AND BAXTER.
Text of a letter from Police Commissioner Klutz dated September 5:
Dear Inspector,
Congratulations on your superb handling of the Robner case. As you have probably heard, a jury convicted Mr. Baxter and Ms. Dunbar today of the murder of Mr. Robner. Thanks to you, the murderers will be behind bars, possibly for the rest of their lives. Thanks for a job brilliantly done. Which reminds me of another fascinating case I would like to assign you to…
Coming soon: Another INTERLOGIC Mystery from Infocom
This would have annoyed me more, except I was pleased that I managed to nail the entire story the game gives after, explaining all the details of the crime.
Mr. Robner’s work was his life, as pointed out by a number of the principals. George knew that his father had lost control of the company, and a story in the newspaper indicated that Baxter intended to sell the company to a multi-national conglomerate, presumably to advance his career. Baxter admitted to the merger plans, but indicated that Mr. Robner was in complete agreement. This is contrary to what George and Mrs. Robner said. The note pad found in the library was Robner’s last, desperate attempt to save the company, in which Robner threatened to expose Baxter’s involvement in the Focus scandal. Baxter denied getting the note, but it was not in the trash. The papers detailing Baxter’s criminality in the scandal were kept locked in a safe in a hidden closet near the library. Only George and Marshall Robner knew the whereabouts of the safe.
Baxter planned to murder his partner, aided by the fact that Robner was known to be depressed, even suicidal. He enlisted the help of his lover, Dunbar, one of whose medicines was found to interact fatally with the pills Robner was taking. The relationship of Baxter and Dunbar was kept quiet, although Mrs. Rourke had an inkling of it. After the concert in Hartford which both Baxter and Dunbar attended, they returned to the Robner estate. Dunbar placed some LoBlo in Robner’s tea. After Robner died, Baxter used the ladder from the shed to enter the library and exchange the incriminating cup for a clean one (counting the china in the kitchen reveals that a cup is missing). Coming down the ladder, Baxter presumably dropped the cup and inadvertently left one piece on the ground in the rose garden, near the ladder holes that McNabb found while tending his roses.
The only bit I didn’t have down was noting that Baxter must have seen the note from the note pad since it didn’t end up in the trash. (I’m not sure that’s ironclad, given there was a time delay and the waste basket could easily have been cleaned, but I appreciate the game did another “clue in the negative space” for good measure.)
Despite the stumble at the end, this game was staggeringly good. Jimmy Maher talked (in his historical intro) about how it used global state. We’ve had other games with global state (like Savage Island Part 1, or Philosopher’s Quest) but this game leaps rather much farther than that, with characters that not only have schedules, but schedules that modify on the fly based on the actions of the player and who happens to be in the room at a particular time.
It keeps track of the knowledge that the NPCs have about what you know. Did you catch them in a lie based on their prior statement? Then they’ll modify their dialogue accordingly. If Robner originally denies knowing Steven, it’s harder for her to claim he’s just a “dear friend”. If Baxter hears Robner’s story about the ticket, he tries to be consistent with his own lie. I can’t even think of many modern games that do this, let alone ones from 1982.
Jon Ingold recently gave a GDC talk about the difficulties of detective games — how it’s hard to “prove” you made a deduction, how subtle hints like the count of the dishes are hard to express as any kind of game verb without giving things away — but Deadline’s format really manages to handle things just fine. Some of the sub-clues are good for leading to the bigger ones — I really might not have searched the holes again if I wasn’t absolutely sure there had to be a substitute cup, for instance. I don’t think the “you have lost” text after a missed arrest is always explanatory enough, but I never felt “cheated” out of the ability to put the pieces together, or felt that what ought to be a complex series of inferences ever got reduced to a simple object puzzle.
I haven’t even talked about the multiple endings. Apparently there’s a way to have Baxter be onto you in such a way that he tries to kill Dunbar, with a gun? And you can do an arrest after the second murder, or even get murdered yourself if you try to stop him en route? I’m not sure how that sequencing goes (my arrest came very shortly after my ticket stub find, so there was no time for anything like that to happen).
I’m honestly not sure, 100 years from now, if anyone will still be playing Zork, but I predict Deadline will still be considered a classic.
The two most significant clues I gathered since last time were from things I didn’t find.
…
Deadline runs into a design paradox when you look at the outside of the Robner house.
The official map of the Robner Estate, from the Invisiclues for the game. I carefully avoided the maps of the inside but I figured the outside was safe.
You want realistic terrain, like above (as drawn by Steve Meretzky, who spent time in the construction industry) and you want to not have many superfluous rooms, like Time Zone did. How would you make the map so as to not be confusing? Well, not like this:
Given I was getting lost trying to make sure I had every outdoors room accounted for, I really did need to figure out how everything was tangled. In multiple cases there are one-way exits, so you can go from (for example) Among the Roses to the West Lawn but not back again.
Another spot with confusing one-way directions. I got lost here figuring out how things were oriented.
Even if the obvious “glitches” are fixed, it’s unclear what you’d do for a circumstance like this:
Yes, if you’re West of the Front Door, it should be possible to move, SW, S, and SE, and yes, the South Lawn is the only logical room to send the player to, but it still is confusing. You could add more South Lawn rooms so the convergence isn’t quite this heavy, but that would go counter to the goal of not having many superfluous rooms.
I remember when I first played Infocom games with a map like this I would simply ignore most of the “extra” exits — just connect the South Lawn to the Front Door and be done with it — but that leads to potentially missing something, and indeed it took me a while to realize that West Side of House was a reachable room (it can only be entered in two different ways).
There’s a fence to the north which is the reason for the restriction.
I mentioned last time the “tool shed” which has a ladder in it. To get to the library window you have to go to the garden area, and it appears that the window is directly over some roses.
>s
In the distance you hear “Hey! WHAT? You, there!” and other choice words muffled by a strong Scottish burr and a stiff breeze. Now, standing at the edge of the garden, can be seen the person of Mr. Angus McNabb, the gardener. He advances, looking crazed and gesticulating wildly. With each carefully chosen step in your direction, a barely visible wince of pain comes to his deeply-lined face. He regards you as you would regard the man whose car just ran over your little puppy dog.
Among the Roses
You are among rows of roses. The ground is soft, and your footsteps leave a rather bad impression as many poor seedlings are trampled underfoot. A safer place to admire the flowers lies to the north. A window to the south allows a view into the house.
There is no way into the house from here.
Mr. McNabb is here. He seems pretty angry about something.
That’s the gardener, Mr. McNabb. As the game kicks off he’s tending to the North Lawn, pulling weeds. He liked Mr. Robner — they’d “talk for hours” about gardening — but didn’t care much for any of the other residents of the estate, and says “I barely know which is which”.
McNabb will happily talk about gardening with you if you ASK MCNABB ABOUT ROSES, but will get upset if you’ve done a visible bout of squishing:
“I dinna give a hoot about you or your questions! Now, begone! Steppin’ all o’er me roses. A crime, it is! I’ll call the police is what!” He seems pretty angry.
If you wait until 9:59, he’ll move to the East Lawn. At around 11:10 he’ll shift to the Garden Path and start cutting flowers. If you keep hanging with him until 11:20:
All of a sudden, Mr. McNabb starts talking to himself quite loudly about his poor roses being ruined. He walks up to you and says “You canna believe the holes someone’s made. Crushed my roses. It’ll take me plenty a time to set it right. I just canna believe it!” He shakes his head dejectedly.
You can then request MCNABB, SHOW ME THE HOLES and he’ll lead you there. Since he’s leading he doesn’t get furious at you for entering the rose area, but rather:
McNabb grabs your arm and leads you to a spot deep within the garden and near the house. You might never have found this place alone. He points at the ground, where you see two holes in the soft earth.
The holes measure two by four inches and are three inches deep, rather like there was a ladder placed there! SEARCH HOLES yields nothing unusual, but SEARCH NEAR HOLES yields paydirt:
You are making quite a mess, but you do run across some tiny pieces of a hard, shiny substance, which drop from your fingers and back onto the ground.
I think I know what the substance is, but I’ll get back to that later. I think this is a good time to pause and talk about Deadline’s special commands, as I’ve already been using some, and there’s a lot of them.
…
Deadline essentially invented a large number of new “standard commands” wholesale.
ACCUSE (someone) OF (something)
ARREST (someone)
ARREST will end the game (if you have enough evidence) and show the result. I’m curious what possibilities (something) has other for accusing other than murder: theft, perhaps?
ANALYZE (something)
ANALYZE (something) for (something)
EXAMINE (something)
FINGERPRINT (something)
SEARCH (someone) FOR (something)
SEARCH NEAR (something)
Lots of analyzing and searching commands. If you ANALYZE an item, Sergeant Duffy (who otherwise doesn’t appear in the game) will come scoop it up.
>examine saucer
The saucer is hand-painted with a mythological scene. It has a couple of small areas of brown discoloration.
>test saucer for allergone
Sergeant Duffy walks up as quietly as a mouse. He takes the saucer from you. “I’ll return soon with the results,” he says, and leaves as silently as he entered.
Not every item can be tested, and sometimes an item can be too big or not portable (“With all respect, I don’t think I can take THAT to the laboratory!”). I oddly haven’t got a lot of hits from testing, although something important did come up once which I’ll mention shortly.
ASK (someone) ABOUT (someone or something)
SHOW (something) TO (someone)
SHOW ME (something)
WHAT’S WRONG?
WHERE IS (someone or something)
ASK was in Zork (kind of) but even it doesn’t get regularized until here. SHOW ME you got to see with the gardener; the fascinating thing with that command is I didn’t actually remember it was a special command, but just thought SHOW ME THE HOLES was the natural response to McNabb’s complaint, and the game responded appropriately.
TIME
WAIT FOR (someone or some amount of time)
WAIT UNTIL (time)
Also fairly novel; you had time play a small part in Warp, and a big part in Savage Island Part 1, but otherwise needing this level of control was unheard of in 1982.
…
In an alternate universe where I didn’t spend the entire span of gameplay goofing about outside:
>knock on door
You hear footsteps inside the house. Mrs. Robner, dressed in black, opens the door and greets you.
“Hello,” she says, “I’m Mrs. Robner. Please come in. I’m afraid I really can’t help you much. This is surely a terrible waste of time, not to mention upsetting, having all these police marching around the house. This has been a trying time, as I suppose you can understand. As I told Mr. Coates and the other detective, you may look around but you must be out by 8 o’clock at the latest. Oh, I almost forgot…Mr. Coates will be reading my husband’s will at noon in the living room. You may attend if you wish.”
Mrs. Robner leads you into the house and closes the door behind you.
One of the interesting aspects is why we have a deadline: here it is given to us by Mrs. Robner. It’s odd we agree to this given Mrs. Robner is one of the suspects.
I do think it fair to say the “case will be closed” so to speak if the day passes without an arrest (given the death already got declared a suicide) but the deadline of 8 pm still felt odd and casual.
The realism-issue with outdoors doesn’t happen in here: everything at right angles. It’s curious how spare and simple everything is, and how the game is quite willing to even toss “useless” rooms on the map just for geographic integrity.
Upstairs Closet
The closet is rather shallow and has some shelves full of assorted linens, towels, and uninteresting toilet articles.
Downstairs, the first place of interest is the Living Room, where the will is read at noon.
Living Room
This is a large and impressive room, whose furnishings bespeak the great personal wealth of the Robners. The south side of the room is a large bay window, now closed, which looks out onto the front yard. A wood pile sits beside a huge fieldstone fireplace. A double doorway leading to the main hall is the only exit. Pictures of Mrs. Robner’s colonial ancestors line one wall. The room contains formal seating for at least fifteen people, in several groups of chairs and couches. Tables and cabinets, all of the finest mahogany and walnut, complete the furnishings. On one of the tables is a telephone.
I already described the will-reading last time — the fortune is split evenly between the wife and son, and George seems rather happy. Despite filling in the details above I’m unclear if anything else is important. It feels like someone might have tried to burn something in the fireplace (…or will try in the future) but nothing came up from searches, and the tables and cabinets have no further description. The telephone is notable; at one point there’s a phone call for Mrs. Robner from an unknown voice on the phone (you can listen in as it happens on a different line). Even if you aren’t listening, Mrs. Robner goes upstairs to the master bedroom to resume the phone call. You can try to HIDE there but it doesn’t work (the verb is recognized, the game just says there’s no good hiding place) and listening at the door is too muffled (although the game lets you try!) The way to hear is to pick up the line while the call is in progress:
>listen to phone
You can hear Mrs. Robner and a man whose voice you don’t recognize.
Robner: “…much too early to consider it.”
Man’s Voice: “But we couldn’t have planned it better. You’re free.”
Robner: “Yes, but it will…Wait a second…I think…”
“Click.” You realize that the call has been disconnected.
While we’re at it poking at incriminating material, there’s also a letter that arrives during the day, that you can snag and read assuming you are fast enough (first time around, I put the letter back in the envelope and returned it to its original spot, and later it was gone).
“Dear Leslie,
I am sorry to learn that Marshall has been despondent again. His obsessive interest in business must be causing you terrible anguish. It doesn’t surprise me that he talks of suicide when he’s in this state, but the thought of the business going to Baxter after he’s gone will keep him alive.
So George has finally gone too far? It’s hard to believe, after all those empty threats, that Marshall actually followed through. It serves that little leech right, if you ask me. This means that, should the unthinkable happen, you will be provided for as you deserve.
I’ll see you Friday as usual.
Love,
Steven”
I’m not sure what to make of this; the phone call indicates a plan of some sort that was being carried out, but it would be to Leslie’s benefit if George was written out of the will (so her preference would for him to be dead after it was made, not before). Was it Steven on the other end or yet another third party?
There’s (unfortunately?) less incriminating material on the business partner, Mr. Baxter (although interestingly enough, you can show the letter above and he’ll tell you “this fellow is quite off base about the business”. There’s a pencil and empty writing pad at the murder scene where you can RUB PAD WITH PENCIL and get something of a message…
…but Mr. Baxter says he doesn’t know what it is getting at, and I’m unclear as well. I’m most interested in the line
plica y Focus s
where “plica” could be… replica? replication? I don’t know what would make sense in the context here.
Speaking of the murder scene, let’s visit up there now:
I’ve marked it in red.
This has the most complex description of the game.
This is the library where Mr. Robner’s body was found. It is decorated in a simple but comfortable style. Mr. Robner obviously spent a great deal of time here. A wide executive desk sits before tall balcony windows which lie at the north of the room. A telephone is sitting on the desk. The east side of the room is composed of three large bookshelf units containing numerous volumes on many topics. The floor is carpeted from wall to wall. The massive oak door which blocked the entrance has been forcibly knocked off its hinges and is lying by the doorway.
A pencil is lying on the floor near the desk.
Beside the desk is a large collapsible tray.
Sitting on the tray is a bowl containing a white powdery substance.
Alongside the desk is a wicker wastepaper basket.
The wastepaper basket contains:
A bunch of crumpled papers
Lying on the floor, overturned, is a beautiful saucer.
Turned onto its side, lying on the floor, is a beautiful teacup.
Lying atop the desk is a pad of white note paper.
A desk calendar is here, open to July 7.
There is a bottle of Ebullion here.
The desk calendar has a July 7 appointment listed with Baxter at 2 pm, and on July 8, after he died, he has listed a 9 AM appointment to “Call Coates: Will completed”.
The wastebasket has a shopping list, stock prices, and start of a letter to the Board of Directors of the Robner Corp which has no details at all.
The carpet has no visible stains but has mud leading from the balcony to the desk (remember the ladder holes, also).
The bowl with a “white powdery substance” is sugar (and as far as Duffy has found, nothing else).
What’s quite interesting is the cup and saucer. They both have brown substances but I haven’t found (from testing, again) anything other than tea. The fingerprints, on the other hand, were very interesting: the saucer and fingerprints from Ms. Dunbar (who delivered the tea, according to her testimony) and the deceased. The tea cup, which should also have fingerprints from both had … absolutely no fingerprints at all.
This was the first negative space clue. It suggested to me that this was a different tea cup than the one Ms. Dunbar delivered upstairs. Maybe the Ebullion overdose was delivered in the tea where the capsules were essentially dissolved in beforehand, and the tea cup was swapped to hide this fact from analysis?
Where this gets to be more of a homerun is the second clue, from the kitchen back downstairs.
Kitchen
This is the Robner kitchen, quite large and with a full complement of appliances and labor-saving devices. On one wall, a beautifully-crafted shelf unit contains rare china, a unique hand-painted family heirloom depicting scenes from Greek mythology. The china consists of many place settings of plates, teacups, and saucers. There are several cabinets which likely contain silverware, glasses, and the like. To the east is a pantry.
Not much here to prod at, still, and searching the china was no use, but I remembered back from my Zork I days that COUNT was a word Infocom knew about.
>count china
There are eight large and small plates, seven saucers, and six cups.
We should expect the same number of saucers and cups, but there’s a cup missing!
I think the substance at the bottom of the ladder may have been slight shards of cup, but I’m not so certain. Even without that, this was my most promising clue. Alas, I haven’t found much else yet of deep value. There’s a newspaper delivery at some point — it just mentions philanthropy work of Mr. Dunbar. I feel certain I’m missing things but most of the rooms in the game are genuinely minimalist, so it’s hard to find things to pick at. There are a couple medicine cabinets with potentially hazardous substances…
Mrs. M. Robner
Take 2 tablets every 4 hours as needed for allergy symptoms. Do not exceed recommended dosage.
Rash Labs / Allergone Tablets
May cause extreme drowsiness. Do not use machinery or drive while taking this medication. Combination of Allergone with alcohol is dangerous. In case of overdose consult a physician promptly. Keep out of the reach of children!
…but I haven’t detected any of them in what I’ve looked at so far. Maybe the missing cup is still on the property somewhere and I can test that? I thought perhaps the saucer residue might have a clue (since that wasn’t replaced like the cup) but none of the tests I ran came up positive.
I still have to rigorously track everyone’s schedules and see if any more items like the letter pop up, so I’m not ready for hints or the like, but I’m still somewhat skeptical I’ll be able to beat this one without at least a few nudges.