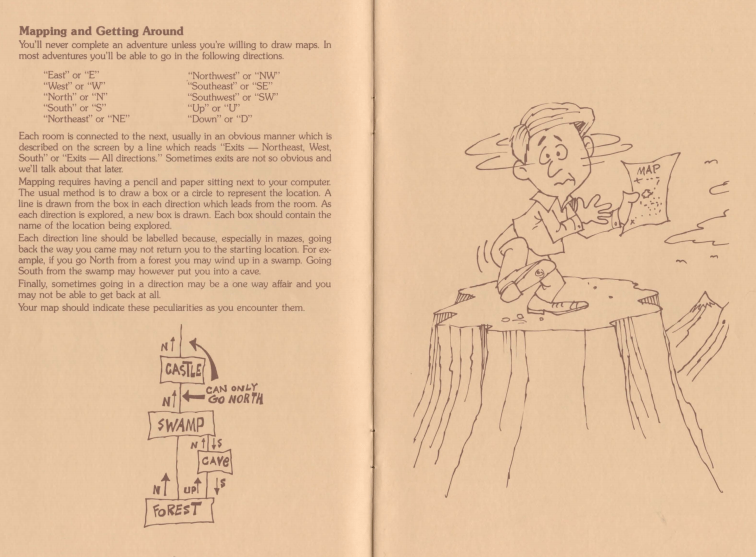
WELCOME TO ADVENTURING.
YOU’RE ABOUT TO LEAVE THE ORDINARY, EVERYDAY WORLD YOU INHABIT AND ENTER A NEW WORLD…A WORLD WHERE MAGIC WORKS AND THINGS AREN’T QUITE WHAT THEY SEEM.
–From the opening text of Birth of the Phoenix
Five years ago, the blogger Kevin Smith went through the bestseller lists appearing in the Apple II magazine SoftTalk (1980-1984) and gathered some data. Looking specifically at adventure game publishers by number of games charted, Infocom had the most at 10, Sierra On-Line had the second most at 5, and right behind them was Phoenix Software, with 3 games that made the bestseller list: Adventure in Time (1981), Sherwood Forest (1982), and Masquerade (1983).
If your reaction is, “Phoenix Software, who are they?”, indeed: I knew very little about them until several days ago when I let random.org pick my next game. This was Paul Berker’s first or second adventure game. (According to this interview he wrote Birth of the Phoenix first and used the source code to help write Adventure in Time, but his interview quote here asserts Adventure in Time came first. It’s faintly possible the order of writing was Phoenix-Time and order of publication was Time-Phoenix.)
The cover calls this a “Class 1 Tutorial Adventure” and as Mr. Berker himself states, “The reason we did Birth of the Phoenix was because there was no such thing as a beginner adventure game, most of them were awfully hard.”
The game came with a manual that feels like a genuine instruction guide. It has a “dedication” to “those of you who have never played adventure games. For all of you, the unique challenge of adventuring still lies ahead … the joys, the frustrations, and the ultimate solutions are just waiting for you to discover.”
The objective is to “help the Phoenix become reborn from the ashes of the old Phoenix.” (There are also a few treasures to collect and place in a Treasury for points. I think the idea may have been “lots of other games do this, and we want this to be a tutorial, so we’re going to include treasures so players know it is a thing.”)

I did finish fairly quickly (45 minutes or so) but I got stuck once on what appears to be an attempt to make sure the player read the manual.

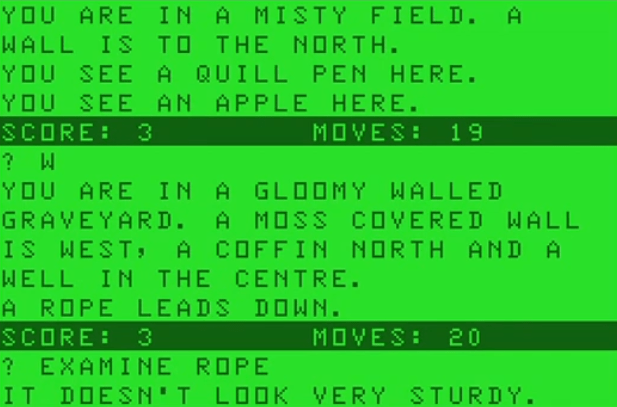
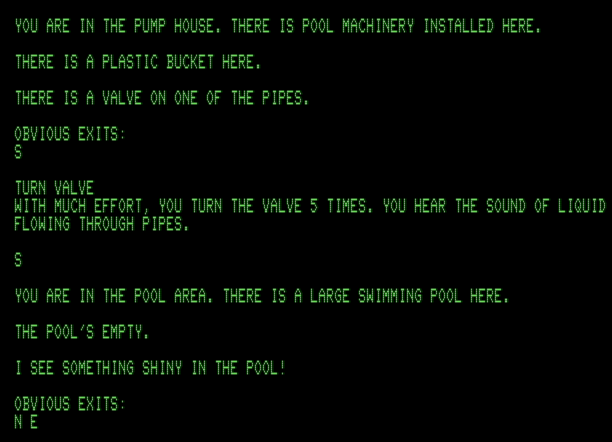
The opening rooms, as shown above, seem fairly straightforward — you need to climb a tree and go down a well and use a flashlight. However, past that there’s one combination safe…

…and a cliff that seemed to be just scenery.

Typing HELP at the safe just states “SEE PAGE 11 OF YOUR MANUAL.” At the cliff, “SEE PAGE 9 OF YOUR MANUAL.” I suspect this may have been an anti-piracy measure.*
I prodded at the manual until I found this comment, which clearly applied to the BOOK from the first room of the game:
In the case of a book or similar object be sure to also try “Open Book”. Then say “Read Book” and you may get an entirely different message. Also try “Turn Page” and then “Read Book” as there may be more than one message.
Grr. While this isn’t technically the first time I’ve been foiled by a book, the main issue here is it’s hard to know what READ BOOK really means in a particular game. Quite often it’s “skim through everything and glean out the one important passage”. Sometimes it’s “grab some text at random”. And here we are apparently only able to read a single page and keep flipping. (Surely this exact manipulation had to happen somewhere in 1980 or before for the author to want to include it here, but I don’t remember seeing it.)

Also, to continue the “which game came first” confusion, Adventure in Time gets referenced inside of Birth of the Phoenix.
I suspected (correctly) the chasm was the place to use the magic word PHOENIX, but only from prior adventuring experience. Checking the manual again I found the section “On Uttering Magic Words” with the line “Obviously we want to get across the cliff to the other side but there is no apparent way to do it.” Again this strikes me more of a test of reading comprehension than pure adventuring.

Here also is the safe combination; it probably isn’t clear to a beginner that the word PHOENIX works to travel back to the original side with the safe. (The safe just has some DIAMONDS for some points, so this might even be appropriate; you can also just start over and enter the combination before crossing the chasm because it doesn’t change.)

The other side of the chasm includes a KEY and a nearby CLOCK. You need to take the KEY to the CLOCK and WIND CLOCK, because otherwise shortly after the game ends.
TOO BAD, YOUR TIME HAS RUN OUT BECAUSE YOU’RE RUN DOWN
There is an obligatory maze, but for tutorial purposes, and there’s even a bag with a maze-mapping starter pack.

The maze contains the phoenix…

I thought the phoenix would be dead? You take the live phoenix, kill it, and then it’s alive again.**
…that you can capture it in a net and take to a TEMPLE OF THE SUN for a re-awakening.

So, not long and hard, but it’s definitely an odd time capsule of what someone thinks a beginner to adventure games circa 1981 needs:
- A puzzle with enough verb difficulties the manual is required
- A password said at an arbitrary place
- A mappable maze
- Treasures and a place to store them for points
- A puzzle with a time limit
The writing is more solid than I expected; this game is written for 48K machines (3 times the capacity of a Scott Adams game) and is able to luxuriate not only in writing in room descriptions but giving descriptions to every item.
YOU HAVE COME UPON THE INNER SANCTUM OF THE PHOENIX. ITS DEN IS VERY ANCIENT AND THERE IS A SADNESS IN THE AIR. THE SOUND OF DISTANT MUSIC CAN BE HEARD.
IN THE CORNER IS A NEST MADE FROM A FEW OLD LEAVES AND TWIGS.
A SLOW TRICKLE OF WATER RUNS DOWN THE ROCKS IN THE OPPOSITE CORNER.
The writing wouldn’t impress a creative writing workshop (cliché watch: the phrase “a sadness in the air” appears in 34100 Google results), but it was coherent and strong enough for me to get a real feel for environment and setting, enough so that I’m looking forward to Berker’s next (or previous) game, which I will be playing right after this one.
(*) According to Paul Berker lots of people he met in 1981 had played his previous games (like 3-D Space Battle) but nobody bought them. Quote from the Gallery of Undiscovered Entities coverage: “I had an office that was a converted garage about 24’x20′, done up really nicely inside, and we had some “pirate” parties there, which seemed pretty popular in those days. I had written the two games I mentioned above and found that was how most of the people I bumped into knew of me… they had pirated copies of those games. There was no copy protection on them, I had them in Ziploc bags and sold them out of my trunk to various computer stores I could drive to. There were some other computer vendors that sold a few for me as well.” ↩
(**) The phrase “won’t sit still long enough for me to examine it for you” is noteworthy in a theoretical sense; the player’s commands are asking the computer to implement them, but it’s also simultaneously still “you” in the world where things are happening, yet you are not seeing the phoenix with “your” eyes, since the computer has to relay the information. Analogy: imagine the player’s avatar in the world is a blind puppet being led by an invisible computer fairy, and the fairy can help move the player’s limbs and convey what they ought to be seeing. ↩
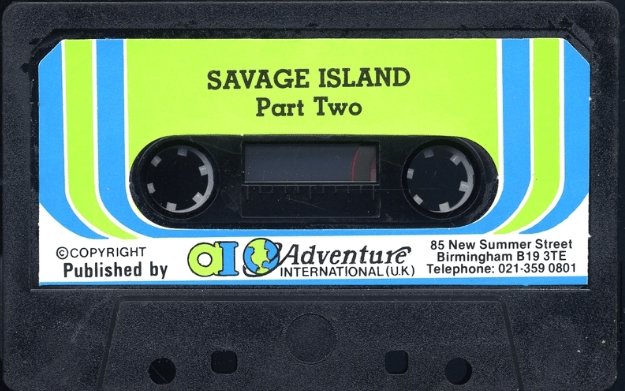
Savage Island Part 2 managed to have essentially no extraneous puzzles — each element is tied in with the plot. In this, it resembles Adams’s own game The Count from two years earlier (and not much else).
So why isn’t this game spoken of as well as The Count? Other than extreme difficulty, including one of the toughest starts of any game I know, there’s one puzzle that requires an action so absurd I combed through the source code trying to find a clue that I missed. I don’t think there was one.
There’s still some fascinating ideas here and a twist at the end I was not expecting.
I left off last time in a small control area. There were two consoles, one indicating it was used for landing, and the other with some gym equipment and an “atom”. I only realized I could LOOK ATOM after I used the console, but I might as well give a preview:
>READ DIALS
picture of T-shaped handle
picture of an atom
>LOOK ATOM
OK
it has 8 electrons

So this is the console that fixes the “vacuum” problem. The button does nothing, and the lever “won’t budge”.
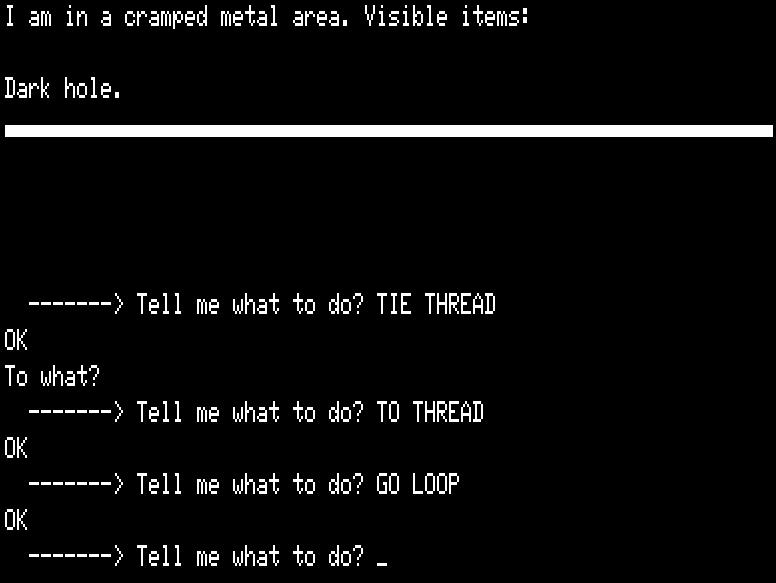
The gym, however, included a treadmill that I could go on and I was quite suspicious. I still couldn’t make any kind of connection into I noticed the BANDANNA I was still carrying around was described as having “metallic threads”. One PULL THREAD later and I had a “glowing metal thread”.
>TIE THREAD
OK
To what?
>TO TREADMILL
OK
>TIE THREAD
OK
To what?
>TO LEVER
OK
One hop on the treadmill later, and a RUN, and then… the game took me back in the control room like nothing happened. I had to peek at the hints here to notice that first typing HOLD RAILING while in the treadmill would make the whole setup work. (I had found this command previously, just I forgot about it.)
Having finished that, I assumed maybe something elsewhere in the ship changed and gallantly did GO FIELD:
Hurricane winds suck me into outer space!
I freeze to death!
Whoops! This is where I realized the function of the console; still progress, though!
But here, we hit the ludicrous puzzle. I’m not going to call it “ludicrously hard” because I think it falls outside the easy-hard spectrum. I just don’t know how anyone, anywhere found out how to do this.
The thread that I used to pull the lever, you see, is useful in another way.
>TIE THREAD
OK
To what?
>TO THREAD
This makes a “Meter loop of glowing thread”, where LOOK LOOP says “I see blackness in center!”
This is a portable hole.
Conceptually, wow, this is great! But could there have been some sort of clue that this worked?
Testing the hole in various places mostly yields the empty room shown above, except when testing it in the main control room.
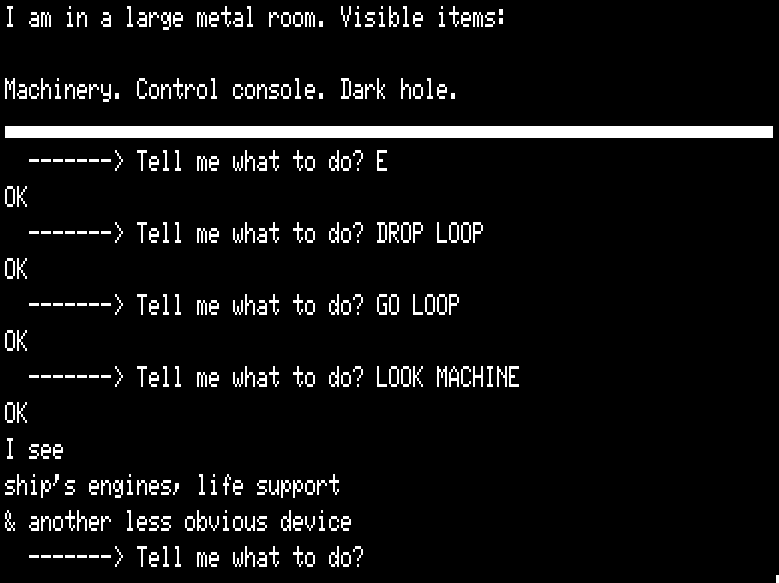
There are fortunately not that many rooms to test in order to find this. The console has a button that returns the ship to normal.
The same room also has an “alien device”; it has red and blue slide switches. Blue just gives a high pitched electronic whine, but red leads to
OK
alien voice says `FREEHJLLGFREEUYE`
Alert reader Lisa already theorized a recorder being helpful at the first console (the one originally in vacuum that requires a voice password). While the vacuum now isn’t a problem, remember the main character is still in Neanderthal form (and realistically or not, has diminished speaking capacity)! So the recording is useful anyways.
(You might wonder why I haven’t gone back and brain transferred back to Original Me yet — more on that later.)

The dials read “Timemachine set for 100,000 years in past and nearest planetary body” so I immediately realized what I needed to do — the console was operating the empty room the game starts out in and sending things back in time. The cube (just sitting right there) explodes after a small amount of time. I originally thought I had to defuse the cube, or put it in the right gizmo for power generation, but since I had a dinosaur problem…

…I nuked the dinosaurs. I’m sorry. It was me.
You can confirm the planet is now dinosaur free by checking the main control room and looking at the screen — no more closeups of dinosaurs. So now all that’s left to do is… hmm, what? The captain’s message mentioned ROBOPIRATE.
Some brute force portable hole searching later, I was able to drop into a metal storage hold the nuke was in:

The cases have “row after row of Neanderthal”. Here is where the blue switch from the alien device works…
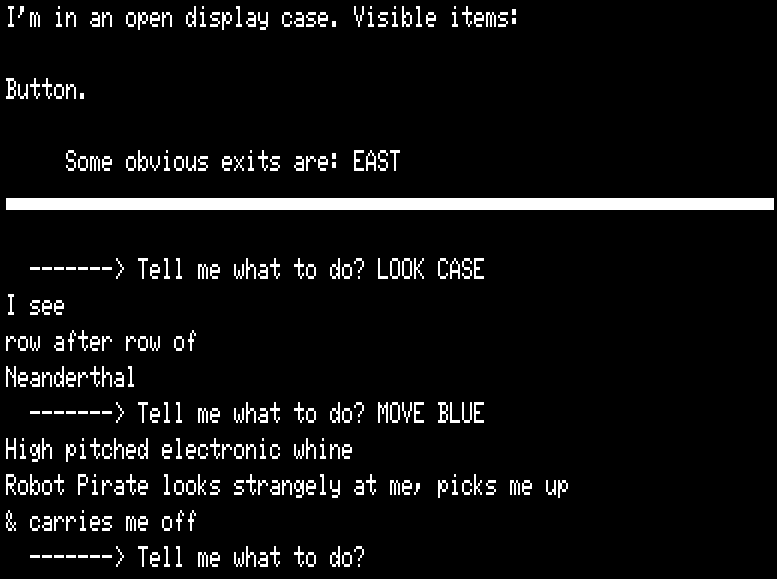
…which is only one step away from victory.

The “code” at the end is because the game is presumably pushing its character limit already. The game came with the ending text but with the lines mixed up; the code tells you what line to read in what order. Reconstructed, here is the full final message:
After resealing the wayward seed controller back in its case, the robopirate continues to execute its main programming.
Strangely, none of the master race are around, but the seed specimens are fine in the storage hold.
A strange looking creature is found wandering in the ship. Looking somewhat like the seed specimens, the robopirate decides to treat it as such and temporarily stores it away in the hold.
Continuing with its programming, the robopirate lands the ship on the blue-green planet it is currently orbiting. It then proceeds to hide the ship and rearrange the interior slightly. The engine and control compartment is separated and launched off into deep space. The seed specimens are then released from the display cases in the storage hold. The colony prospers and the strange specimen originally found wandering the ship becomes their chief.
Strangely enough, the chief’s offspring look more like him than they do his assorted wives!
Checking the planet the robopirate finds one lone wandering dinosaur. Being the last of its species, the robopirate stores it away in a now vacant display case.
All looks well and the robot closes the now hidden ship and powers itself off.
100,000 years pass and a timer reactivates the robot, which then goes to implement its final programming in the timeswap plan. The plan: make sure a current inhabitant is tricked into going back in time to eradicate the giant reptiles (for the robot is completely unable to harm or kill any living being.) Later, with a slight robotic chuckle, the robot realizes the strange twist of fate which awaits the specimen he chooses.
For it is obvious now that the Neanderthal sleeping in the display case these 100,000 years has the brains and personality of the chosen victim.
Yet it is the victim’s own genes which help launch the race of Man (after first ridding the world of the dinosaur!) Slayer of the dinosaur and father of all mankind, the world’s greatest hero now rests in the body of a prehistoric caveman. Who knows what great adventures await him in the future?
You may have noticed I didn’t talk about going back to switch brains. The console where PSYCHOTRANSFIGURATION happened does indicate pulling the lever will work for switching back, but there is no way in the game to pull the lever.
That means Original Protagonist is now in a Neanderthal body, and Original Me is now a Neanderthal, and at the end of Part 1 it was Neanderthal Original Me that sent (other) Original Me over to the ship by pushing the button.
That’s quite an ending — not necessarily pessimistic or bad for the main character, who has essentially saved the universe, but still life-changing in a way uncommon for the time — or, to be honest, even now.
…
Writing puzzles that are tough but fair is an extraordinarily challenging task in any system. Based on his own ad copy, Scott Adams clearly considered his adventures to be part of a set, and since the “easy” games were already taken care of with his earlier work, he was obliged to shoot for hard. (I don’t know about the difficulty of game #12, Golden Voyage, but that game is similar to Pyramid of Doom where another author did most of the writing and Adams just did some editing and polish.)
A question Mike Taylor raises is: just how much was he stymied by technical issues and the capabilities of the system? Nearly every puzzle is at least moderately difficult; for 1981 the conceptual idea of hopping between bodies and having one’s abilities change in the process was enough as is, and I think the only reason I had a smooth time over it was the benefit of years of videogame history where this sort of shtick recurs in many ways.
TIE THREAD TO THREAD doesn’t strike me as difficulty with verbs. Did the authors overlook putting a hint in the text? (Or maybe even: did *I* overlook a hint in the text?) Perhaps they did not have room for more text? Consider the ending text was all given in the manual for lack of space in the game itself. Once the portable hole is made the puzzle becomes semi-fair, especially since at the first use the player is restricted to a tiny area.
HYPERVENTILATE (which can also be BREATHE DEEPLY, but hunt-the-adverb is not much better than hunt-the-verb) is a fascinating case; I’m not sure how you’d indicate it even given the most blatant hintage and parser flexibility, yet the general idea — that you are “backing up” before exhaling, rather than doing a “standing jump”, is technically sound. If I was in charge of revising, I would probably take my editing pen and allow HOLD BREATH there — it’s a carry-over from the first game so not unreasonable, and it’s too easy for a player to be unclear what the real differences is between HOLD BREATH and BREATH DEEPLY.
Even when tools are capable of supporting a piece of complex world modeling, that’s not the same as making it easy and natural to do. It’s quite plausible to say Scott Adams was scratching at the very limits of his system here. And certainly, the forced tightness of the text itself cannot be forgotten; for 1981 home computers the very words themselves were at a premium.
Alas, I can’t say here we have a forgotten masterpiece (although Kim Schuette writing in 1984 calls it a “jewel”) but it’s certainly of strong historical interest and proof that in 1981 Scott Adams wasn’t quite done yet thinking about advancing the craft of adventure games.
I wrote quite a few text adventures in my youth, including one when I was about 7 or so which went something like: you were on the surface of Mars, which was also a maze. You found three colored buttons. If you pressed the wrong button, you blew up. If you pressed the right button, you went inside the planet to safety and won the game.
Let us just say I had the opportunity to save some of my old GW-BASIC source code, and declined.
The exception would be Night of the Vampire Bunnies, which I wrote when I was 10/11 (I believe I had my birthday somewhere mid-progress). There was a discussion of juvenilia on the rec.games.int-fiction forum and I decided to upload the thing, whereupon people have since treated it far more seriously than I would expect.
This includes a port for z-code which just appeared out of the blue one day — Patrick Kellum emailed me after the fact mentioning he had written it, and it includes a compass as well as a hint system.

We can add a second port to the pile, by the prolific Jim Gerrie. It’s for the TRS-80 MC-10 and allows more of a full retro effect.
The real damage done to Jason’s program, beyond condensing his descriptions, was that he had a fairly complex parser which I removed. It is clear that he did not simply use a standard existing two-word parser example program like “Tower of Mystery” from Compute’t Guide to Text Adventures (1984). He created his own unique system for parsing command input. He had a complex system for removing extra article words like THE and ON and TO. He had ways of breaking the sentences input not just into VERB NOUN, but also W1$ and W2$. He had the ambition to have his players type in more complete English sentences and then to try to parse the input into coherent instructions that could be handled by the program.
By the time I had written it, I was mainly playing Infocom games, so clearly a two-word parser would not do. However, there wasn’t anything in the game that seriously demanded the full parser, so the demake plays just fine.
While I’m mentioning Jim Gerrie, I’d like to point to two of his other ports: his version of Dave Kaufman’s Star Trader which is a seminal early 1970s game that is mostly forgotten today, and his port of Shoplifting Boy, the first stealth game, originally by Hiroshi Suzuki in 1979.
Okay, things got good.
They got good enough that I’m going to give fair warning about plot spoilers — if you’re genuinely wanting to play this (once you’re past the breath control stuff it gets better) you might want to veer away now. (You’ll need to have played the first game or at least read my own playthrough from last year. There’s an online BBC Micro version that runs well.)
Also, before I dig in, I realize I neglected in my first post to mention that Scott Adams has a co-author credit on this one: Russ Wetmore. A year later Mr. Wetmore went on to write the Frogger clone Preppie! for Atari computers. He’s still active to this day in software, just not in games.
I had previously been stuck in a small area with a PSYCHOTRANSFIGURATION device and a Neanderthal. The device is in a “red metal room” and it is next to another empty “red metal room”. I had been thinking (given the game’s description of the Neanderthal as a “non-transfigured controller”) that I needed to lure the Neanderthal over to the empty room and then start the device. The Neanderthal sometimes follows and sometimes lags behind (so the idea was technically sound) but unfortunately, I could never get them to step into the right room.
I eventually resorted to a hint (early, I know, but HYPERVENTILATE was enough to make me wonder if the rest of the game would be equally hard) and found out that the flower that smelled like a sedative could be smashed.
>SMASH FLOWER
sedated!
I feel
ASPHYXIATED
I am dead.
(I would normally use BREAK but that’s the BREATHE verb — the game understands the first four letters of each word as opposed to three as in previous Scott Adams games, but that’s still enough to cause overlapping. CRUSH works too.)
Fortunately, I had just undergone breath control boot camp and knew what to do next: HOLD BREATH (which you can do before releasing the Neanderthal) and then SMASH or CRUSH the flower while he’s in the room.
He’s then sedated, although trying to TAKE NEAN leads to “How? too large”.

I figured this out almost immediately after so I suppose it’s better at emphasizing the “weight” of the action over just GET, but I could still see someone getting unnecessarily stuck here by visualizing the PULL and GET actions as equivalent.
I deposited the Neanderthal in the empty room as I was theorizing, went to push the button, and got a different reaction than before.
OK
metallic voice whispers in my mind:
“Vocalize password Please”
I confess I had to reach for another hint. I’m slightly embarrassed by this one; I knew from the previous game I was already carrying over the bandanna, so I had the notion of carrying physical objects from Part 1, but it didn’t occur to me I might also need to carry information from Part 1. Here’s the relevant screenshot from that game:

The password here (FREE) was used in the previous game, but it also is used here. While I’m pulling out old screenshots, let me yank out one more which I’ll be referring back to.

Back to Part 2. Applying the password:
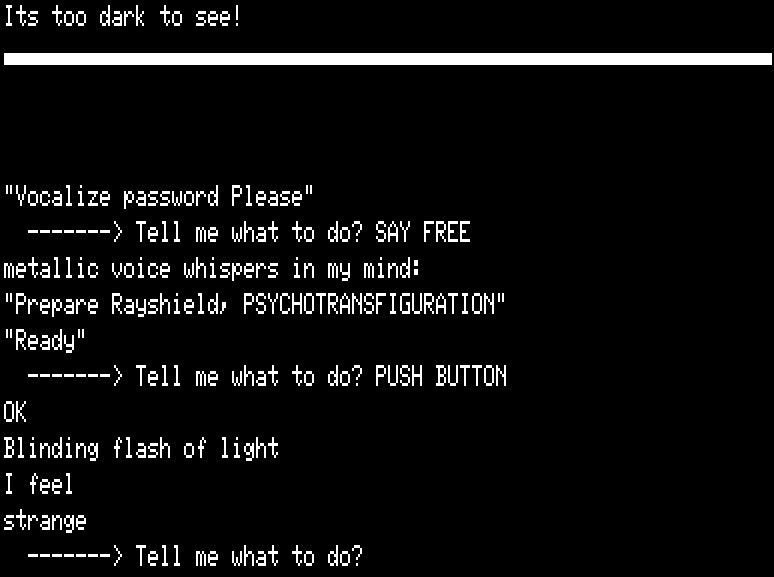
The “Rayshield” mentioned is the bandanna carried from Part 1; I was wearing it so I solved the puzzle by default, and found out what it was doing when I looked up the password puzzle.
It took me a few beats to realize PSYCHOTRANSFIGURATION was referring to brain transfer. You are now the Neanderthal.

And with one stroke, Adams/Wetmore pulled off what is likely the first change in player character for an adventure game. There’s still lots of 1981 to go, of course, but still, this was a jaw-dropping moment for me.
The Neanderthal can read the alien script on the dials. I assume the aliens genetically engineered the knowledge in.
>READ DIAL
strange
I can
read it!
“Pull lever to reverse Transfiguration Process”
The Neanderthal also has more lung capacity than the original character, and so can last in vacuum longer and make it all the way to the blinking-red-light force field.

There’s two “me”s going on now — the Me as the now-unconscious start character, and the “me” being referred to here.
The OPEN EYES needed when waking up as the Neanderthal trained me in knowing I could CLOSE EYES as well.
>CLOSE EYES
OK
Vacuum!
>GO FIELD
>OPEN EYES
OK
I am in a metal room. Visible items:
Force field. Control console. Treadmill. Large medicine ball. Freestanding punching bag.
I haven’t played much with the devices here yet. You can GO TREADMILL which leads to a “room” that I can’t get out of (I’m guessing parser trouble). PUNCH BAG busts the punching bag and leaves scraps of cloth; I’m going to try bringing it back to my original body and see what happens with it when I switch minds back and punch it there.
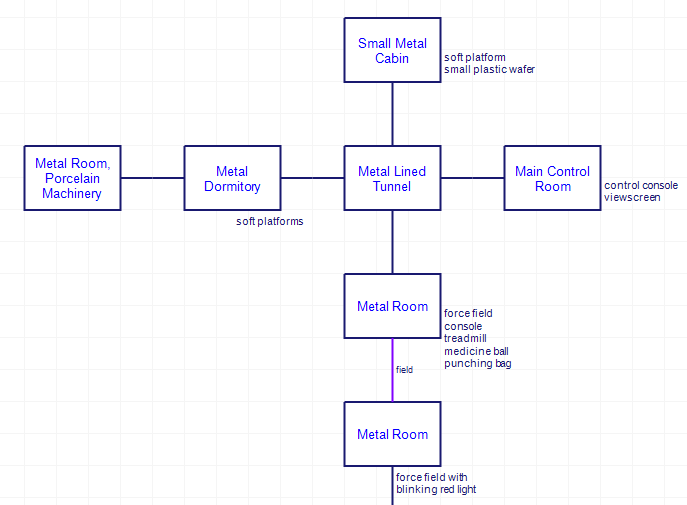
The rooms nearby (see map above) include a main control room…

…and a cabin with a “small plastic wafer” which was sufficient for me to realize the plot.

Let me summarize:
Aliens came to Earth to seed humanoids. In order to seed them, they needed to remove the dinosaurs first. A mutiny happened and the mission was never completed. Without the Neanderthal seed being placed on Earth, humanoids will never develop. Our hero was thrown back in time to the alien ship. If the alien ship is destroyed, there is a time paradox as a human destroys the method that humans exist in the first place.
(You can destroy the ship early on by picking up a “plastic block” which turns into a “GLOWING plastic block” and then: “EXPLOSION! Time paradox shatters reality”.)
This means our quest is to kill the dinosaurs, seed the first humanoids, and save reality.
I’m hoping I get to use the command >DROP METEOR later.
Also note the picture with “me” in on the cave wall from Part 1, or even the “Large stone head” from the very first room of Part 1:

Our hero has already been memorialized for deeds that they have yet to do!
I’ve chipped away some small chunks, leaving behind a mountain of dead protagonists.
To recap from last time: I started in a metal room; then went through a force field, into a vacuum, and died.
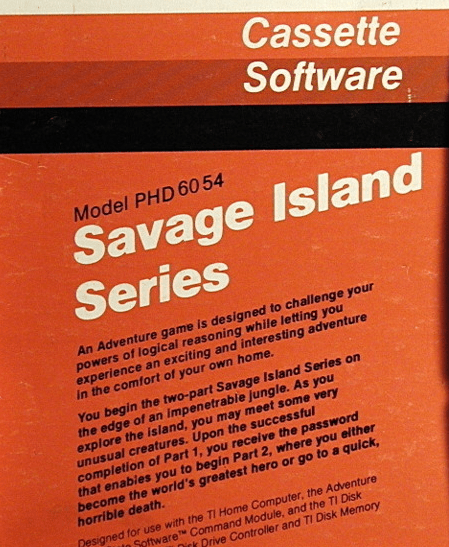
“…Part 2, where you either become the world’s greatest hero or go to a quick, horrible death.” Via Giant Bomb.
From Savage Island Part 1, I remembered HOLD BREATH worked. It “works” here too but rather than your lungs becoming a gooey mess you are ASPHYXIATED.
After some toying around I discovered EXHALE OUT was responsive.
Try: “BREATHE OUT”
(The game clearly understood what I meant: why not just parse it? The same issue came up with Cavern of Riches. I can understand trying to train the player in a system to make things easier, like Adventure letting the player know they can just type W rather than GO WEST after they’ve done it enough times, but this case was just an alternate phrasing.)
I found if I did HOLD BREATH, then stepped into Vacuum and did BREATHE OUT I could survive a little longer. Four turns, to be exact. Long enough to fiddle with the console to no avail (there’s a lever that won’t budge, dials with “alien script” and a button that asks for a voice command) but also to make it to another force field only to die.

If I could only survive just a little longer, I could make it through the second force field (and presumably to non-vacuum safety).
A lot of fiddling later and I remembered something I saw 30 years ago (!!) from Kim Schuette’s Book of Adventure Games. I was flipping through the back looking at hints for a different game but saw HYPERVENTILATE on one of the pages. I clearly thought it was absurd at the time and it stuck with me, because I remembered it here. (I’m not exaggerating on the number of years!)

Possibly the text adventure record for “most impressive verb required to beat the game”.
Then when I went in the force field and tried to BREATHE OUT, I was able to survive for an extra two turns in vacuum, long enough to get through that force field I was dying at previously.

The hydroponics hide a FLOWER where typing SMELL FLOWER says “I feel briefly sedated!”
The display case has a Neanderthal (like Part 1). If you push the button a voice tells you
WARNING – Non-transfigured controller of seed specimens has been released
and the Neanderthal follows you around, says Argh, and eventually hits and kills you if you hang out long enough.
North a bit there’s another console (again with buttons, dials, and a lever). The lever won’t budge on this console either, but the button has an impressive message:

That’s pretty much it for progress.
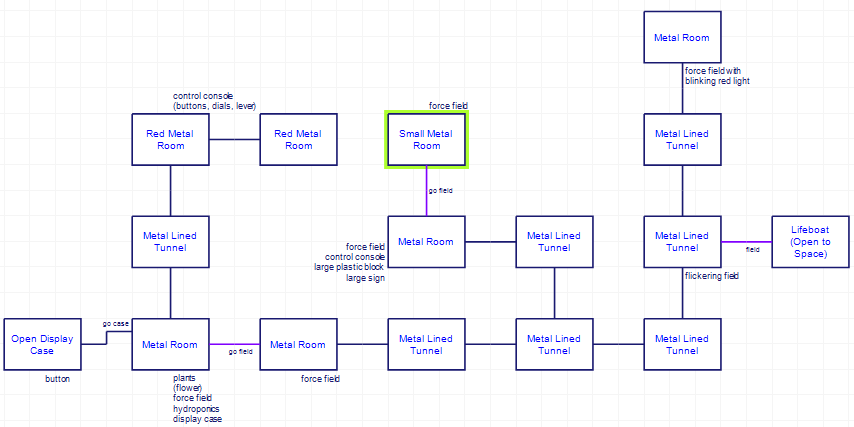
In addition to the hydroponics area, I was able to go to a lifeboat exposed to space, and jump to, er, freedom.

“Stop, stop! He’s already dead!”
There’s one more force field with a “red blinking light” but I don’t have enough air supply to get through (if it even will let me through without dying in some new horrible way).
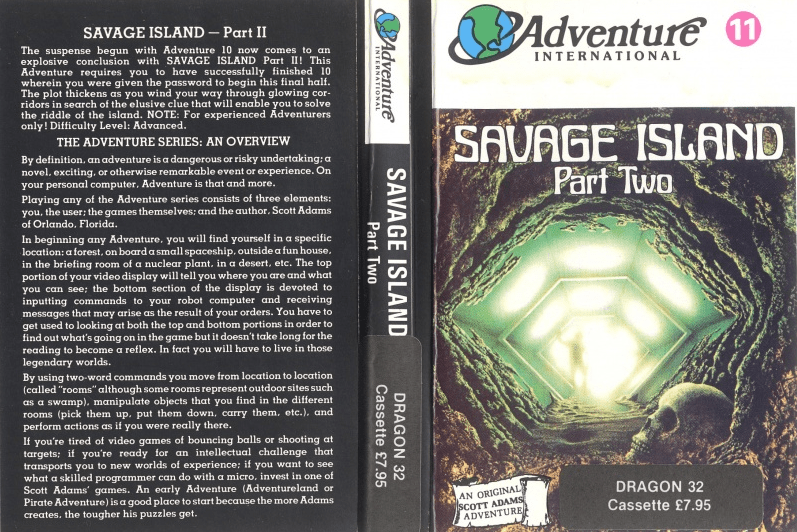
I did promise I would be posting about a new discovery, but it’s one of those where the writeup is very complicated (and requires some backstory that goes back to the 1960s) so I’m going to keep that on my back shelf and put forth my next 1981 game: the finale of a Scott Adams duology self-advertised as being very, very, hard.
A sign in the second room even touts this fact:
Compared to what you’re to go through, Part I was a piece of cake! Good Luck & Adieu
You can read my writeup for Part 1 (or I, or One) if you like, although the brief summary is: you start on an island about to be hit by a hurricane. You survive the hurricane and investigate a small nearby island to find a strange technological area, where finally a caveman comes and pushes a button causing you to get a password and the game to end.
That admittedly sounds bizarre written out, but I did think Part 1 managed a good atmosphere and sense of tension, with complex puzzle interlocking that required keeping track of both time and space.
…
The password I got was 123, and it does indeed work as advertised.
metallic voice whispers in my mind: ‘Vocalize password please’
>SAY 123
Flash of light I’m naked! except 1 item
Past this room is a room with buttons, dials, levers, and as the game insists, “Vacuum!”.
I am in a metal room.
Visible items:
Force field. Control console. Large plastic block. Radiant glowing neon sign.
You only have one turn before you die (“lungs explode in red bubbling ruin”). I don’t know yet what to do. So … good start!
Ok, I’m being glib, but there’s a spot of evil that happened before I even started. There are two passwords you can get from Savage Island Part 1. When I finished that game I happened to have a bandana which was still in my inventory, and I consequently receieved password 123; using it means I started Part 2 with the same item.
If you don’t have the bandana, you get a different password: 474. (I found this out by reading Gaming After 40’s playthrough; his final shot is of 474.) In the post I just linked to, a comment by none other than Scott Adams himself implies not having the bandana means you have already lost.
So: it’s possible to softlock Savage Island Part 2 before you’ve even started playing the game. I am in awe.
You’re a biologist and the only non-engineer among the spaceship’s crew. To make yourself useful, you volunteered for the cryogenic deep freeze experiment. You’ve been on ice for fifty years, the time it has taken the crew to fly to the newly discovered planet Xepa, where they are to capture an alien egg and return it to Hoboken for analysis. Your time is up. The freezer lid opens automatically. You leap out, eager to take center stage away from all those engineers. But wait … something’s wrong. A deadly silence replaces the normal hustle and bustle of the crew’s activity. The entire crew has mysteriously disappeared. Surrounded by clickings and whirlings of instruments about which you know nothing, you try not to panic. You kick yourself for passing up that flight instrumentation course in Waco, Texas so you could attend the est retreat in Tahiti. Nevertheless, you conclude your only recourse is to try to complete the mission yourself, Thus, you must figure out how to suit up, exit the spacecraft, capture a specimen and return it to the ship’s lab for analysis. You can worry about how to get back home later!
— From the manual for Alien Egg
APX (Atari Program Exchange) was a program Atari had designed to sell user-written software: “all APX software is written by and for people just like you.”
1981 was still a year where “user-written” doesn’t entirely make sense as a separate concept from just software, since quite a few of the things being published “normally” were random folks sending software to publishers; that is, exactly the same thing that APX describes. I’m hoping they paid fine and it wasn’t just a way to eke out extra product for less money (I have no evidence either way).
Alien Egg is one of two adventure games by Robert Zdybel (the other is Castle, also from 1981) and the first game we’ve seen for this project only available on an Atari computer. He did go on to a long career after (including making Warbirds for the Atari Lynx, arguably one of the best games for the system) and is still currently at Electronic Arts.
I’m not sure whether Castle or Alien Egg came first; they both show up in the Summer 1981 Atari Program Exchange catalog (along with four text adventures by other authors) so I just picked one at random.

As the opening text I quoted earlier implies, you are on a spaceship where everyone has mysteriously disappeared, and your job, rather oddly, is to ignore all that, and go on with the mission: to find and retrieve an alien egg.
I’m going to start from the positive end first: this game had a nice sense of attitude. We’re still in the era where a lot of games feel drained of humor (due to having to pack so much in so little) but the author here felt free to make the narrator into a character of sorts.

This is crossed with a sense of unresolved mystery.
This is where the rest of the crew slept before their mysterious and untimely disappearance.
There are several bunks against one of the bulkheads. All of the are neatly made and empty.
>U
CAPTAIN’S BUNK
This is where the Captain used to bunk before HIS mysterious and untimely disappearance.
Unfortunately, that’s about as far as my positive comments go. The parser was sheer suffering, and not necessarily for missing verbs. The verbs are even printed right in the manual.

Notice a complete lack of synonyms, like “TAKE” but no “GET”. At least the author was up-front about it.
No, the problem is the nouns.

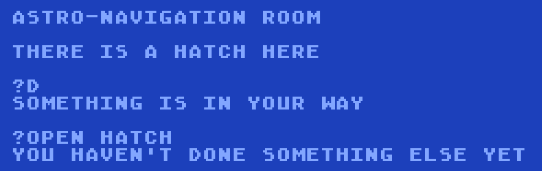
The right thing to type here is — and I wish I was joking — TAKE SPACESUIT. It only gets referred to that if you leave and come back (the room switches to displaying in “brief” style).

The messages are almost as unhelpful as possible. Going in a direction that isn’t open yet just gets “SOMETHING IS IN YOUR WAY” without further detail what that something might be.
This game does have a context-sensitive HINT command (good) which sometimes has funny easter eggs (also good)
but the HINT command also sometimes acts like an EXAMINE command, and the intent by the author almost seems like it’s intended people use it as much as possible.

…
OK, let’s backtrack and go over the plot. You start off in the Astro-Navigation Room with a mysterious HATCH that won’t open but access to most of a ship, and find a TRIBBLE, CAP, SPACESUIT, and LAMP.
There’s also a PAMPHLET which indicates aliens are afraid of tribbles, and a SIGN indicating “ACCESS TO SECURE AREAS CONTROLLED BY VOICE COMMAND”.
One of the secure areas is reasonable to find using a command on a nearby sticker, and yields a locked chest. Further exploration yields horribly being stuck, unless one happens to do HINT in the Crew’s Bunks.
The Captain’s Cap belongs in his cabin.
Dropping the CAP in the cabin opens a secret compartment that yields a RECORDER.

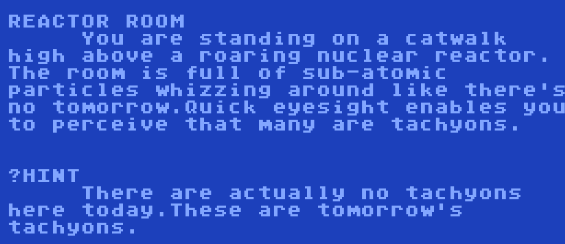
WARNER is good enough to enter a computer room.

With the glove you can then MOVE ROD in the Reactor Control Room to shut off the nuclear reactor. This lets you finally OPEN HATCH and get to the bottom part of the ship, and outside. In the bottom of the ship you can find a KEY that unlocks the chest from earlier, yielding a BLASTER.
Then you can get on the surface of the planet, apply your newfound blaster to get past a rock and into a cave, and softlock yourself because you went down a bottomless pit.
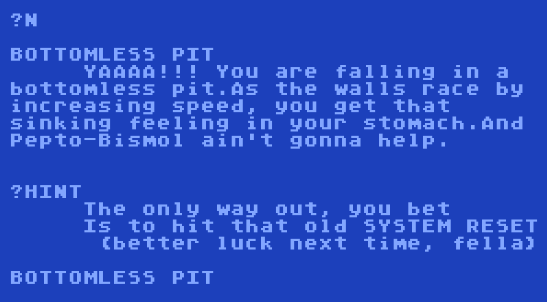
Oops! Playing everything over again (or reloading a save state because modern conveniences, yay) and going a different direction, you find an alien and the titular egg.

Taking the egg back to the Biology Room and dropping it leads to victory.

Of course, as the manual says, “You can worry about how to get back home later!” So, later is … now? Hello? Where did everyone go? Is there instructions for flying this thing?
…
I do appreciate the game, feels, hm, written. (Compare with Miser, which is almost unarguably a better game, but had to be so crisp in its prose it lacked character.) Narration with attitude still wasn’t common for 1981, so that was enough to carry me through. I just wasn’t a fan of suffering to communicate.

READ BOOK only works in the Billards Room (it’s a book on Zero-G Billiards, but you can’t read it elsewhere, because … ???).
(Bonus: just like Miser, this game doesn’t have an inventory limit either! Two in a row! When previously there were almost none! Weird how that happens.)

CURSOR was a “publication on tape” that ran from 1978 to 1981, distributing a small selection of programs every month with a one-page newsletter. It’s rather like CLOAD for the TRS-80 which we saw back with CIA Adventure, the difference being CURSOR was for the Commodore PET.

This is two screenshots side-by-side. The opening music is animated (shown on the left) and plays through the PET’s sound box.
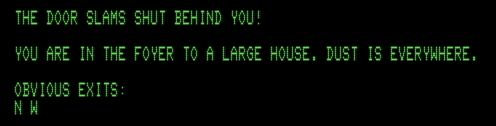
Miser appeared in the August 1981 issue. Credit in the printed material is given to Mary Jean Winter, although the opening screen of the game itself credits M.J. Lansing. (It’s likely she took the last name Winter on getting married.)

The text is all in short snippets, even shorter than the typical Scott Adams game (based on the source code, it seems to be intended to be playable on a monitor only 40 characters wide, although I used an 80-character width to play).

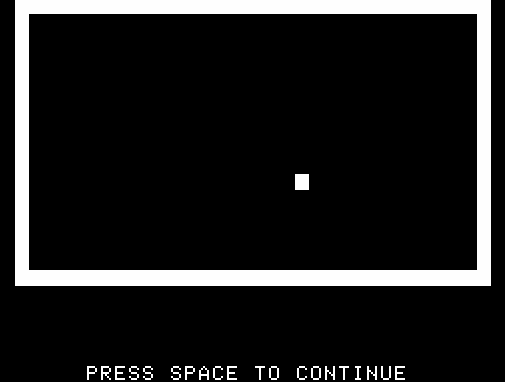
As you might be able to guess from the opening screen, this is Yet Another Moderately Spooky House. There are many adventures of this type
Mystery Mansion (Wolpert, 1978)
House of the Seven Gables (Hassett, 1978)
Haunted House (Arnstein, 1979)
Journey (Baker, 1979)
Mystery House (Williams, 1980)
Mystery Mansion (Hassett, 1980)
Haunted Mansion (O’Hare, 1980)
Mad Scientist (Hamlin, 1980)
Haunt (Laird, 1980)
The Secret of Flagstone Manor (Betts, 1981)
and this doesn’t even include the Spooky Castles (like The Count, Vampire Castle, and Dracula Avontuur).
While Crowther/Woods Adventure clearly set a fantasy treasure-hunt prototype for others to follow, there isn’t an obvious predecessor for Spooky Houses. It’s as if all the writers spontaneously arrived at the same idea. (The biggest seller on the list above was Mystery House, but that’s rather different than the other games; the emphasis is on mystery and not hanging out with ghosts.)
…
Upon entering the house, the door closes and locks behind the player, and they need to find an alternate method of exit.
What follows is a mostly straightforward treasure hunt. The author was clearly aiming at “easy” difficulty.
This isn’t necessarily a bad thing, especially given the limited parser (and when the parser was asked to stretch a bit, it clearly had trouble).
Trickiest was receiving the magic word “victory” with no clear place to use it, although I went with my most likely guess and got it right first try.

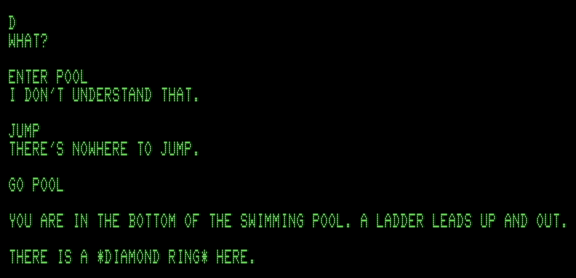
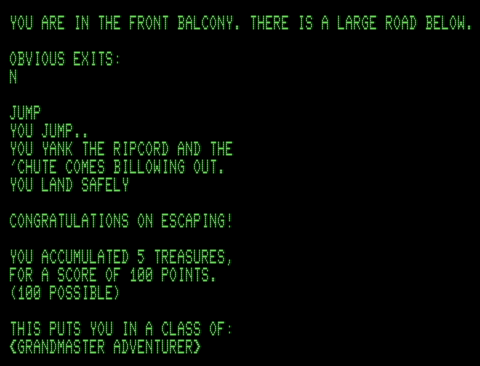
I liked this scene involving a ghostly organ

and the fairly colorful escape involving a parachute
(Aside: from what I gather it is impossible to use a parachute from the second floor of a house; according to The Internet which is always correct about everything the limit is 30 meters.)
…
For fun, let’s compare Miser with Flagstone Manor (the adventure from Australia I played recently), two games where it is almost guaranteed the authors never heard of each other.
1. Both have the door closing and locking with the alternate exit (Miser from above, Flagstone from below).
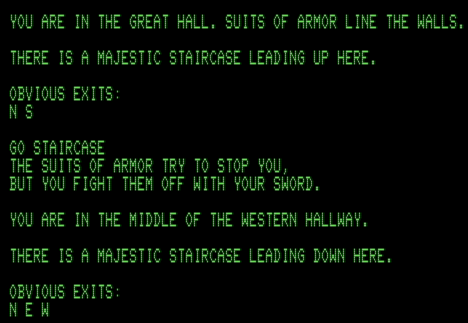
2. Both have “living armor”. Flagstone’s is deadly, Miser’s is just an obstacle.
3. Both have hidden exits, although Flagstone has quite a few more than Miser.
4. Flagstone has a safe with a three-number combination, Miser has a vault with a three-number combination.

There are still quite a few differences (Flagstone has the day/night system and only has one treasure to collect so doesn’t really count as a “treasure hunt”) but it’s fascinating to see a sort of “cultural convergence” of the Spooky House genre. I’m not sure what it is that made them seem like the ideal adventure spot (or even now seem like an ideal adventure spot) but multiple authors independently made what is clearly the same type of game.
…
One last note, in the department of “accidental innovation”: even though there’s lots of items and treasure hunting there is absolutely no inventory limit for this game. This is something I’ve kept a watch out for, assuming some author would just forget to code it in, but even the most broken games have had an inventory limit.
The lack of inventory limit may even be intentional because the game doesn’t let you drop treasures! I don’t believe Nellan is Thirsty had a limit either, but it also had a very small number of items.
Whether by being on purpose or by accident, unlimited inventory is one of those conveniences that eventually became standard for adventure games. 1981 is so early that even the most humble and straightforward of adventures can innovate.
Finis, 400 out of 400 points, cue fireworks. Spoiler warnings apply.
Before I discuss the game itself, I want to refer back to a point I made about Star Trek: 25th Anniversary.
You are given a score based on amount-you-followed-Federation-ideals when playing; ex: don’t randomly shoot aliens if you can help it. Sometimes there will be a dilemma where you *can* shoot past aliens to solve a particular puzzle. Maybe there’s another way? But if there is, you have to come up with a plan and enact it, there isn’t a morality button you can just press to do the right thing.
The idea hovers around my beef with modern “moral choice” games in that they lay out the options clearly on a platter, when in real life even working out what the options are is murky.
The finale of Zork II does something spectacular with moral choice.
Last I posted, I was stuck on a wall of ice and a dragon. The solution (which I did need to look up) was to combine the two. You can ATTACK DRAGON to annoy it and it will follow you, then ATTACK DRAGON again to keep it annoyed, until reaching:
Ice Room
This is a large hall of ancient lava, since worn smooth by the movement of a glacier. A large passage exits to the east and an upward lava tube is at the top of a jumble of fallen rocks.
A mass of ice fills the western half of the room.
As the dragon enters, he sees his reflection on the icy surface of the glacier at its western end. He becomes enraged: There is another dragon here, behind that glass, he thinks! Dragons are smart, but sometimes naive, and this one has never seen ice before. He rears up to his full height to challenge this intruder into his territory. He roars a challenge! The intruder responds! The dragon takes a deep breath, and out of his mouth pours a massive gout of flame. It washes over the ice, which melts rapidly, sending out torrents of water and a huge cloud of steam! You manage to clamber up to a small shelf, but the dragon is terrified! A huge splash goes down his throat! There is a muffled explosion and the dragon, a puzzled expression on his face, dies. He is carried away by the water.
When the flood recedes you climb gingerly down. While no trace of the dragon can be found, the melting of the ice has revealed a passage leading west.
Your sword is no longer glowing.
I was foiled somewhat by visualization issues. I assumed that the dragon was very large, too large to really follow after the player. (Or at least, the locations along the way were too small to let a dragon through.) It did cross my mind that dragon + ice would be very interesting, so I’ll still call this a failure on my part rather than the game’s. Can’t win them all.
…
Continuing the theme of failure on my part, my eternal nemesis of missing an exit returns.

Argh! The south exit isn’t even hidden, it is right there in the room description. It’s a fun puzzle, at least.
Dingy Closet
This is a dingy closet adjacent to a larger room to the north. Chiselled into a wall are these words:
Protected by
FROBOZZ
Magic Alarm Company
(Hello, footpad!)
There doesn’t seem to be any footpad here, however.
There is a robot here.
There is a beautiful red crystal sphere here.
>get sphere
As you reach for the sphere, a solid steel cage falls from the ceiling to entrap you. To make matters worse, poisonous gas starts coming into the room.
Cage
You are trapped inside a solid steel cage.
>robot, lift cage
The cage shakes and is hurled across the room. It’s hard to say, but the robot appears to be smiling.
I think there’s a potential parser meta-frustration in that it isn’t clear you can still communicate with the robot while in the cage. The general rule for CHARACTER, DO SUCH-AND-SUCH requires the player and character to be in the same room; the cage is technically “the same room” I suppose but that’s still a potential dodgy space. (The very first release of Zork II had even more parser trouble here; I played the last version, since the bugs in earlier versions are well-documented.)
…
Zooming back to the dragon, past where it originally lurked was a room with a princess.
Dragon’s Lair
You are in the dragon’s lair, where the rock walls are scarred by flame. A blackened doorway leads to the south.
A rotten old wooden chest is in one corner among the debris. A beautiful young woman, wearing a dirty and bedraggled gown, sits on a rock in the corner. Her hair is unkempt and she is oblivious to your presence, almost in a trance.
The princess walks all the way to the garden, befriends the unicorn, and rides off, leaving the key behind.
Shyly, a unicorn peeks out of the hedges. It notices the princess and seems captivated. It approaches her and bows its head as though curtseying to her. Around its neck is a red satin ribbon on which is strung a delicate gold key. The princess takes the ribbon and uses it to tie up her hair. She looks at you and then, smiling, hands you the key and a fresh rose which she plucks from the arbor. “You may have use of such a thing,” she says. “It is the least I can do for one who rescued me from a fate I dare not contemplate.” With that, she mounts the unicorn (side-saddle, of course) and rides off into the gloom.
Your sword is no longer glowing.
So that’s another puzzle solved without any extra effort on my part — the puzzle I was stuck on really was the hinge for quite a few things.
…
Past the ice wall is a volcano which I remember from Zork mainframe.
Volcano Bottom
You are at the bottom of a large dormant volcano. High above you light enters from the cone of the volcano. The only exit is to the north.
There is a large and extremely heavy wicker basket here. An enormous cloth bag is draped over the side and is firmly attached to the basket. A metal receptacle is fastened to the center of the basket. Dangling from the basket is a piece of braided wire.
Part of the way up the volcano is a box which requires explosives to open.
Dusty Room
You are in a dusty old room which is featureless, except for an exit on the north side.
Imbedded in the far wall is a rusty box. It appears to be somewhat damaged, since an oblong hole has been chipped out of the front of it.
>examine hole
The oblong hole has been chipped out of the box, probably by someone wanting whatever is inside the box. The attempt was a pathetic failure, however.
Flying even higher leads to the most colorful death in the game.
The balloon floats majestically out of the volcano, revealing a breathtaking view of a wooded river valley surrounded by impassable mountains. In a clearing stands a white house. You drift into high winds, which carry you towards the snow-capped peaks. Oh, no! You crash into the jagged cliffs of the Flathead Mountains!
Honestly, even though I didn’t remember it from before, the volcano was straightforward and fun, which was a relief after banging my head on everything else.
…
Getting the key from the unicorn led me into the Wizard’s Lair, and the endgame.

From the Zork User Group map again. Unlike the later Invisiclues version, there are drawings of the characters, including the sea serpent shown that I will discuss shortly.
The centerpiece is a “wizard’s Workroom” with “three stands – ruby, sapphire, and diamond – which form a triangle.”
I realized immediately the spheres would be useful. I had a red sphere already (for the ruby stand) and a blue sphere (for the sapphire stand), but the third sphere was still elusive. I knew from seeing it on the other side that it was a “blurry” scene, and I also knew I had mostly exhausted the Zork II map otherwise, so it led me to zero in on an aquarium in the Wizard’s habitat.
Aquarium Room
Here a dark hallway turns a corner. To the south is a dark room, to the east is fitful light.
Filling the northern half of the room is a huge aquarium.
The aquarium contains:
A baby sea serpent
Breaking the aquarium revealed a “clear sphere”. The first time around I had to die in the process.
>break aquarium with sword
The elvish sword shatters the glass wall of the aquarium, spilling out an impressive amount of salt water and wet sand. It also spills out an extremely annoyed sea serpent who bites angrily at the elvish sword, and then at you. He is having difficulty breathing, and he seems to hold you responsible for his current problem. He manages to rend you limb from limb before he drowns in the air.
I guess you were too careless.
Upon resurrection I walked back to find the sphere, so I knew I was on the right track. (Technically I could have kept going and finished the game, just with a reduced score.) A reload and a little thought later led me to throwing the sword rather than swinging it.
>throw sword at aquarium
The elvish sword shatters the glass wall of the aquarium, spilling out an impressive amount of salt water and wet sand. It also spills out an extremely annoyed sea serpent who bites angrily at the elvish sword, and then at you. He is having difficulty breathing, and he seems to hold you responsible for his current problem. He tries to slither across the stone floor towards you. Fortunately, he expires mere inches away from biting off your foot. A clear crystal sphere sits amid the sand and broken glass on the bottom of the aquarium.
Poor baby sea serpent! But I had the third sphere.
As you place the clear crystal sphere in the diamond stand, a low humming noise begins, and you can feel the hairs on the back of your neck begin to stand up. The three spheres begin to vibrate, faster and faster, as the noise becomes higher and higher pitched. Three puffs of smoke, one red, one blue, one white, rise up from empty stands. The spheres are gone! But in the center of the triangle formed by the stands is now a black stand of obsidian in which rests a strange black sphere.
…
I was right that the demon from the afterlife was to come into play in the endgame. The black sphere I obtained from the previous scene went in a black circle nearby.
A cold wind blows outward from the sphere. The candles flicker, and a low moan, almost inaudible, is heard. It rises in volume and pitch until it becomes a high-pitched keening. A dim shape becomes visible in the air above the sphere. The shape resolves into a large and somewhat formidable looking demon. He looks around, tests the walls of the pentagram experimentally, then sees you! “Hmm, a new master…” he says under his breath. “Greetings, oh master! Wouldst desire a service, as our contract stateth? For some pittance of wealth, some trifle, I will gratify thy desires to the utmost limit of my powers, and they are not inconsiderable.” He makes a pass with his massive arms and the walls begin to shake a little. Another pass and the shaking stops. “A nice effect… I find it makes for a better relationship to give such a demonstration early on.” He grins vilely.
This is a lovely way to justify treasure-hunting — arguably the best I’ve seen. The demon demands treasures, and it happens to be all the treasures available in the world of Zork II. He helpfully tells you when you’re getting closer to the right number. Fortunately, I had already found all the treasure by this time, so I got to move on to being able to control the demon.
>give violin to demon
“This will do for my fee. ‘Tis a paltry hoard, but as you have done me a small service by loosing me from this wizard, it will suffice.”
>demon, kill wizard
The demon grins hideously. “This has been my desire e’er since this charlatan bent me to his service. I perform this deed with pleasure!” The demon forms himself back into a cloud of greasy smoke. The cloud envelops the Wizard, who waves his wand fruitlessly, mumbling various phrases which begin with “F”. A horrible scream is heard, and the smoke begins to clear. Nothing remains of the Wizard but his wand.
The genie departs, his agreement fulfilled.
Satisfying! The wizard leaves behind his wand, which led me to resolve one of the last lingering puzzles.
>wave wand at menhir
The wand grows warm, the enormous menhir seems to glow dimly with magical essences, and you feel suffused with power.
>say “float”
The wand glows very brightly for a moment.
The menhir floats majestically into the air, rising about ten feet. The passage beneath it beckons invitingly.
The “F” was a pretty good hint signal that I needed to wait until I could cast spells, so I didn’t waste much time at the menhir before this. Good job, Blank/Lebling. (This is somewhat canceled by the syntax being finicky — you have to put “float” in quotes.)
Behind the menhir was a dog collar, which I could take to the final stretch: nearby is the oddly-angled room maze I’ve already discussed in depth, and past that is a room with a Cerberus.
Cerberus Room
This is the entrance to a huge crypt or tomb. A marble stairway leads up from a gateway arch.
There is a vicious-looking dog guarding the entrance. It is more or less your usual dog, except that it has three heads and is the size of an elephant.
I had a slight hiccup here because I first typed GIVE COLLAR TO DOG
>give collar to dog
The huge dog snaps nastily at you.
and assumed that meant I couldn’t put it on him.
>put collar on dog
The creature whines happily, then the center head licks your face (which is roughly like experiencing a sandpaper washcloth). The other two heads look about, as though the monster felt a sudden need to find a pair of slippers somewhere. Its huge tail wags enthusiastically, knocking small rocks around and almost blowing you over from the breeze it creates.
>pet dog
The dog is now insanely happy, slobbering all over the place and whining with uncontained doggish joy.
Confirmed: In Zork II you can pet the dog.
Past the Cerberus was a crypt and the final challenge.
Crypt
The room contains the earthly remains of the mighty Flatheads, twelve somewhat flat heads mounted securely on poles. While the room might be expected to contain funerary urns or other evidence of the ritual practices of the ancient Zorkers, it is empty of all such objects. There is writing carved on the crypt. The only apparent exit is to the north through the door to the anteroom. The door is open.
>read crypt
“Here lie the Flatheads, whose heads were placed on poles by the Keeper of the Dungeon for amazing untastefulness.”
I have heard report if you let your lamp run out (and have enough points overall) the Wizard casts “Fluorescence” on you and causes you to permanently glow. That’s great for getting close to the end, but robs you of final victory, because here you need the lights off.
>turn off lamp
The lamp is now off.
It is dark, but on the south wall is a faint outline of a rectangle, as though light were shining around a doorway. You can also make out a faintly glowing letter in the center of this area. It might be an “F”.
>open secret door
The secret door opens noiselessly.
>light lamp
The lamp is now on.
>s
Landing
Beyond the door is a roughly hewn staircase leading down into darkness. The landing on which you stand is covered with carefully drawn magical runes like those sketched upon the workbench of the Wizard of Frobozz. These have been overlaid with sweeping green lines of enormous power, which undulate back and forth across the landing. The wand begins to vibrate in harmony with the motion of the lines. You feel yourself compelled downward, and you yield, stepping onto the staircase. As you pass the green lines, they flare and disappear with a burst of light, and you tumble down the staircase!
At the bottom, a vast red-lit hall stretches off into the distance. Sinister statues guard the entrance to a dimly visible room far ahead. With courage and cunning you have conquered the Wizard of Frobozz and become the master of his domain, but the final challenge awaits!
(The ultimate adventure concludes in “Zork III: The Dungeon Master”.)
Sweet, sweet, victory. But I wasn’t done yet.
…
I started this post off with the title The Death of a Wizard trying to parallel my Zork I finish with The Death of a Thief. As I got typing, I started to wonder: do you really need to kill the wizard? There isn’t much left in the game after he’s eliminated.
Yes, it is indeed possible to avoid killing the wizard; you can ask the demon to get his wand for you instead.
>demon, give wand to me
“I hear and obey!” says the demon. He stretches out an enormous hand towards the wand. The Wizard is unsure what to do, pointing it threateningly at the demon, then at you. “Fudge!” he cries, but aside from a strong odor of chocolate in the air, there is no effect. The demon plucks the wand out of his hand (it’s about toothpick-size to him) and gingerly lays it before you. He fades into the smoke, which disperses. The wizard runs from the room in terror.
(!!) The rest of the game proceeds as mentioned above. You are still told your courage and cunning helped you “conquer” the wizard but note that’s different than “killing” him.
This was a moral choice without even announcing a moral choice was happening. Again: when I first finished, I thought DEMON, KILL WIZARD was the only solution. All that really needed to happen is the removal of the wizard as a threat (the wand he uses).
This could have gone the other direction in terms of hidden choice. Both Jimmy Maher and Joe Pranevich asked for the wand on their playthroughs; it appears it never occurred to either one to just request that the demon kill the wizard.
What makes the ending even more fascinating is a third moral choice, but what turns out to be a wrong one. You can ask the demon to GET MENHIR, bypassing needing the wand to get the collar. This is enough to get you right to the end, where you fail in spectacular enough fashion I’ll quote the whole thing.
Landing
Beyond the door is a roughly hewn staircase leading down into darkness. The landing on which you stand is covered with carefully drawn magical runes like those sketched upon the workbench of the Wizard of Frobozz. These have been overlaid with sweeping green lines of enormous power, which undulate back and forth across the landing. The green curves begin to vibrate toward you, as if searching for something. One by one your possessions glow bright green. Finally, you are attacked by these magical wardens, and destroyed!
**** You have died ****
Now, let’s take a look here… Well, you probably deserve another chance. I can’t quite fix you up completely, but you can’t have everything.
Room of Red Mist
You are inside a huge crystalline sphere filled with thin red mist. The mist becomes blue to the west.
You strain to look out through the mist…
You see only darkness.
>w
Room of Blue Mist
You are inside a huge crystalline sphere filled with thin blue mist. The mist becomes white to the west.
You strain to look out through the mist…
You see only darkness.
>w
Room of White Mist
You are inside a huge crystalline sphere filled with thin white mist. The mist becomes black to the west.
You strain to look out through the mist…
You see only darkness.
>w
You follow a corridor of black mist into a black walled spherical room. The room is empty. A huge face looks down on you from outside and laughs sardonically. It doesn’t look like you’re getting out of this predicament!
Your score would be 360 (total of 400 points), in 516 moves.
This score gives you the rank of Master.
Killing the wizard works, disarming the wizard works, but the moral choice of ignoring the wizard means he gets you in the end (you need his wand to get by the magical traps).
Now, I fully acknowledge there’s a game design issue here when nobody notices the choices available even after the fact (this could be alleviated by some more specific ending text) but this is still far more advanced plotting than I would have expected in 1981.
How does this compare with Zork I? The first game had a much tighter geography with multiple methods from the underground back into the house, and I still found the thief superior to the wizard. I could believe Zork I’s sprawl was a real environment, whereas Zork II’s hub structure felt like a loosely connected set of mini-areas (even though there were some crossover elements, like the princess walking all the way to the garden). And while Zork I had some frustrations (like the egg) Zork II trumped them (including two puzzles that live in infamy today).
So if I was applying numerical ranking, sure, Zork I would score higher, but Zork II’s intent was rather different; being meant more as a blanket challenge for those sturdy enough to beat the first game, with less attention paid to geography but more coherence behind needing a treasure hunt. For what it tried to be, it succeeded, and is still worthy of the Infocom library.
…
I haven’t fully decided what I’m playing next, but sometime next week I will show off another discovery I’ve unearthed not chronicled on any gaming site: a missing branch in the chain of adventure game history.
I was planning on doing some save file hacking and finding out what was at the missing corner of the map.

Although I worked out the exact space on the disk that stores the location of the player (00011e01 if you’re curious), I think it’s possible the corner just doesn’t have a location at all. Immediately below the corner is FF 01, and immediately below that is FE 01. (This is in hexadecimal, so FF is the largest possible number; 255, one byte.) You would think based on the pattern the next value would be either 00 02 or 01 02, but modifying the save file to that number just puts the player somewhere random.
I should incidentally say “below” because my map is technically upside down; there’s an automap in the game (not a very helpful one) and I realized only about 3/4 in I was out of synch.
That is, the upper left corner on my map is the lower right corner on the screenshot.
It ends up not affecting anything unless there’s something literal about the map placement.
Speaking of map placement, Casey Muratori made an interactive version of the map. You can click on a square and have the corresponding clue come up.
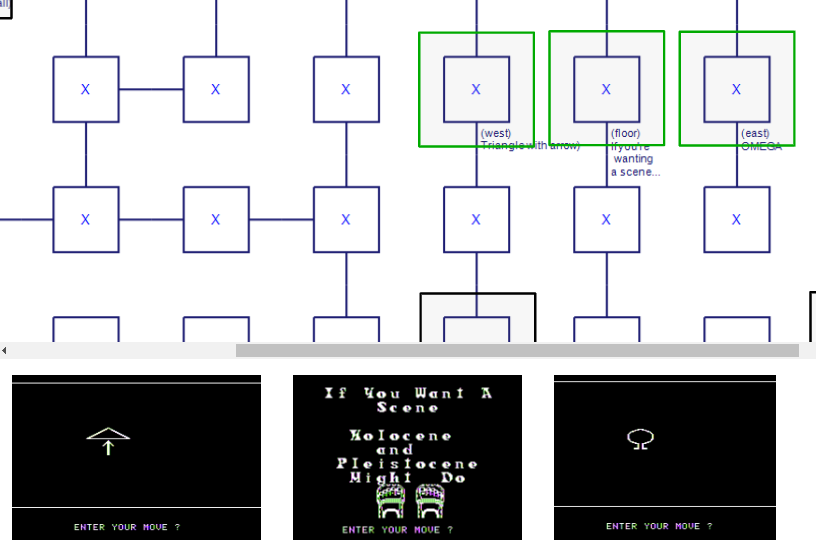
I have no idea if these being adjacent is significant. I have been running the theory the middle clue refers to the DC Natural History Museum.
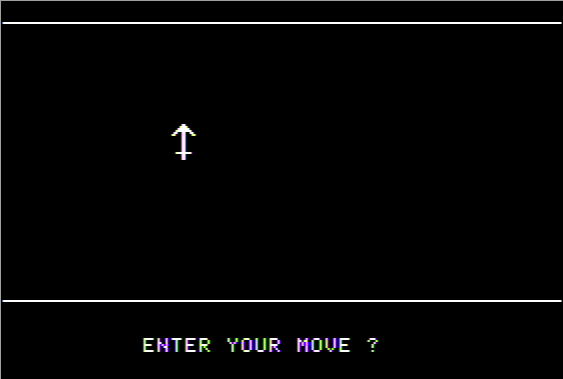
The thing I’ve previously noted as an “omega” symbol might just be a picture of a tree. It’s drawn imbalanced for an omega.
I wish I had more to update on; the only “solving” I did was realizing “DENVER/10” has a good chance of meaning “a tenth of a mile” (Denver being the Mile High City). I originally tried zip codes, phone codes, and all sorts of shenanigans before it struck me as likely a distance, but of course I have no confirmer to work with yet.
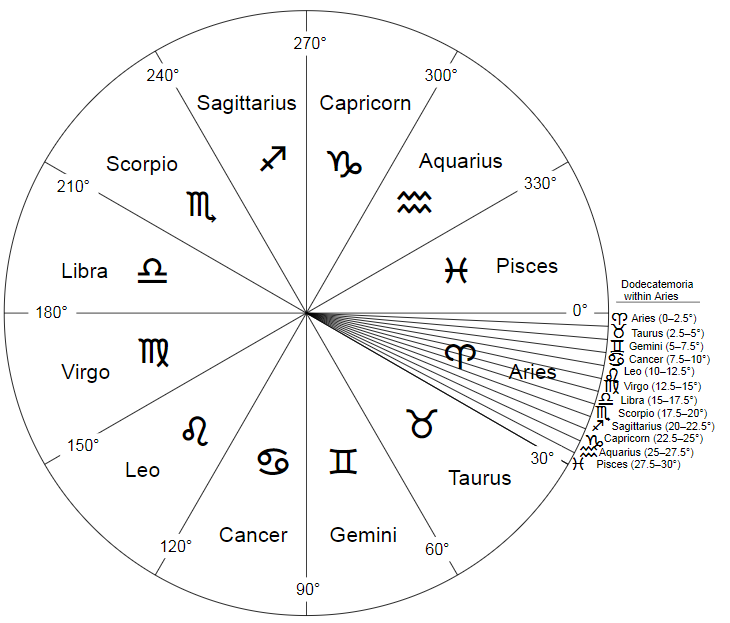
I might as well throw out the Zodiac angle-thing I’ve hinted at possibly being relevant.
There’s been a direct reference to Aquarius, and a symbol that looks like Sagittarius (although turned on its side).
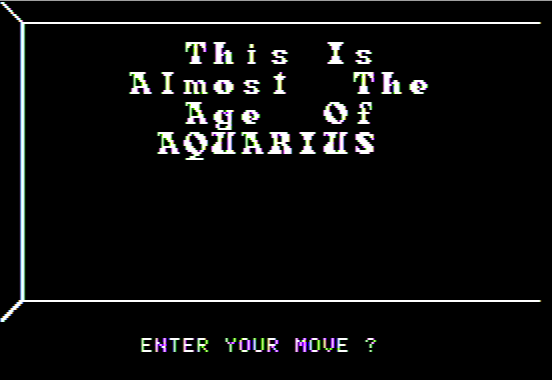
My theory is an angle is indicated somehow by combining the two, but unfortunately, astrology charts are all over the place and there doesn’t seem to be a consistent “up/down/left/right” to the angle chart shown above. I can say potentially the “avoid winter” hints indicate we want Sagittarius
to be the primary symbol (Aquarius starts in February, Sagittarius starts in November) but again, this is flailing without some kind of confirmation.
So I mainly have nothing at all to report, but Casey’s map is so slick you really should give it a look. I’m still keeping an eye on this one and will do at least one last stab with a mad-conspiracy-theory style chart with lots of arrows.


