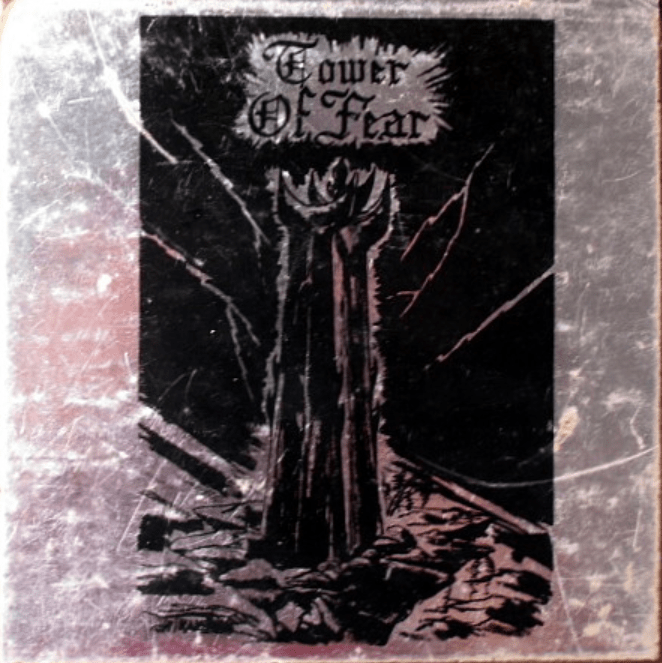
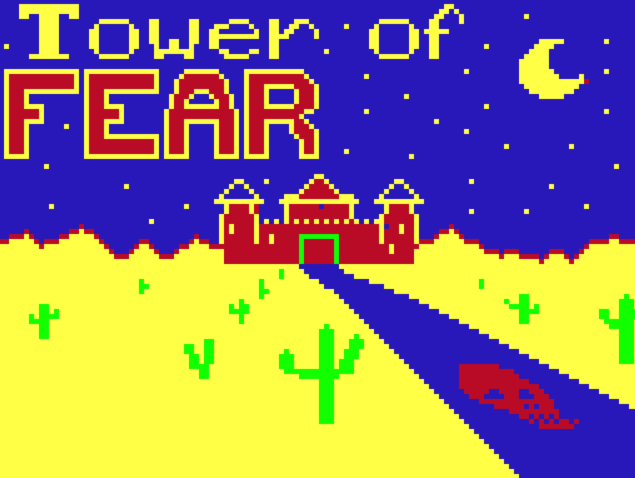
The cover art and the plot as given on the back of the packaging (from the Museum of Computer Adventure Games) are both kind of metal, and they suggest — nay, demand — the plot be read out loud. So I have done so. Enjoy my dramatic rendition of the introduction to a TRS-80 adventure game written by a high school student.
(There should be an embedded recording with a “play” button above. If you’re not seeing it, try clicking here to listen.)
Deep in the Graylock outback, in the mists of pre-time, dwelt THE WIZARDS, a race not native to this simple place, a race of powerful necromancers, whose awesome prowess at magic caused rampant terror in every heart that dared contemplate them.
As the years marched by, they each individually succumbed to the ravages of death. Some, who were the most powerful among their peers, forstalled the shadow-journey by barring themselves from the sunlight and the eyes of time, in huge towers, islands of life in the barren desert. By surrounding themselves with magic, they, for a time, held off death. But the reaper claims all, so he claimed each of The Wizards in his turn.
The last of these would-be immortals, BLACKHEART FIRETHROWER, so named through proficiency with flameballs, built a fortress so awesome as to earn a reputation of Widowmaker to the Kings Many tried to conquer it, to dispell the dred CYCLOPS, to penetrate its inky interior and remove its secrets and treasure. None returned. Kings and paupers all perished in its traps and corridors.
So the Wizard’s Tower, last of the surviving fortresses, and catacomb to the omnipresent undead spirit of BLACKHEART FLAMETHROWER, became known as THE TOWER OF FEAR.
ENTER IF YOU DARE, BUT DON’T EXPECT TO EMERGE ALIVE.
TRS-80 MODEL I AND III
-MACHINE LANGUAGE-
TEXT ADVENTURE
(Typos are reproduced correctly, including the name of the Wizard being both FIRETHROWER and FLAMETHROWER.)
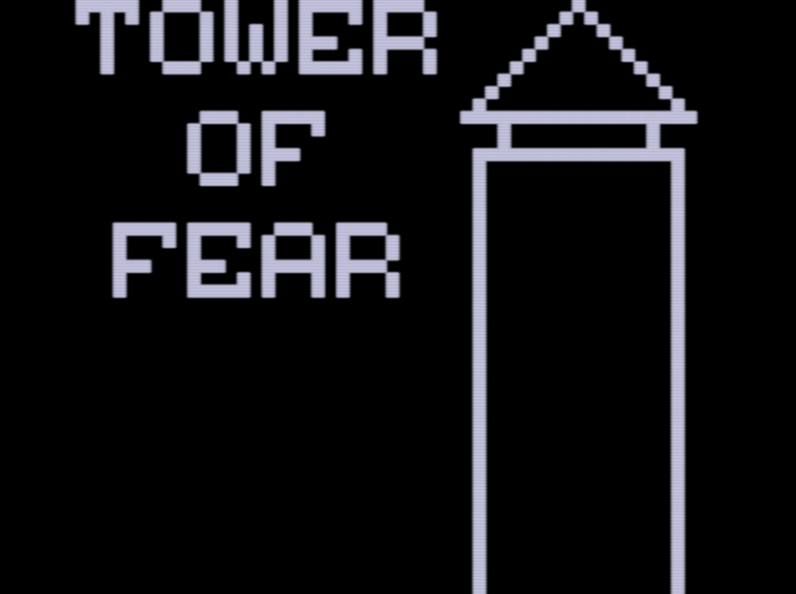
Like Dragon Quest Adventure, there’s also an elaborate animated title screen.
I ended up doing most of my playing on the TRS-80 Color Computer version, which, other than a different title screen (I bopped it into the end of this post) appears functionally identical.
Despite the opening promising a showdown with BLACKHEART (FIRE/FLAME)THROWER no such character appears in the game. This is another pure treasure hunt.
This is if you READ MEMO. The same memo in the TRS-80 original advertises other Programmer’s Guild text adventures.
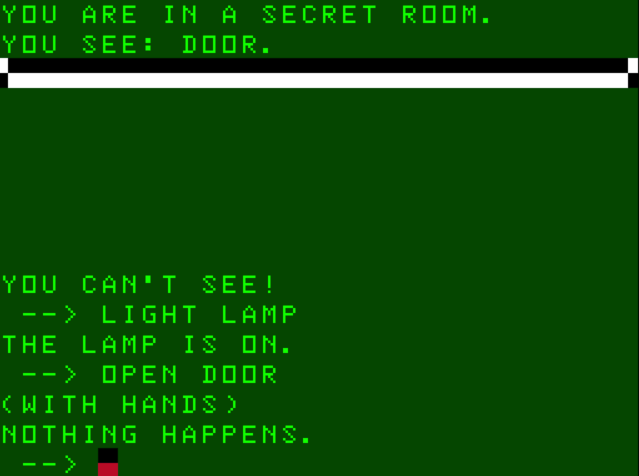
At the start, you have access to just a dagger and a lamp. There’s also an ARCHWAY where if you go in it you’ll fall in spikes…
…and if you climb the ivy you’ll get trapped in a tower room.
Just south of the opening room is a pit with a cyclops. I tried tangling with it using the dagger a few times.
>KILL CYCLOPS
(WITH DAGGER)
YOU HIT!
THE CYCLOPS SWINGS HIS MIGHTY SWORD AND HITS YOU!
>KILL CYCLOPS
(WITH DAGGER)
YOU MISS!
THE CYCLOPS SWINGS HIS MIGHTY SWORD AND HITS YOU!
I assumed — incorrectly, as it turned out — I needed to save the cyclops for later. After being stuck for long enough, I tried, out of odd frustration:
>GET CYCLOPS
You can cart the cyclops around and drop him off wherever you like. You can then resume typing KILL CYCLOPS, except now he doesn’t fight back! This is how I beat the first puzzle of the game.
This netted me a JEWELED SCABBARD and a SWORD. I was able to use the SWORD to cut a hole in the ivy and go into the tower a different way.
I appreciated the alternate use of the ivy; you can still climb the ivy even with the hole. Notice the (WITH SWORD) message, which is a great feature; sometimes my puzzlement at adventure games involves my not understanding what was being used for a particular action, like KILL GUARD and PUNCH GUARD being considered different commands in Asylum. In this case, if you are holding only the dagger and try to cut the ivy, the game responds “(WITH DAGGER) YOU CAN’T DO THAT!” An admittedly more helpful message would be “it isn’t quite large enough” but the presence of the “with dagger” message was still enough for me to try the sword immediately after I got it.
The inside started with a corridor containing a SILVER BAR and a chain to pull.
SOMETHING GOES “CLICK” AND THE CHAIN PULLS UP OUT OF REACH.
My intuition told me this opened the door above (the one where you otherwise get trapped) and I discovered later I was right.
There’s also a BOOK (which the cover says “INSERT ME INTO…”) a NOTE with the hint EMASES+MIRROR and a room full of colored boxes (where only the RED one held something useful, a CLOCKWORK MOUSE, the rest had poisoned arrows).
This is the moment where I suspected the author was trying to match Dungeons & Dragons; something about the “mass of doors or chests to try opening” feels very late-70s-early-80s campaign to me. Having the chain affect a trap in an entirely different part of the tower (and a lever you’ll hear about in a few moments) also strikes me as a D&D standard. I theorize that both of these elements give the “feel” of puzzles without requiring the campaign to grind to a halt; multiple doors/boxes can be tackled with the party splitting up, and a puzzle that requires realizing something changed in another location can be resolved in a way natural to the tabletop (“let’s go back to location X” with the potential for random monster encounters being much less annoying than stopping to solve a sliding puzzle the Dungeon Master hands out).
I also found a maze but my attempts at mapping it led me to a re-match with the cyclops.
YOU ARE ATTACKED BY A VENGEFUL CYCLOPS!
So I ignored the maze for the moment and went upstairs (where I found the door was, indeed, open). I then found a bookcase (where INSERT BOOK opened a secret passage), a LADDER, a RUBY, and a GOLD KEY.
There was also a laboratory with a vat of acid which I could do nothing with at the moment.
I’m not sure how the inspiration struck here, but I went back to the boxes with the CLOCKWORK MOUSE and tried WIND MOUSE. The mouse ran to the east and I was able to follow it through the maze, leading to a magic fountain and an EMERALD. The fountain healed all my wounds (which were obtainable either via cyclops or poisoned dart, but oddly, the fountain is useless, since nothing after this point can cause injury, just immediate death).
I still had the EMASES+MIRROR hint I hadn’t used yet, but also the archway at the start of the game that led to spikes. With no link other than running out of things to do, I went back to the archway:
>SAY SESAME
YOU HEAR A GRINDING NOISE.
This disabled the spike trap and led me to a “HIGH WALL” where I needed the LADDER from the tower. This took me to a JEWELED STATUE and a LEVER. I needed the key to move the lever, and pulling it led to another grinding noise. Having run out of everything to do other than figure out the acid vat, I went back up there to find the acid had spilled all over the room.
Putting my D&D “marginally unfair trap” thinking cap on, I restored my game and tried PUSH LEVER instead of PULL. Success! The vat was drained of acid entirely and I found a DIAMOND inside.
This game maybe didn’t sound impressive written out, but: while the traps would be considered tacky by modern game design standards, I felt enough on my toes that the atmosphere of the game held out; this was true even given the disappointing lack of a Wizard, who I assume fell into one of his own traps before I got there. Additionally: short and mostly solid coding where I didn’t have to fight with the parser. While clearly a light attempt, Tower of Fear was still a satisfying send-off to the works of Charles Forsythe.
The TRS-80 Color Computer title screen. I like the original one better.
Bear with me: I’m starting with a tangent even more off-track than usual. Also, this post will make no sense unless you’ve read my previous ones on Mad Venture.
We’ll get back to this shortly, I promise.
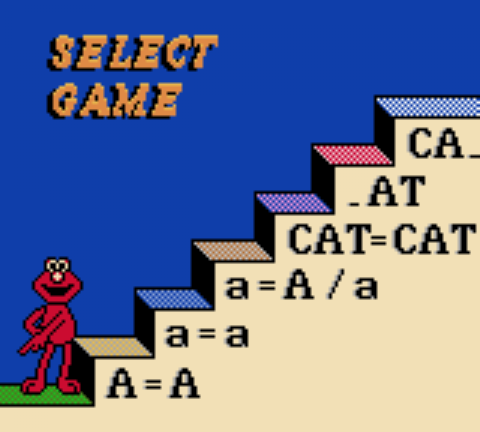
Underneath almost any game is a second game, one that perhaps only bears partial resemblance to the original. To illustrate my point, consider Elmo’s ABCs (1998) for the Game Boy Color.
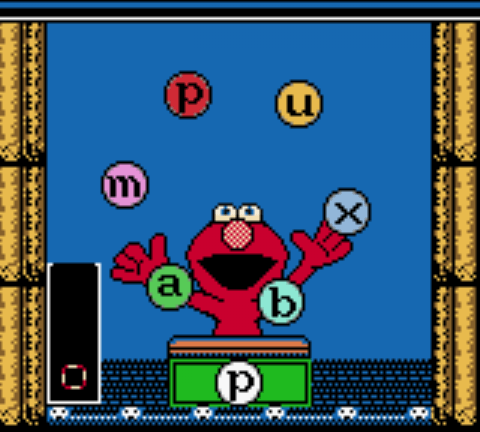
The game involves six learning activities, all requiring the player to pick the right letter from some balls that Elmo is juggling:
The letters rotate slowly. In the example above, when the “p” is in front of Elmo, the player must push a button to deposit the “p” in the box to the lower-left.
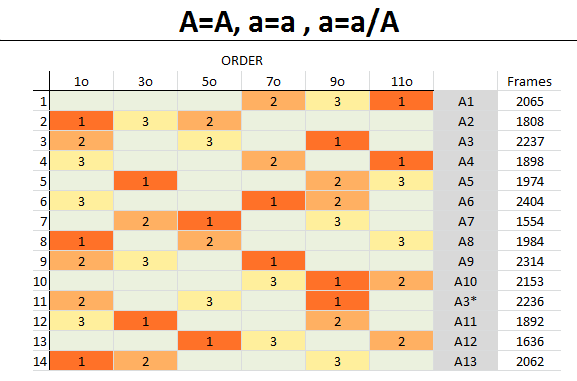
By all surface measures, this is simply testing the letter-recognition ability of small children, and the animation is simply a mechanic to make the game slightly less mundane as a trivia quiz. But for those who follow speedruns, it may not be a surprise that, yes, people speedrun Elmo’s ABCs. The Any% category has 9 scores on the leaderboard, with the world record at 2 minutes and 32 seconds.
This is not a joke: people have put serious work into optimizing the game, including manipulating the random number generation in order to get favorable ball placement (so you don’t have to wait so long for them to go slowly around the circle).
Exhibit A:
Exhibit B:
This is glorious. I may have done some nerdy things in gaming, but I can’t say I’ve made a spreadsheet analyzing the frames in a children’s game from the 1990s.
By diving into the number-of-frames level, speedrunners of Elmo’s ABCs essentially discovered a new game hidden within the game, one generated essentially by accident via the system of random number generation used by the programmers. There’s a 15 minute Youtube documentary with exhaustive detail.
In the text adventure universe, while Zork I does has a time-based leaderboard (world record 3 minutes 25 seconds), the “optimization game” under the main game is normally about raw number of turns. This has been implicit from the very begining, with Adventure having a lamp with limited turns and many games following. Adventure 430 (Woods’s own extension of Adventure 350) had point bonuses for finishing under particular move counts (including one bonus I am unsure if it is even possible to get).
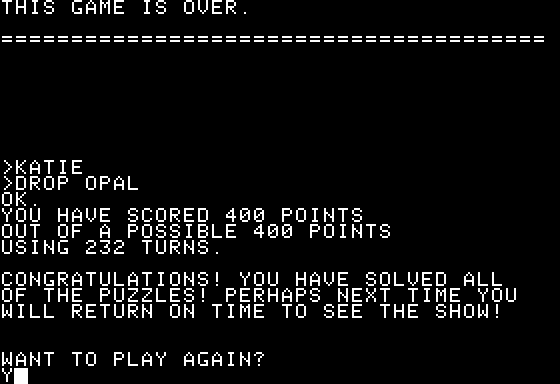
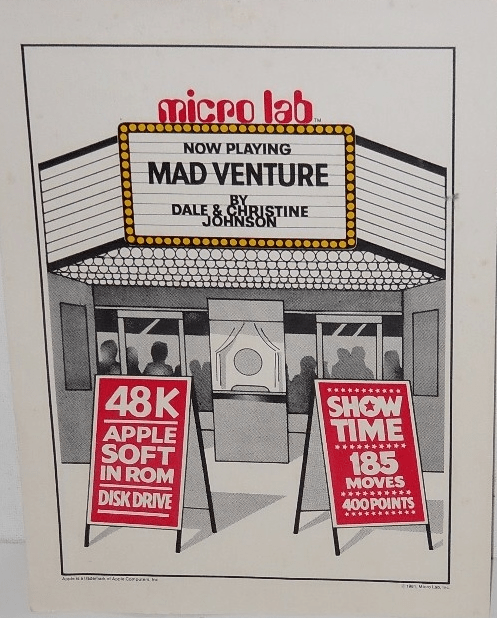
The box art for Mad Venture mentions “185 moves, 400 points” explicitly. It is possible to get 400 points without beating the turn limit; the optimizing for a “best ending” only needs to come later. Even more explicitly than any text adventure that came before, optimizing feels like an entire hidden “second game” with different conditions than the main game.
400 out of 400
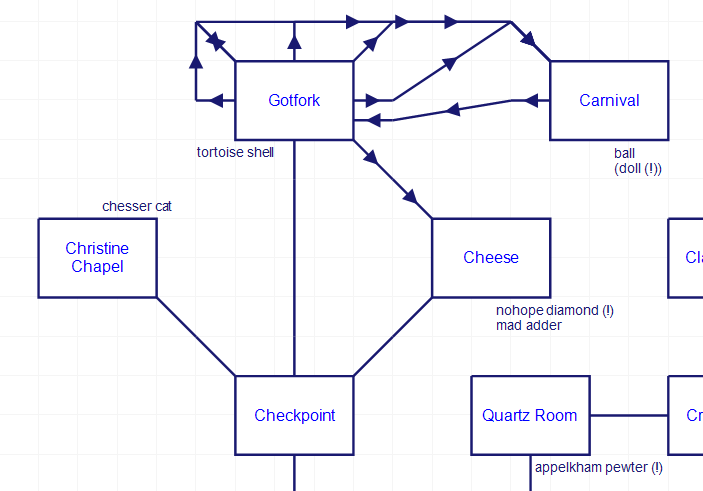
Before even thinking of optimizing, I needed to get all the points and treasures first. Unfortunately, the puzzles that remained from last time were mostly disappointing.
In the GET FORK area, I had missed an room; in the room Gotfork most of the exits go in a loop back to the same room (“YOU HAVE CRAWLED AROUND IN CIRCLES AND WOUND UP BACK WHERE YOU STARTED.”), except sometimes, entirely at random, you’ll land in a carnival. (The “entirely random” part will become important when I reach the “185 moves” part of the game.)
This puzzle is sort of fair. I didn’t quite have the thinking of the authors (Dale and Christine Johnson) down. Rather than presenting an obstacle to overcome, this room was inviting the creation of a set-piece to match the room description.
>DROP BOTTLE
OK.
>GET BALL
OK.
>THROW BALL
A STRIKE! YOU TOPPLED THE MILK BOTTLE WITH THAT THROW! A ROCK SLIDES OPEN AND A RARE PORCELAIN KEWPIE DOLL FALLS OUT! THE ROCK QUICKLY SNAPS SHUT.
The doll is doubly useful, because if you lose the doll, you can get another one. If you remember the beggar from last time who needed a treasure: to get full points, you have to give the doll, so you can get a second doll and don’t lose any treasures in the end.
Nearby, at the room marked “Cheese” on the map, is a less-fair puzzle.
YOU ARE IN A ROOM WHOSE WALLS RESEMBLE LIMBURGER CHEESE.
THE ONLY EXIT IS THE WAY YOU CAME IN.
EXITS: YOU FIGURE IT OUT!
OBJECTS: NOHOPE DIAMOND! MAD ADDER AROUND IT!
The giant snake can be fended off via fork.
>THROW FORK
NICE SHOT! WITH YOUR FORK IN HIS SIDE, THE WOUNDED ADDER CRAWLS AWAY.
Note there’s a turtle shell in the adjacent room; if you leave it be before forking the snake, the snake will curl up in the shell and die, leaving the fork. If you’ve taken or moved the shell, the snake just disappears. The only reason to suspect there might be something wrong with the snake disappearing is that the fork counts as a treasure. I suspect most people who solved it “legit” (I looked it up) did so by accident rather than by thinking about it, even though “finding an enclosed place to curl up in” is reasonable for snakes.
The “you figure it out” part mentioned in EXITS was also a hassle. The right way to escape is:
>BACK
The text says THE ONLY EXIT IS THE WAY YOU CAME IN, which has to be interpreted as the verb BACK. This sort of follows the same pattern as the ON and OFF puzzle, but at least that one technically made sense in “the real world”; typing BACK is purely a parser-based solution and there’s no clear action attached. (That is, why does BACK differ from just going in a particular direction?)
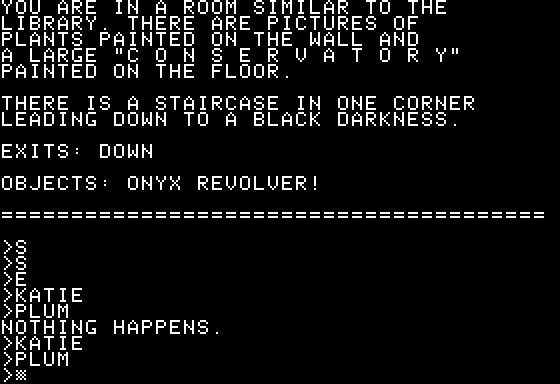
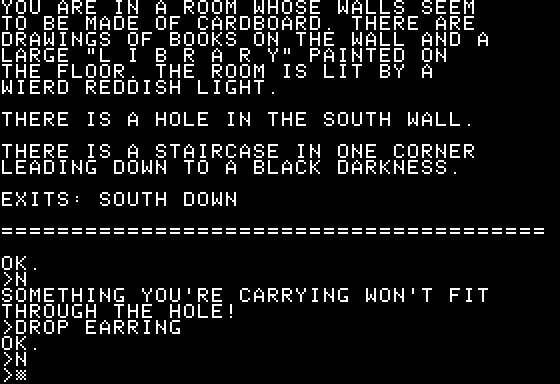
I had noticed at the odd “L I B R A R Y” room that I could read the book for a new message…
…but I was stumped from there. If you go down (to a room that’s dark, because the lamp can’t fit inside) and type PLUMM it teleports you to the movie lobby (where the treasures go) and back. This teleportation allows you to bring in the lamp after all and find a revolver which counts as a treasure.
Or you can type just PLUM since the game only recognizes the first four letters of each word.
The CHESSER CAT I mentioned being stumped by was resolved by simply typing PET CAT, which led me to a maze
One final obstacle involved a TUESDAY RUBY. If you try to teleport with it the normal way (KATIE) you get sent back to the room it started in. In the maze above, there’s an exit that drops you back in the DEPOSIT CHUTE room so you can hike back to the movie lobby and drop off the ruby sans teleportation.
That was pretty much it — I did say the remaining puzzles were disappointing. I guess BACK counted as a sort of wordplay puzzle but all the ideas were used only once so no sort of system was built up (as would later happen in Nord and Bert, Ad Verbum, Counterfeit Monkey, and other games).
Where things really started to go off-kilter is when I went for 185 out of 185. Just to be clear, the guide I was using does not help with the optimization part, and I did need to write my own walkthrough.
185 out of 185
The first part of my journey in trying to get Mad Venture’s best ending was traditional: thinking about what actions needed to come before others, and clumping runs where I picked up treasures into groups. The inventory limit is technically 6, but the lamp must be carried essentially at all times, so some juggling happened with the five remaining slots.
For example, the doll at “1” needs to be obtained before reaching the beggar at “2”. That means any route will necessarily pass by the adder-with-diamond (at “a”) so I grabbed the diamond as one of my five slots. The doll went to the beggar (so didn’t take up one slot) and I was able to fit the treasures at “b”, “c”, “d”, and “e” in my inventory before making a trip back to the lobby to drop the treasures off.
After some rearranging and squeezing what I assumed was every possible step possible, I still didn’t quite the list down to 185 moves; I was at 195, 10 too many.
I struggled for a while figuring out where to find them, until I reconsidered my opening. Here were the starting steps of my original walkthrough:
GET KEY. N. GET LAMP. GET CROWBAR. N. GET BOTTLE. GET SANDWICH
N. N. UNLOCK DOOR. GO DOOR. GET BOOK. W. LIGHT LAMP
DEPOSIT KEY. DEPOSIT CROWBAR. DEPOSIT BOTTLE. DEPOSIT BOOK. DEPOSIT LAMP. E. S. S. EAT SANDWICH. GO HOLE. EAT KEY.
This solves the opening puzzle with the sandwich and the edible key the “normal” way. However, I realized that solving the sandwich puzzle does not actually give any points. Of equal importance: the word KATIE works without solving any puzzles! In many games, there would be some prohibition to make sure the puzzle was solved the “right” way so you’d have to go through the shrink-and-eat-key-to-get-big process (even potentially randomizing the magic word needed, like Adventure 430 does) but it appears not only does the game let you sidestep solving the puzzle, it requires sidestepping the puzzle in order to get a best ending!
GET KEY. N. GET LAMP. GET CROWBAR. N. GET BOTTLE. N. N. UNLOCK DOOR
GO DOOR. GET BOOK. S. S. S. S. S. E. PLUM.
LIGHT LAMP. D. DROP BOOK. D. GET REVOLVER. PLUM. DROP REVOLVER. KATIE.
This felt like I was breaking into a second game with a different structure: now the sandwich was no longer the essential item for solving the first puzzle, but a red herring.
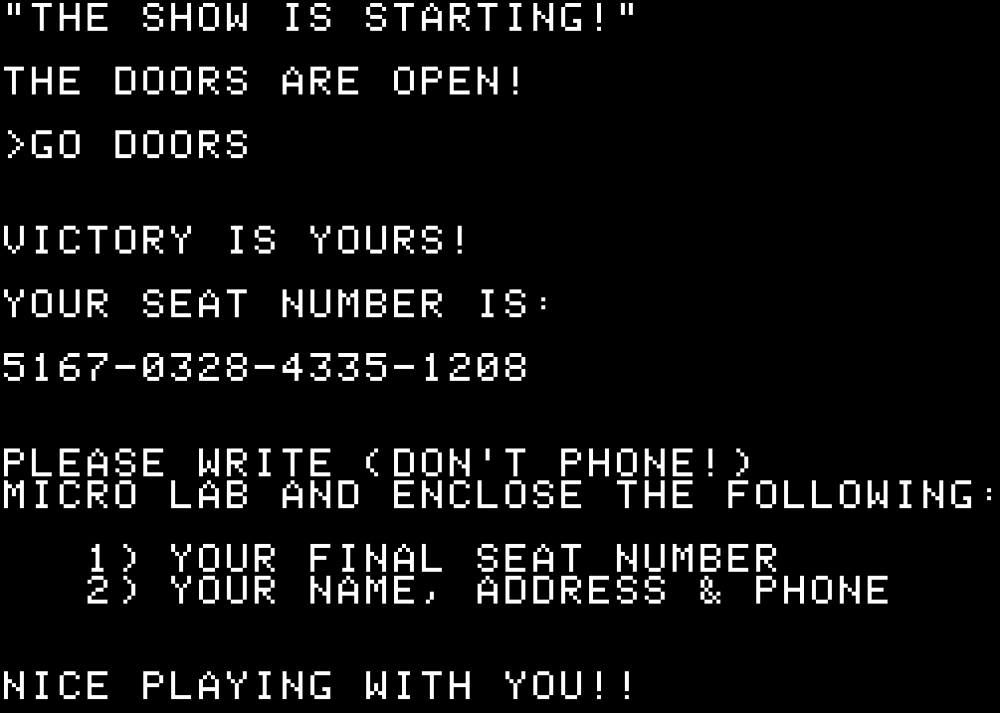
I’m not sure what the seat number code is about.
One last piece of evil: I did say the entrance to the carnival is randomized, and you need to enter it twice. I’m not certain as to the chance of success but I believe it’s somewhere around 20%. So to get through without saving requires getting a 20% luck chance, twice.
My walkthrough has 183 moves; 185 are allowed. The extra two moves can be used to save a game! So the game intends for you to save and reload until you get the right random chance at those positions. I found this utterly, profoundly off-kilter to my views of how games are supposed to work. This sort of thing happens in speedruns, or “cheating” at adventures, but in optimizing Mad Venture, the hidden game became the primary one.
Back on my Pirate Island post where I was stuck at 12 out of 16, Tom Shave (one of the sons of the author) showed up and gave some hints.
Now this is going back a while so I don’t have all the answers (my Dad wrote this game when I was about 8 years old and my brother and I used to play test it. I think we got 29p for any bugs we found!). The wood shavings I’m pretty sure are to make some sort of tinder box. A light to help you down the well perhaps. The cheese is to give to a Ben Gunn type of castaway in exchange for treasure or a map. I can’t remember where he is though (perhaps down the well). There is indeed a map and it gives you a location to dig. You won’t find it by randomly digging though.
I admit I’m quoting the whole thing just because I love the “29p for any bug” story.
While this did not tell me exactly where to go, it strengthened my suspicion I was missing a room exit (a mistake that long-time readers of mine should be familiar with). After poring over each room in turn, I finally hit the Sandy Beach, and right there in the room description, it mentioned both a west and a south exit.
I may have been fouled up by the physical position I used on my map of the connection to the boat. When there’s more than one way of drawing a map, it’s possible to get a slightly different mental image than the author; I was imagining the boat more or less being to the “south” and only drew it to the side for compactness sake.
This led me to a cave that required using my tinderbox for light. Inside I found a man with a paper; I handed over some cheese and he became friendly.
Picking up the paper revealed it was my long-sought-after map:
GO TO THE LONE TREE. FOR FINAL DIRECTIONS, ASK THE …”. THE REST IS MISSING.
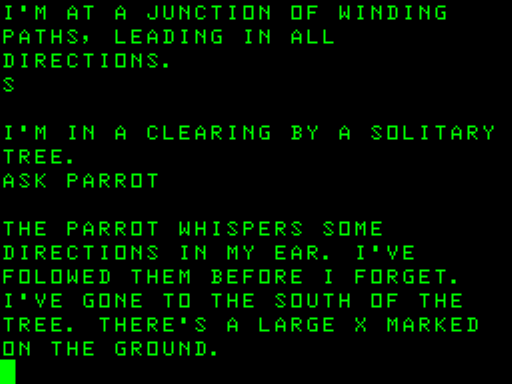
Going back to my list of things I hadn’t used: the spade (which clearly is about to show up), the bottle (which I could fill with water, although I didn’t know what yet), some wood shavings (it turns out these can refill the tinderbox if it burns out) and a parrot. Ah, the parrot!
It had been hanging on my shoulder. I had not been able to interact with it at all, but the message from the game hinted at a verb; I tried ASK PARROT and it said “PIECES OF EIGHT.” (This led me on a long useless side attempt to get the parrot to steal the pieces of eight back I had already spent for the last treasure; we’ll get to that.)
I took the parrot over to a suspicious-looking tree and typed ASK PARROT.
Hurray! I dug the X with my spade, revealed a treasure chest …
I’VE BEEN DIGGING FOR SOME TIME.
IT’S VEY HOT.
I THINK I’VE FOUND SOMETHING!
YES, IT’S A CHEST FULL OF TREASURE.
… and found … that I had gotten thirsty from the digging, and the chest was too heavy to pick up without a drink of water. On that particular run I hadn’t got the water yet.
(facepalm)
Unfortunately, leaving the X mark means you can’t find it again, so I had to reset and make sure I got the water first before digging. Amusingly, on my “winning run” the pirate stole the chest before I could pick it up; I don’t know if that “short circuits” the puzzle so you don’t have to drink water. (It does work on the puzzle with the gorilla that you need to give bananas so you can take a silver bar; one time I ended up with both the bananas and the silver bar because the pirate stole the silver for me. Accidental emergent puzzle solve ahoy!)
This let me get 14 out 16 points, but the last 2 remained elusive. Sneakily, the two pieces of eight used to buy the antidote from the natives can count as a treasure, so I spent a long time trying to either steal the antidote or steal back the pieces of eight with no luck.
redhighlander, who has helped on a previous treasure-laden island, managed to sleuth out the missing 2 points. You may remember I cut open a crocodile to get a clock, but the crocodile wasn’t done being useful yet.
I’ve been trying to reverse engineer how I could have figured this out myself. I’m not sure, other than perhaps the relatively elaborate descriptions of cutting the crocodile were intended as a clue.
Incidentally, the “I am your puppet” idea where you are “remote controlling” a character shows up in full force here, with the line “THIS ISN’T THE SORT OF THING I ENJOY.” It’s like the player character is only reluctantly carrying out your orders. Except, the player character is also the computer, somehow. I find the clash disconcerting. (Also, when we return to Michael Berlyn, we’ll see he plays with this player character vs. computer relationship in the game Cyborg.)
I’m winding down on Mad Venture (it really isn’t a “large” game) so hopefully, by my next post, you’ll see victory there as well.
Well, I peeked at a map, and this game likely won’t take a few weeks; I have most of the map already. That doesn’t mean the remaining puzzles won’t be hard.
This is most of the right side of the map; I’ll talk about the missing part shortly.
In particular, while I’ve been alert to wordplay (in addition to just regular physical object solutions), I was paying more attention to nouns than to verbs. This was a mistake. Let me reproduce from last time what the beggar said when I handed over a treasure.
The text of what the beggar is saying is an enormous clue: OFF AND ON I SHALL PAY A VISIT TO SEE IF I CAN HELP YOU. This isn’t referring to the beggar visiting the player just based on the passage of time; this is referring literally to the commands OFF and ON, which are shorthand for LAMP OFF and LAMP ON.
What the beggar is trying to communicate is that you can try to get their help by turning your lamp off and on again.
One of the places I was stuck was at a palace guard who needed me to hand over a gold coin.
Turning OFF the lamp here led to a strange THUD.
When I turned it ON again, I found an unconscious guard. Neat!
The actual palace itself didn’t have any puzzles, but was slightly confusing to map (hence my not bothering to add the rooms to the map at the top of this post). It did have a GOLD COIN (well, we could have used that earlier) and a CANDY HEART in a clearing with a loudspeaker.
A SPEAKER IS PLAYING LOUDLY,
“YOU GOTTA HAVE HEARTS,
MILES AND MILES OF HEARTS!”.
The lobby of the Queen’s Palace went meta, and I assume is referencing Micro Lab’s next game (Alice in Thunderland).
Mad Venture is one of those games in split-screen format where room descriptions, objects, and exits are consistently displayed on the screen, so the command LOOK by itself (which makes sense in single-window games to reproduce the room description) is a little redundant. In Mad Venture it gives the message
OK. SEEMS SAME SCENE SEEN!
and I suddenly had 20-year old memories flood in.
You see, this reminded me of Nick Montfort’s game Ad Verbum (2000) which I was a beta tester for.
Sloppy Salon
Simple social space, sadly spoiled. Some skewed situation’s sequel, surely. Seemingly, slovenly students sojourned — scraping, scratching, scuffing surfaces.
Stuff: … stainless steel stapler… sizable sofa.
This is a room where only words with the letter S work. To get by this point you need a word meaning “exit the room” which starts with the letter S.
This alerted me to that — at least to some extent — Mad Venture is a wordplay game, where the physical selves of objects are just as important as the words attached to them.
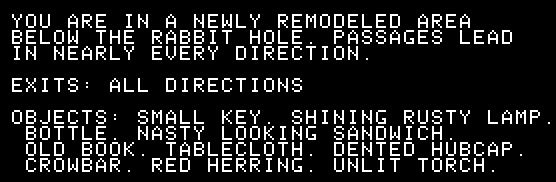
I had previously managed to get small by eating a sandwich, and pop in a rabbit until to an underground area. From there I was stuck; there was a nasty sandwich there, but if I tried to eat it, it ate me back. I was too small to pick up any of the items, including the lamp, so I wasn’t able to travel anywhere.
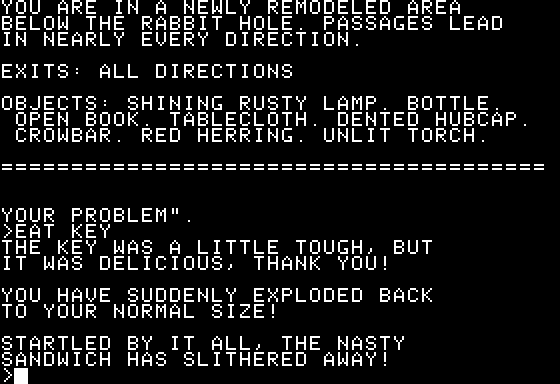
Previously, aboveground, I had found a book that read “THE FOOD IS THE KEY TO YOUR PROBLEM” that I used as a hint to eat the sandwich; since I sent everything underground, including the book, I decided to try reading it again and was surprised to find the text had changed:
THE KEY IS THE FOOD TO YOUR PROBLEM
Oho, what about EAT KEY?
This opened the map up much wider.
The left half of the underground, as I’ve mapped it so far.
To the west I found a “small, low chamber” that was “filled with dusty rocks”. You might be familiar with this location from Adventure. Keeping the wordplay in mind, I tried to CLEAN ROCKS:
THE DUST SEEMS TO REVEAL “KATIE WAS HERE” SCRIBBLED ON ONE OF THE ROCKS.
The word “KATIE” in this particular word serves to teleport the player back and forth from the lobby of the movie theater where all the treasures need to be dropped.
I mostly haven’t had other progress. I did find a boulder I pried away with a crowbar, and a beggar who wanted one of my treasures.
I haven’t seen the beggar since; at the moment I’m assuming you get a hint later but not an optimal score if you hand over a treasure.
I got stymied by a guard who wants a gold coin, and found a very strange L I B R A R Y that didn’t let any of my objects in.
I also found a puzzle which utterly blew my mind.
Remember, in a wordplay game, words only connect tenuously with their corresponding objects, so–
Actually, let’s pause a moment. What can happen next?
I found a SMILING CHESSER CAT down one of the branches, but I don’t know what to do with him yet.
While FORK does refer to a fork in a road…
Notice the room description change.
…it can also refer to a utensil, so GET FORK works, and removes the fork in the road! This changes the map so rather than there being a northwest and a northeast exit, there’s just north.
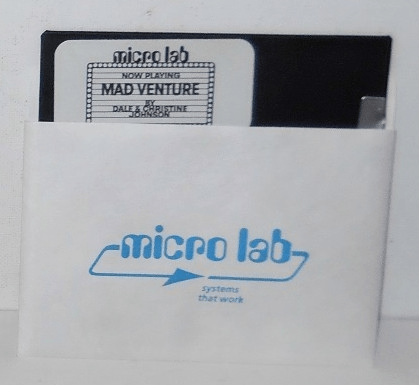
Micro Labs published only two adventure games, both for the Apple II and both from 1981: Mad Venture (Dale Johnson and Christine Johnson) and Palace in Thunderland (Dale Johnson, again, and Ken Rose).
This is yet another pure treasure gathering game, although this time the game is very explicit about a time limit, as shown on the box art above. I suspect I will need to create myself a walkthrough to win.
Or possibly: cling helplessly to one. For I’ve known about this game for a while, where the one thing I’ve heard is the difficulty is really high. We’re talking another aspirant for Quondam’s throne of Most Difficult Adventure Ever, here. Of course, I can’t know how hard Mad Venture is until I try it, but I am still blocking out a few weeks.
While Palace in Thunderland is more explicit about the connection, Mad Venture has a vague sense of Alice in Wonderland to what I’ve seen so far. This led some people on the intfiction forums to speculate this was one of the first adventure games with a female character (Alice) but while I’d say the argument holds for Thunderland, I’m pretty sure the hero for Mad Venture is intended to be “you”. (Keeping an open mind, though, until I get deeper in the game.)
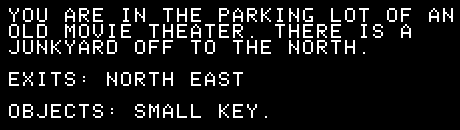
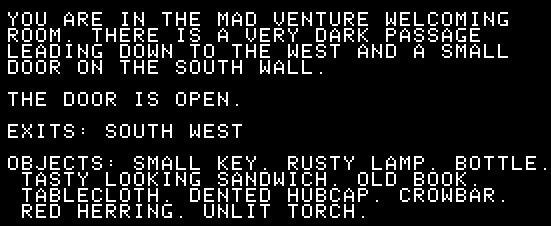
You start outside a movie theater where you are told to bring the treasures in 185 moves or bust. Nearby there’s a bunch of items, a rabbit hole (described as too small to enter), and a cave.
I moved all the items to this room to get them in one screenshot.
Going west:
YOU ARE IN A LARGE UNDERGROUND CHAMBER. A PASSAGE WEST HAS BEEN BOARDED UP! THERE IS A SIGN POSTED HERE THAT READS: “CAVE CLOSED FOR REPAIRS. DEPOSIT ALL NON-PERISHABLES IN CHUTE FOR FULL REFUND.
THERE IS A “DEPOSIT” CHUTE HERE.
The book has a faded cover which states “LE…CAR” and the inside notes “THE FOOD IS THE KEY TO YOUR PROBLEM”. This made me think the sandwich was somehow helpful but my first attempt at eating it while standing by the deposit chute led to death.
YOU HAVE BEEN CRUSHED TO DEATH BY A FALLING OBJECT!!
YOU ARE DEAD!
After some experimenting, I found that the sandwich has a better effect while eaten in the initial cave room.
YOU ARE NOW 4 INCHES TALL.
(There’s some rooms where you die and some where you transform — I’m not sure the pattern.)
This lets you be small enough to pop in the previously mentioned rabbit hole. Any items dropped in the DEPOSIT chute await below.
Notice there’s a “nasty sandwich” that’s new. If you try to GET SANDWICH you die with the message “THE SANDWICH GETS YOU FIRST!”
Paul Shave’s third release for 1981, like Atom Adventure, used his Create Your Own Adventure system.
Via Everygamegoing.
Also like Atom Adventure, the goal is to gather all the treasures, and many of the objects are randomly scattered. Unlike that game, it doesn’t have super-tight timing (although I haven’t gotten a full score yet, so maybe I’m wrong).
Most of the game is set outside, so a light timer isn’t really an issue. (There is a tinderbox you can light for the purposes of one room.)
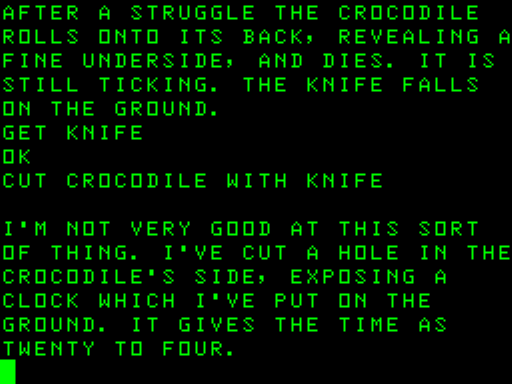
There’s an initial “short-term” timer with a crocodile that eventually shows up and starts following you. The crocodile has a ticking sound (yep, it’s a Peter Pan reject). Eventually, the crocodile bites your head off, but if you have a knife, you can kill it and cut it open, revealing a clock.
Note that by bad luck you may run into the crocodile before you get the knife and just die on a particular run (this is another similar element to Atom Adventure).
A “long-term” timer is formed by “natives” that show up at random and shoot poison darts at you. There’s a village where you can buy antidote from other (different?) natives for TWO PIECES OF EIGHT and you can APPLY ANTIDOTE in order to avoid dying.
The antidote is not well described, so this is a likely result from first trying it out. I admit being more amused than frustrated, since this wasn’t far in.
However, the antidote only has so many applications, so you eventually will succumb to a poison dart if the game goes on long enough.
Additionally, the antidote is considered one of the treasures, and there’s a pirate that shows up at random that will swipe all your treasures and take them to his “lair” which is just a spot in the forest. It’s possible to have very bad timing and get the antidote swiped from your inventory right before getting shot with a poison dart, so the pirate inadvertently does a combo special with the natives conspiring to kill the main character.
As noted in the screenshot above, there’s a place marked GRUD OMASSI. If you say these words anywhere on the island you get teleported back to the GRUD OMASSI spot and have all wounds healed. This makes for a nice backup plan for getting stuck by poison where the antidote is too far away. (It works twice, but the third time kills via a lightning bolt, so it’s still an emergency-purpose-only situation.)
The natives that sell an antidote also have an idol which counts as a treasure, but if you try to steal it, they cook you over a pot.
I’ll save some extra commentary on this for the end of this post.
I mentioned getting a clock from the crocodile already. If you give them the clock they gather around it, fascinated, which distracts them enough you can steal the idol.
To win you need to sail away, but the catch is there are two ships. Observe on the map:
There’s a “ship” both on the north side and south side, with a shore and rowboat conveiently placed. You need to LAUNCH BOAT, ENTER BOAT, and ROW BOAT to get to the ship, at which point you may find the HISPANOLA (good!) but it may be the SANTA MARIA (bad!). If you board the Santa Maria you find pirates who make you walk the plank: game over. The placement of the two ships is random, so you have to check and may need to turn around to go to the other ship.
Assuming you do get on the correct ship, you can RAISE ANCHOR and SET SAIL to victory. (The game doesn’t tell you about RAISE ANCHOR; just like drinking the antidote, it expects you to step into a losing game once. “Dying from things that are realistic and logical but in gameplay terms unfair” is sort of a running gag for Pirate Island.)
You may notice a lack of 16 out of 16 in the screenshot above. Each treasure is 2 points, and I’ve managed to max out at 12 with a RUBY RING, GOLD NUGGETS, JEWELS, IDOL, ANTIDOTE, and SILVER BAR. (The first four are randomly placed, the antidote is always bought at the village, and the silver bar you get from a gorilla by trading a banana.)
I sometimes end these with “whelp, the game was too painful, that’s it” but for some reason, the missing points here really gnaw at me. I think it has to do with the advertising blurb I quoted at the top of this post, which you might notice mentions a map for digging. I have found a SPADE in the game and tried digging the ground in every location, so no dice at random luck: I think the map is necessary to find whatever treasures remain. But I have no idea how to get the map! In addition to what I’ve mentioned, I’ve found a PARROT (which perches atop the player’s shoulder), some WOOD SHAVINGS, a BOTTLE (which can be filled with WATER), and some CHEESE. I haven’t been able to make use of any of them. I had strange notions of “reconstituting” a map by combining wood shavings and water, but no luck (at least with the parser commands I tried).
(If you’d like to take a crack, download the Atom Software Archive here, the program Atomulator here, drop the archive files in the “MMC” directory, then start the emulator and pick shift-F12, which jumps to a menu that accesses every available Atom game, including PS3A, Pirate Island.)
Oh, and the natives. They are definitely just old-timey cartoon stereotypes. I especially felt uncomfortable stealing the idol. The pieces of eight (which you use to buy the antidote) incidentally count as a treasure, so it’s possible to get a full point spread you need to steal the antidote in addition to the idol. This makes me tempted to just bail out early for story purposes like I did with It Takes a Thief. But really, where is that map?
ADD: You can see in the comments I missed a location, so I found the map and an extra treasure. No idea on the last treasure; I still have to spend the pieces of eight to get the antidote, and haven’t found a way around that.
I stopped keeping track of how many Harrys we lost (20?), but victory was eventually ours.
I will narrate the rest of the game, then dive into some exploration of structure. There’s been a lot of theoretical work on the effect of overall choice-structure, but not as much on the micro-pieces therein.
Last time, our hero had made it to the hostage storage area.
BY NOW DR. NON HAS RADIOED FOR HELP. KRUEL REINFORCEMENTS ARE ON THEIR WAY.
1) STUDY THE STORAGE SYSTEM
2) FREE EVERYONE BY DISABLING LOCK MECHANISM
3) EXAMINE THE FILES
4) CALL UEC ON SLED RADIO
5) GET MECHANISM TO PRODUCE MORE PELLET KEYS
Just as a reminder, the hostages are “DATA PATTERNED AND LASER STAMPED” on slides, and we’re trying to rescue a princess. Dr. Non gave Harry one “pellet key” as a “free sample”, but it only works on one slide.
Trying to free everyone:
We start by trying to disable the lock mechanism.
TAMPERING WITH THE LOCK STARTED A BASE DESTRUCTION SEQUENCE. HARRY HAS 60 SECONDS TO DECIDE WHETHER TO:
1) ABANDON THE BASE 2) TRY TO ABORT SEQUENCE
Both are Bad Endings.
HE ALMOST HAD IT, THEN *BOOM!*
Next Harry. Taking his time, he examines the storage system…
FILES
PELLET PRODUCER
LOCKING MECHANISM
…then tries and fails get the mechanism to make more pellet keys.
BY ATTEMPTING TO BYPASS THE PELLET TIMER, HARRY SETS OFF A SIGNAL WHICH ERASES ALL THE FILES! MISSION IS A FAILURE.
The next Harry reconsiders and examines the files more carefully.
THERE ARE MANY FILES. SINCE THE GIRL WAS JUST TAKEN, SHE SHOULD BE AMOUNG THE LAST ENTRIES. BUT HARRY HAS ONLY 1 PELLET.
WHICH FILE IS THE RIGHT ONE?
1) LOAD THE FILES UP AND BRING THEM TO UEC
2) DISABLE LOCK MECHANISM
3) TAKE A GUESS
4) GET MECHANISM TO PRODUCE MORE PELLETS
5) CUT OFF POWER TO STORAGE COMPUTER
6) GO BACK TO SHIP AND USE RADIO
While not obvious, this is the last choice of the game!
First Harry tries cutting off power…
WITH THE POWER OFF THE SYSTEM BECOMES TOTALLY INOPERATIVE.
SHOULD HARRY:
1) TURN POWER BACK ON
2) EXAM SYSTEM WITH POWER OFF
…but examining the system leads to electrocution.
Then he tries to load all the files at once.
WHEN HARRY ATTEMPTS TO REMOVE A PANE FROM ITS HOLDER, THE FILE DISSOLVES. THE GIRL AND ALL OTHER HOSTAGES ON THE PANE ARE DESTROYED. MISSION FAILED.
The next incarnation makes another attempt at producing more pellets, but it turns out as badly as last time, wiping out the system. Finally, he tries going back to call the UEC.
HARRY DRIVES BACK TO THE SHIP AND CALLS UEC. COMPU-CEN SUGGESTS TAKING MICRO-PHOTOS USING THE MEAD CELL AND ANALYZING THEM ON THE SHIP’S COMPUTER.
IN ADDITION, UEC IS SENDING A TASK FO TO SECURE THE BASE.
HARRY RETURNS TO THE STORAGE AREA, AND FOLLOWING COMPU-CEN’S ADVICE IS ABLE TO IDENTIFY THE GIRL’S FILE.
HE SLIPS THE PELLET IN AND A HOLOGRAPHIC IMAGE APPEARS. IT IS KURVI CALLEASE. SHE IS ALMOST MAGICALLY
BEAUTIFUL. THE IMAGE FILLS AND SHE COMES TO LIFE, BUT IMMEDIATELY FAINTS.
HARRY CATCHES HER AND CARRIES HER TO THE SLED. THEY SPEED OVER THE YELLOW SANDS TO HIS SHIP. ABOVE, THE SKY FLASHES WITH RED AND BLUE LASER STROBES AS UEC AND KRUEL FORCES BATTLE IT OUT.
THE GIRL AWAKENS. A TEAR IN HER EYE REFLECTS THE FLASHES OVERHEAD.
‘WHO ARE YOU?’
‘HARRY FLYNN FROM UEC AT YOUR SERVICE.’
SHE PRESSED CLOSE TO HIM, HER HEAD ON HIS SHOULDER.
‘TAKE ME HOME, PLEASE, HARRY.’
‘YOU’RE AS GOOD AS THERE.’
CONGRATULATIONS,
MISSION ACCOMPLISHED!
Deep thanks to everyone who participated! (I’ll figure out who gets the Steam keys next week.) I wanted to try something a little different, but also, I thought taking a slow journey through the steps might reveal some interesting nuances of game design that’d be easy to miss if I just spilled out the whole plot at once.
Before I analyze a few moments, it’s important to note that this seems intended as a skill-based game; that is, if you think through things carefully, you can make the right choices and not die. This is in contrast to the wild-bouncing structure that can happen in one of the Choose Your Own Adventure novels at the time, where the point is almost more about exploring every node rather than reaching any kind of “success”.
All dotted lines lead to “bad endings”, mission failure and/or death.
The start, riding a sled outside the compound, was relatively sedate: it took at least two choices before a Game Over, and all the initial wrong choices could be backtracked.
But there was still some player confusion; the MEAD cell Harry had could be used to determine laser fire would work on the barrier — “Info” on the map — but choosing then to do an immediate hand laser (as opposed to going back to the sled and using that laser) leads to death. Paradoxically, I think the player who is more reckless at the start and just starts shooting is less likely to lose lives here.
After Harry is captured, and the structure gives four choices.
1) BREAK BONDS
2) ROTATE MIRROR FROM SUN
3) USE MEAD CELL
4) PRAY
Pray is an informational choice: it gives Harry the idea that he should use his MEAD cell. Interestingly enough, we picked that one on our playthrough, but when we picked using the MEAD as hinted, the response of “NOTHING HAPPENS” was enough to turn people away. They then went with both BREAK BONDS all the way to the Bad End, and the same with ROTATE MIRROR FROM SUN before going back to USE MEAD CELL.
The “confirmation” structure was deceptive; if the MEAD cell had worked right away the scene would have been over much faster.
Let’s look deeper at the very last choice.
1) LOAD THE FILES UP AND BRING THEM TO UEC
2) DISABLE LOCK MECHANISM
3) TAKE A GUESS
4) GET MECHANISM TO PRODUCE MORE PELLETS
5) CUT OFF POWER TO STORAGE COMPUTER
6) GO BACK TO SHIP AND USE RADIO
When I went through I personally got flummoxed; it really seems like genre expectations are to do something heroic, even if it’s “mechanically heroic”. But the correct choice is to go back and use the ship radio, which sounds like an intermediate step and not something that would win the game at all. (Our players were similarly deceived, and the only option not chosen was “TAKE A GUESS”.)
In general, I found myself fairly grouchy with the game in its original form. There are no saved games, so it takes a lot of repetition to work to the end, and there were a lot of “cheap shot” branches. Especially bad was this one, after Harry “successfully” fakes his death.
NO ONE WILL BE LOOKING FOR HIM NOW.
SHOULD HE: 1)ESCAPE 2)TRY TO CAPTURE DR. NON 3)GET THE GIRL
All three choices lead to death. In practice, this means repeating a bunch of actions to that point (thinking it was the next part of the plot) only to repeatedly meet with failure.
I can see why, plot-wise, it is impossible to do the correct action (destroy the base with the mirror) after Harry fakes his death (someone would have to find his … clothes? … the game never spells out how the faking works … but that means Harry can’t use the mirror any more). Still, in a gameplay sense, this was terrible, in the sense that if I was spelling out a Bill of Player’s Rights for Choice-Based Games this would make one of the entries; don’t block apparent success in a dead-end where a player will have to try all the choices before they realize they’re in a dead-end.
This is the message you get if you pick N to the prompt that asks if you want to try again after losing. This emphasizes the attempt to make the game skill-based. While I appreciate the interesting bits of deception, when I played there just wasn’t enough to grasp the pleasure of working things out; it was more sorting out what happened after I had already died.
An ad printed in the page facing the source code for Assignment 45. Accounting for inflation, $3899 in 2020 dollars is $11,057.76.
Since last time, we had reached Harry #3, who had broken into a complex.
HE IS IN A HUGE COMPLEX OF SILVER GLASS PANES.
EACH PANE IS SCORED INTO 5 CM SQUARES, AND EACH SQUARE IS PERFORATED BY A SMALL HOLE.
1) EXPLORE MORE
2) EXAMINE PANE
Checking out the pane led to a villain monologuing and the longest text of the game:
AS HE TOUCHES THE PANE, HE IS STUNNED UNCONSCIOUS. WHEN HE AWAKENS, HE IS SURROUNDED BY A SECURITY TEAM. A MAN WITH GOLD TEETH IS SMILING. THE MAN SPEAKS.
‘THE GREAT HARRY FLYNN. I NEVER THOUGHT I’D MEET YOU IN PERSON.’
(STANDING UP, HARRY RETORTS) ‘THE INFAMOUS DR. NON FROM KRUEL.’
‘YES, KRUEL. KIDNAPPING, REVOLT, USURPATION, EXTORTION LEAGUE.
YOU, MR. FLYNN, HAVE INVADED OUR HOSTAGE STORAGE CENTER.’
(HARRY PROBES) ‘TELL ME MORE.’
‘OF COURSE. EACH HOSTAGE IS KEPT FOR FUTURE POLITICAL USE. THEY ARE DATA PATTERNED AND LASER STAMPED ON THOSE SLIDES YOU CARELESSLY TOUCHED. INSERT A PELLET LIKE THIS, AND THEY ARE RECONSTRUCTED–UNHARMED.’
‘WITHOUT A PELLET, A NASTY SHOCK IS APPLIED. YOU MAY HAVE THIS ONE AS A SOUVENIR.’
(DR. NON SLIPS A PELLET INTO HARRY’S SHIRT POCKET)
‘TOO BAD YOU MUST LEAVE US NOW, MR. FLYNN… PERMANENTLY.’
HARRY IS TAKEN TO THE SOLAR MIRROR. ONE OF THE GUARDS EXPLAINS THAT DR. NON RESERVES THIS FORM OF EXECUTION FOR SPECIAL GUESTS.
HARRY IS STRAPPED TO THE MIRROR. AT SUNRISE HE WILL BE INSTANTLY TOASTED. THE GUARDS LEAVE.
1) BREAK BONDS
2) ROTATE MIRROR FROM SUN
3) USE MEAD CELL
4) PRAY
Harry prays, and gets the idea of using the MEAD cell (his handy gizmo which allows him to see invisible things and project his mind as force).
He tries his bonds…
MIRROR BUDGES A LITTLE AS BONDS STRETCH.
SHOULD HARRY: 1) KEEP TRYING 2) TRY SOMETHING ELSE.
…and backtracks (option #2) and tries the MEAD cell instead.
HARRY REMEMBERS WHAT ORR SAID ABOUT THE CELL AMPLIFYING THOUGHT WAVES. HE CONCENTRATES ON MOVING THE MIRROR’S POSITION CONTROL LEVER.
Backtracking again, Harry goes back to trying to break the bonds.
THE MIRROR DOESN’T TURN FAR ENOUGH.
GOOD BYE HARRY!
No doubt in a real Choose Your Own Adventure book there would be a carefully-narrated ending, but the TRS-80 here is already jammed to the gills with text.
Reincarnating as Harry #4, he revives and tries rotating the mirror from the sun instead.
THE MIRROR DOESN’T TURN FAR ENOUGH.
GOOD BYE HARRY!
Oops! On to Harry #5, whereupon our audience realizes the MEAD cell was right after all. While the first time using it, nothing happens…
FINALLY THE LEVER MOVES AND ROTATES THE MIRROR AWAY FROM THE SUN. THIS GIVES HARRY THE TIME HE NEEDS TO BREAK FREE.
1) SNEAK BACK TO HOSTAGE STORAGE AND USE PELLET
2) ESCAPE AND RETURN WITH REINFORCEMENTS
3) CAPTURE DR. NON AND USE HIM TO BARGIN FOR THE GIRL
4) FAKE HIS DEATH BY TURNING MIRROR BACK INTO SUN
5) USE MIRROR AS WEAPON
Harry first tries to sneak to hostage storage:
AS HARRY SNEAKS BACK HE IS SURPRISED BY A SECURITY TEAM.
Reincarnating as Harry #6, he tries faking his death, which succeeds! The games options are:
NO ONE WILL BE LOOKING FOR HIM NOW.
SHOULD HE: 1)ESCAPE 2)TRY TO CAPTURE DR. NON 3)GET THE GIRL
although it turns out all of these are dead ends! We lose Harry #7, #8, and #9 this way.
Reversing time to the previous decision, Harry #10 tries to get reinforcements.
HARRY MAKES IT OUT OF THE COMPLEX, BUT WITHOUT THE SLED. HE PERISHES IN THE DESERT.
Finally, Harry #11 has success when trying to use the mirror itself as a weapon.
HARRY TURNS THE MIRROR ON THE INSTALLATION AND DESTROYS IT.
DR. NON, HOWEVER, ESCAPES IN HIS PERSONAL SHUTTLE.
SHOULD HARRY: 1) GO AFTER DR. NON 2) GET THE GIRL
Harry decides the princess is the top priority and goes to GET THE GIRL.
HARRY MAKES HIS WAY TO THE HOSTAGE STORAGE AREA.
BY NOW DR. NON HAS RADIOED FOR HELP.
KRUEL REINFORCEMENTS ARE ON THEIR WAY.
1) STUDY THE STORAGE SYSTEM
2) FREE EVERYONE BY DISABLING LOCK MECHANISM
3) EXAMINE THE FILES
4) CALL UEC ON SLED RADIO
5) GET MECHANISM TO PRODUCE MORE PELLET KEYS
What should Harry do next? Please vote in the comments.
(I’m going to restrain myself from commenting too much, but the events above contain two fascinating theoretical bits — the part where the use of the MEAD cell did nothing and the players went back and died on the other options, and the “dead end” where faking death was a success but it led to 3 losing options. We’re almost there, so I’ll get into a full discussion next time.)
So, I’ve been having trouble keeping the momentum going on the playthough of Assignment 45 (which is close to done!) so for the last leg, I’m going to do the tried-and-true method of GIVING AWAY STUFF.
To recap, Assignment 45 is a TRS-80 game from 1981 in Choose Your Own Adventure style, and we are playing through in the comments. All you need to do is read up to the current update and post a number corresponding to your next choice.
Now, it so happens that Orihaus (who is likely reading this, hello!) sent me some keys for his interactive fiction game To Burn in Memory to do with what I wanted. I have four spare keys so the next four people who vote (as of the time of this post) each get a Steam key to the game! (Assuming they agree to getting one; if someone passes I’ll move on to the next person.)
In addition, for everyone who has participated (including back to the very start of playing Assignment 45), I will drop everyone’s comments in a randomizer and pick three people who can grab a game of their choice from my pile of Steam keys.
I did say comments, which means the people who participate more have a more likely chance to win. (Only one win per person, though.) And yes, that’s more than 3 games, but I want the last person in line to be able to choose rather than just pick what’s left.
Note I will need access to your email for all this to work, so if you put a dummy address on your reply I’ll have to do some follow-ups. Drawing will happen after the game is over.