(Continued from my previous posts, which are needed to make sense of this one.)
I’ve managed to get into the black tower, and … wow.
A zoom-in on the Jewels of Darkness disk for Atari 8-bit, Via Gaming Alexandria.
One quick thing first: I have managed to resolve my light source issues. The trick here is that when the driftwood burns out, you can just relight it and it lasts just as long on repeat. Frustratingly, while the game lets you re-light the driftwood early, the extra time only happens once the driftwood is out, so it’d be very easy to test this and decide this was a useless maneuver.
Now for my main progress: I had a wrong presumption partly brought on by the exact positioning of the copy protection of the game (right before the entrance to the black tower). In the versions that don’t use Lenslok (like the DOS version I was playing) the game asks you to pull words from the manual instead.

The gates are simply shut and not described as locked. While I was starting to think a collect-enough-treasures method of opening was unlikely and it was instead going to be via magical gizmo, I didn’t realize I had the object to do so quite early. It was an item I had been trying everywhere with no luck, and to be fair, we have the fantasy-vs-realism divide here again (see my last post’s discussion of Starcross) where it’s more of an intuitive reasoning that came up with the connection rather than a solidly logical one.

The whistle is just to a west a bit of the jellies so solving that puzzle is all that’s needed. I do think the authors expected the player to get in here relatively late because the “later” collar security clearances are in here, including a new one (mithril).
The authors really thought carefully through here: you’re in a lair of a giant mega bad-guy who is already dead (sort of, we’ll get to that). What will you find? If you get on the throne, you’ll find his secret control buttons to set people on fire and drop people in pits and so forth.

The list of controls are:
1 pit opens
2 pit closes
3 fill room with light
4 throne moves up to an “odd little room” (I will describe in a moment)
5 throne moves down
6 alarms sound
7 fire jets
8 “Master: I beg to report that all internal eyes are dead and enemies are in the caves. Also, thousands of enemy orcs are advancing upon us.”
9 you get teleported to a secret room at the top of the giant trap tower (will save for later)
This reminds me a lot of AD&D, but I’m not sure if it’s a particular campaign reference. It was delightful to play around with. It also helped explain a game design mystery, as the trap towers seemed to be entirely self contained: they were intentionally designed by the Demon Lord himself in order to dump in unsuspecting adventurers and presumably cackle at their demises. For example, if you press the “1” button and decide to jump in, there’s a sign explaining the 9-gem condition:

The “odd little room” that the throne moves up to (elevator) style has two collars and two treasures.

The “mithril collar” is indicative of yet another pillar. That pillar turns out to be the throne itself. If you’re wearing the mithril collar you can teleport to any of the locations while standing on the throne (red, orange, yellow, green, blue, violet (indigo is a synonym), silver, and mithril itself will warp you back to the throne). I love that the detail makes sense as both a puzzle and as a magical access system someone might design. There’s no logic you can just eyeball and work out — you have to experiment — but at least the Demon Lord’s motivation has been thought through.
There’s a bit more to see than just the throne:
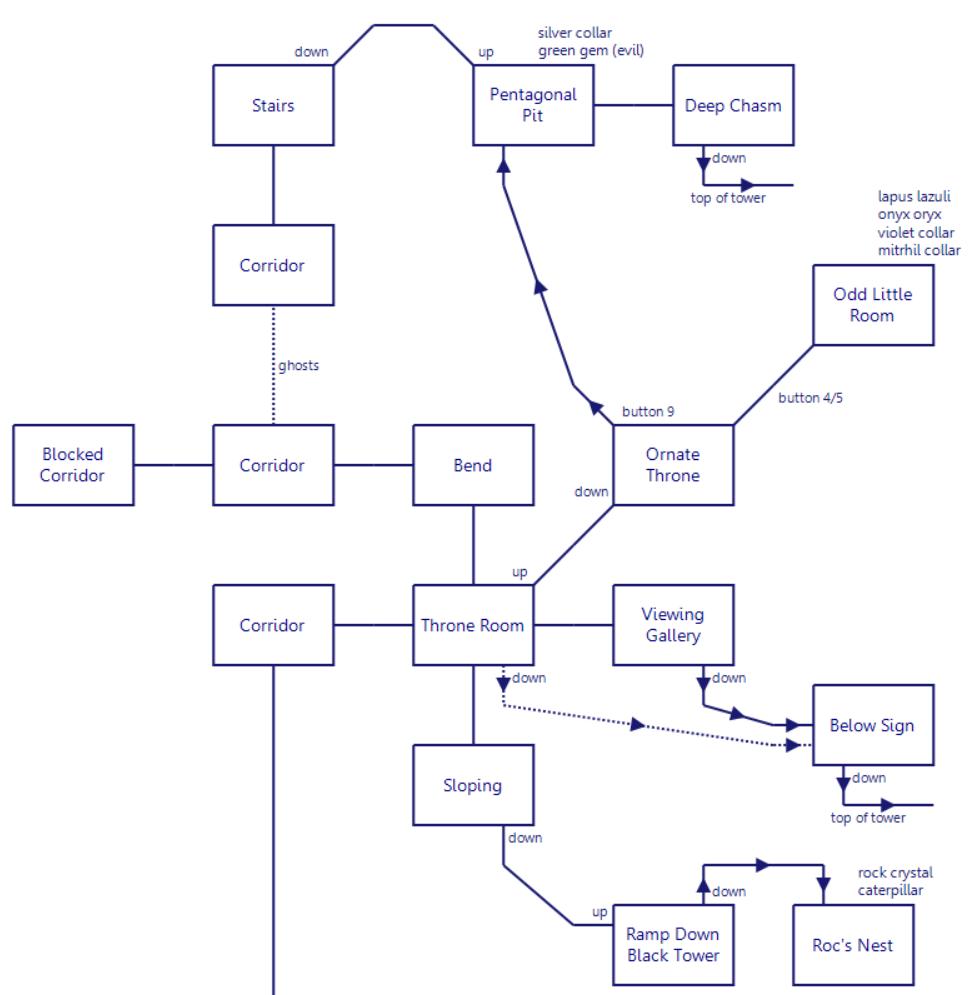
Heading south, there’s a spot where you get picked up by a Roc and dropped in a nest, with both a caterpillar and a rock crystal (both are treasures). Unfortunately, I don’t know a way out! This is more irritating than it might normally because since I just unlocked teleportation across the entire map.
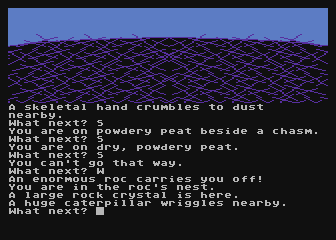
The Atari version has a “powdery peat” area before the nest, but since the DOS version jumps straight to the nest, I’m guessing it is just for atmosphere.
Heading north, you get stopped by ghosts, who explain “We failed the Master once and our doom is to remain here whilst He lives.”


In the Atari 8-bit version, you get rather less information.
Whilst He lives! Yes, as I long suspected, the Demon Lord is dead but not quite Dead dead. Although I didn’t realize it immediately, the place he’s hidden is revealed by pressing button 9.

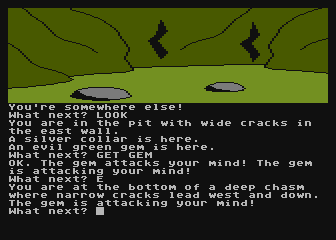
This is technically a room at the very top of the trap tower, and the exit will (in two steps) drop you down to the swirling-images-of-madness room. The silver collar is of course one for the collection (I have the whole set now, but I don’t know if there’s some ramification of this). The gem starts trying to take you over if you pick it up.
Trying to CUT GEM helpfully responds you need a hammer for that, so I reloaded, grabbed the hammer from my supplies (they were previously used with nails to lock in a zombi) and killed the Demon Lord, this time for good.

This can be confirmed because once you do this the ghosts are gone. There is one catch to all this, which was mentioned by button 8 — there are orcs approaching. If you walking out the front gate, or even teleport to the green tower (which might be the better idea), you’ll be overwhelmed.
My guess is that I need the horn at the goat — the one showing fleeing enemies — and then I can escape. I still am stumped on getting it though! My best guess is I need to drop the bed somewhere (which becomes very large when you drop it — there’s no way they coded that in without it being important) and use it as a mattress to fall on when the goat bumps you off the top of the “stone face”. It looks like the landing place might be right outside (to the southeast or “out” where the skeletons were) but I can’t get there yet because I still get rebuffed by stones getting thrown from afar.

It would make sense in terms of story logistics if whatever item(s) found by solving the trap towers can then go back to get outside the stone face, and that will lead directly to the horn, which will lead directly to getting by the orcs that have gathered at the front of the dungeon. The game hasn’t followed my predictions that well, though.
(Speaking of trap towers, no, I haven’t got past the flying hand yet. I don’t know if you can get past the flying hand. And does the gem I destroyed count as the “10th gem”? The game gives you score for destroying it and the ghosts acknowledge the Demon Lord is finally dead, but maybe there’s a way to keep it around long enough to open that door.)
Just to summarize, the open puzzles I know of are:
- getting the horn, where a goat knocks you off an edge
- getting by unseen enemies throwing rocks
- getting out of the Roc nest
- finishing the gem-gathering trap tower area, either getting by the hand or safely opening the snake box or both
- (MAYBE?) keeping the gem from soul-stealing without breaking it
- the endgame with the orcs, that I theorize needs the horn
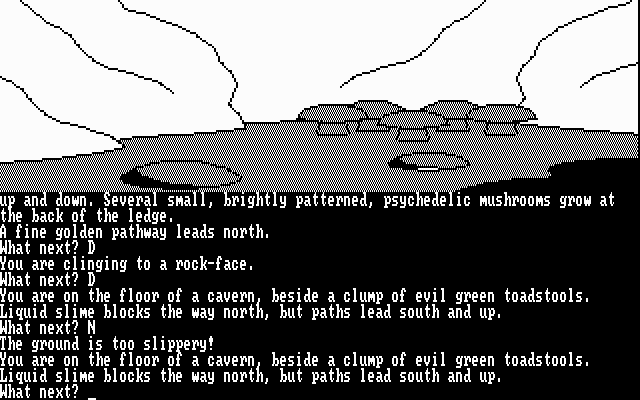
- (BONUS, NEW) getting by a spot that is “too slippery” by some “evil green toadstools” in the mushroom area — this isn’t marked as an exit but going north has that special message, so it may or may not be a puzzle
Keep in mind this is at its essence a treasure hunt there could always be some secret action somewhere that reveals yet another treasure. I don’t get the vibe this is like Sharpsoft Haunted House which had one of the treasures hidden in a super-obscure way; the Level 9 method has generally been to give at least a stub of interaction to indicate there’s something to worry about.
But also: technically, I don’t need all the treasures. The game lets you leave right away, even, so you could claim you’ve “won” with just a few. I still think killing the Demon Lord is important enough it is a requirement of really “winning” and getting to that point will cause the orcs to appear blocking the exit. Even given that objective, some treasures would still be purely optional, just like Hezarin or Acheton.

Here are some clues for the few problems you stills have:
Unseen enemy:
The slime:
The goat:
Snake box
The hand
The second light source (yes, there is one)
The roc nest – this one is ridiculous
I got the goat (and the other related puzzle on that list) last night
which technically means I “win” the game according to my conditions
but got very stuck after, especially on the nest, was going to give myself an hour more trying to go hint-less before I start to check things
Pingback: Dungeon Adventure: You Seem to Have Survived | Renga in Blue