I’ve now utilized the teleportation booths, visiting both an asteroid and an alien city. I haven’t found any way to extend my oxygen (or swap the helium that’s currently in the ship’s air with oxygen); with teleportation it may just be possible to go fast enough, but given I still have some puzzles to go I have my doubts.
All amidst a flurry of bugs, alas.
A preliminary NASA design for a 12-man module from ’69-’70. It normally is in zero-G but allows for rotation to test artificial gravity. This is smaller than the Derelict ship but with the same concept, connecting floors via a central shaft.
My first breakthrough was simply figuring out how to work the glass booths everywhere on the map. Saying both LOOK GLASS and LOOK BOOTH let to the game declaring they weren’t there, but for whatever reason GO BOOTH is special-cased to allow entering. Please note that this is different from every other object in the game; MAGNETIC BOOTS must be referred to as MAGNETIC (or just MA), not BOOTS; it’s using the initial part of the string, with no notion of which part is the verb and what’s the adjective.
Leaving is just a matter of GO OUT, but that’s not safe with the droid (who seems to always miss their first shot, but shots later have a random chance to hit). Trying to PUSH KEYBOARD leads to the game asking for a number from 1 to 99. Trying out “1” since there seemed to be no logical way to do better, as “YOU MOLECULES ARE SCATTERED”:
2 and 3 similarly lead to inadvertent exploration of the known universe; locations start at 4. I ended up just brute forcing all 99 options, although most led to death.
There’s a way to avoid at least some of the brute force (kind of, I’ll get back to that) and three of the locations — as marked in boldface — go to new areas, which I’ll also get back to. I originally didn’t have the colors on my chart but I teleported myself to SECURITY (23) to try to pop open the safe, now that the power was on. Remember, I had determined the safe was
SAFE: BLACK/PURPLE – BLACK/YELLOW – BLACK/PURPLE
but typing in PURPLE-YELLOW-PURPLE didn’t work, and I realized quickly the safe really wanted a numeric code. I realized I could triangulate the room colors with the teleport locations, leading me to find the base-10-using aliens had the code
black = 0
brown = 1
red = 2
orange = 3
yellow = 4
green = 5
blue = 6
purple = 7
gray = 8
white = 9
that is, the same order that’s on the chart from the communications room. So BLACK/PURPLE is 07 or just 7, BLACK/YELLOW is 04 or just 4, and BLACK/PURPLE is 7 again. The combination for the safe is 747.
Popping open the safe reveals a ring of keys, a phaser, and some coins. The coins are just a treasure, the keys go to the locked cabinet in the sick bay (which you’ll see shortly), and the phaser can be used to smite droids, specifically with the verb BLAST.
The two-letter parser means there’s a lot of nonsense here: the green verbs are real, blue verbs map elsewhere. I found out from the response to PLAY that PLACE has to be a verb, not on my standard list (but I added it), and BLAST (not listed) I figured out while playing around with the phaser.
Blasting droids is quite satisfying and since they seem to always miss their first shot the droid rooms are now completely safe.
Above, I’ve used the keys on the cabinet, with the debris of a destroyed droid close by. This reveals
a gray box with a knob (this creates a beam, I haven’t done anything useful with it)
a silver wire (I also haven’t done anything useful with it)
and immortality serum (!!). I tried every verb I had extracted to see if it was possible to take the serum and thus survive the oncoming lack of oxygen, but had no luck. I tested out DRINK with a response of O.K. but that just mapped to DROP.
I finally realized (by testing it at back at the ship) the serum is simply intended as a treasure and we can’t use it. I admit I was looking forward to some even-more-terrible ending message by testing out the teleport-your-molecules device whilst immortal, but alas the technical requirements of this game remain extreme (it uses 12k rather than 8k, at least) and I don’t think the authors would have wanted to custom handle that.
Returning to those new locations: one is supposed to be clued by the projector in the library, which shows a brown and black alien city so the teleportation code 10 matches.
I suspect most people who played got this already by brute force. The thing is: at least some death-testing is required to understand the code, the asteroid has no similar clue, and there’s no reason why the authors couldn’t have dropped yet another hidden teleport somewhere in the 80s or whatnot.
The puzzle is rescued by the fact that the safe really needs the player to have understood the code. I’m not sure if changing the puzzle to remove the brute force (by adding more digits, say) would have made it stronger.
The new locations are above; I marked the teleport destinations. The shaft is the buggy one, as there’s no glass booth in the room, and when you leave the booth to enter the room the booth disappears. There’s also no corresponding color (it’d be black/yellow, 04). That buggy room — which a player is most likely to come across first — is another reason why the brute force can only sort-of be avoided — even if someone spots the pattern early they get dealt a room that breaks the pattern! But it’s the only one.
The asteroid just has a titanium pickax (treasure) and some lumps of coal (not treasure, yet).
The city is more interesting; it has a “press” that you can PLACE the lumps in (…thanks goodness I randomly learned about that verb…) and convert them into diamonds, as long the power is going.
While I now can easily open the bay doors and drop the tractor beam for escape, there’s still the matter of getting the treasures. Things I have yet to puzzle out are:
The box that shoots a beam
The silver wire
A flashlight near where the diamond press is (you can turn it on, but why? there’s no darkness)
An oven with a bottle of cooking oil
A metallic suit, which can’t be worn at the same time as the oxygen is attached
Some “shielding” near the radiation sign
More details on the last point: the shielding is at the hyperspace drive, and I’ve successfully lit up a welding torch and managed to CUT SHIELDING. Unfortunately this simply kills the player.
(By the way, CUT on anything else has the game claim you don’t have a torch, even when you do. I have to keep alert with any parser message to determine if it’s saying something real or if it’s just a bug.)
The reason why you’d want the shielding is back at the lab: there’s a machine that indicates (via cryptogram) it is for turning lead into gold. So I imagine you can get gold shielding if you can just survive ripping it off from the engine.
I suspect I’m closing in on the ending, and I also even suspect I have all the verbs. I’m still probably getting stuck via some cryptic parser response without realizing it. If someone wants to check Dale Dobson’s playthrough, I’d appreciate any ROT13 hints (especially if it turns out I’m missing something outrageous).
I’ve got the layout now, and this is very similar to Starcross in that a complete layout of the ship is really needed before puzzle-solving can begin in earnest.
Just like Starcross, Derelict is set in a rotating cylinder with artificial gravity (given the same author made a Rimworld game the same year, this is not a shock). The directions are up, down, forward, aft, spinward, and antispinward. There’s a central shaft that links to multiple layers of the cylinder, and when inside the cylinder, travel “wraps around” going spinward or antispinward.
Although smaller than this; in two of the layers only two GO SPINWARD or GO ANTISPINWARD actions are enough to loop, and in the middle layer, only three steps are needed.
I’ve divided the central shaft into four layers…
…and I’ll give the map in four parts. My coloring is arbitrary and most rooms have a unique color combo that I’m sure is important (they also all have the mysterious glass booth). In the landing bay, the floor is red and the walls are green; all combos are unique.
That’s everything for the start. Note on the map I have a corner marked; I’m using that to indicate where all the droids are (there are droids #1 through #6). I also have north mapped to forward, south mapped to aft, east mapped to spinward, and west mapped to counterspinward.
(As simple as the above looks, it took me a little while to figure out because I didn’t have an item and the loop going down at the Central Shaft was counterintuitive. Dropping the magnetic boots gets you stuck in zero gravity, and of course dropping your suit or oxygen are similarly fatal. I eventually found out that the sign at the start of the game which tells you DROP TREASURE HERE is takeable so I used it for mapping purposes.)
Moving on to the next floor, the one I’m calling “Technical”:
Past the starting floor all names of rooms are given in cryptograms. I suppose this is meant to represent an alien language but if it’s just a cryptogram, doesn’t it mean they use English? If I keep the thought process going I’d imagine we’re looking at a human ship that’s been tossed back in time, but in all honesty this is almost certainly meant like “Hollywood English” in a movie set in a non-English country; we’re just supposed to get the feeling of translating an alien language without having to do it.
The yellow sign says IZWRZGRLM, or RADIATION. I have a feeling I’m going to need the “metallic suit” that’s in the storage room on the same level, although just passing through isn’t fatal. Also noteworthy is a CUTTING TORCH with a TANK (with a cryptogram on it that says WELDING GAS) as well as a transmitter with a ruby crystal in it (my first treasure) and a chart with more cryptograms.
…let’s just ignore the two bathrooms (is this really an alien ship?) and note the locked cabinet in the sick bay…
…a “library” next to a “rec room” where there’s some playing cards (aliens?!), some jeweled gaming pieces (treasure number 2), a platinum globe (treasure 3), a projector that needs power…
…and in the XZKGRZMH XZYRM (CAPTAINS CABIN) there’s a log book giving an encoded safe combination.
Using the crypto-translated chart from the communications room, that comes out to be
BLACK/PURPLE – BLACK/YELLOW – BLACK/PURPLE
or maybe just PURPLE-YELLOW-PURPLE if we’re ignoring the initial #.
(I should also highlight, referring back to the screenshot, one of the major annoyances of the game. Aardvark games always have had a tendency to give no response at all to particular commands, and this is true for many of the things you want to look at or read. In this case, READing a log book shows nothing, and you have to LOOK!)
Moving to the top:
The safe is right there (HVXFIRGB, or SECURITY) but it needs power; an oven has cooking gas, and a lab has a “large machine” which needs power as well.
Finally the very top is the control deck, where a CRT indicates there is no power, and there are three colored buttons.
That’s POWER, TRACTOR BEAM, AND BAY DOORS. Rather like Dog Star Adventure, it’s clear the beam and doors need to be operated before we get out. Pressing either one indicates there is no power, so that must be the right press?
The exit down gets cut off, and the droid (and I assume all the other droids) wake up.
Other than running out of oxygen (the oxygen is really tight but I don’t know yet if we get a refill) there hasn’t been any hazards in the game yet. The ship is waiting for us! This might end up being a “preparation puzzle”, one of my favorite kinds, where we have to pre-create a safe route before lighting things up. It’s too bad the Aardvark parser makes everything three times harder to deal with.
Aardvark is a company I’d never heard of before starting the project, but we’ve spent an awful lot of time with now. They originally wrote their games targeted at the ludicrously small-memory requirements of the Ohio Scientific Challenger 1P computer, and made some odd parser sacrifices to get there (like only understanding the first two letters of each word). Despite this they’ve been rather clever in terms of geography, with (for example) Bob Anderson’s Circle World having a fair number of locations only reachable by teleport, but having all areas united together by the end. Earthquake, the game we most recently looked at, had an almost completely wide-open map, but led to puzzles where the thought process sometimes went “what store would have a solution to this” and not simply thinking about items.
Derelict is another Bob Anderson game from 1982, where he is again listed as co-author with Rodger Olson (founder of Aardvark). I’d be cautious about saying this was an equal collaboration; quoting Bob Retelle (of Trek Adventure):
Credits often resulted from “Hey why don’t you write an adventure based on xxxx” and it became “By Rodger Olsen and (whoever)”. At least I got paid (sometimes).
(Regarding getting paid, Retelle points out how ports were considered “owned by the company” so the original author did not make money off them. In one case a store told him about how the TI-99 port of his RPG Quest II was popular, except this was the first he even heard of a TI-99 port existing. Also, there is no Quest I and calling it II was a marketing stunt.)
Our goal is to raid a 1000-year old alien vessel for treasures. This is kind of like Queen of Phobos if we were one of the thieves. The catalog says it is “the new winner in the ‘Toughest Adventure at Aardvark sweepstakes'” and notes there are “no irrational traps and suddenly senseless deaths”.
This ship was designed to be perfectly safe for its builders. It just happens to be deadly to alien invaders like you!
This description made me hesitant. Earthquake was genuinely good (almost recommendable) but still had the miserable Aardvark parser. Any game designed as “easy” can get away with a less robust parser, not just because the player will have less moments of stuck-ness in order to test the boundaries, but because easy games tend to ask the player to communicate fairly straightforward actions.
The two versions of Derelict I’ve been able to find are for the Commodore PET and C64. I went with the Commodore PET this time. There’s a short series of messages about being pulled in a ship by an alien tractor beam, and then:
My first problem was just trying to pick anything up: GET BOOTS says “IT’S NOT IN SIGHT”. This is another instance of a parser’s try-not-to-reveal-too-much attitude is hurting, those boots are clearly right there! The default message is trying to avoid noun-hunting but it ends up leading to a bit of nonsense right at the start.
You’re instead supposed to TAKE MAGNETIC (or TA MA, this is a two letter parser) and you can do that for the other items. The sign indicates the treasures go in the room for points; yes, it’s one of those games. (Oddly enough, not common for Aardvark! They’ve been cranking out escape games, not Treasure Hunts.) Moving on with all three things (boots, spacesuit, oxygen):
Here is the usual airlock setup where you close one door to open the other one, go outside, and then:
I… what? Didn’t you say I was wearing the oxygen, game?
READ OXYGEN gives the message ATTACH/DETACH OXYGEN. Ok, fine, but it seems weird to make this essentially a puzzle. (And give the oxygen a response to reading! The magnetic boots give a blank message when you try to read them.)
Finally, through with that, I went outside again, did LOOK #1 DROID, and got the response
WHAT?
(EXAMINE doesn’t work at all, READ gives a blank prompt.)
Hmm, maybe try the booth instead? LOOK BOOTH:
THAT’S NOT HERE
Oh that’s right, it needs the noun from the start, it needs to be called “glass” instead. LOOK GLASS:
THAT’S NOT HERE
Game. Excuse me. You literally have the text “THERE IS A GLASS BOOTH HERE”.
Ye flask indeed. I don’t remember having anywhere near this trouble with Earthquake, but keep in mind this game has already tried to having both items being worn and things attached, and I have no doubt there’s something weird and complicated going on in the landing bay, but I’m still unclear what that thing is. Maybe it is best to just move on and explore.
This one’s going to be a headache to map out, isn’t it? And likely buggy.
I remember discovering some of the bugs of other games in early testing (it was pretty common for Rodger to hand out tapes of new games before they were put in the catalog), but it was like pulling teeth to get him to fix any of them.
In “Mars Adventure” (or was it “Pyramid”.. hmm.. I forget exactly), there was a stairway with exits that didn’t line up with the next locations. That is, you’d exit to the East, say, and end up in a room with exits to the North and South. Going south would take you back to the first room (it should have said West). Made it really tough on people who liked to map the advanture. Rodger’s response was something like “tough”.
Another one let you eat the key that was absolutely essential for escaping (maybe that was the Pyramid bug). Again the answer was “well, then don’t eat the key”.
Let me get a bit farther and report back next time. Aardvark games always stayed in tight constraints so there’s no way this goes out long, but if the parser difficulties stay this could still require multiple parts.
This is, as far as I can find, the only game or article of any kind by Stewart F. Rush. It comes from a BASIC type-in listing printed in the January 1982 edition of Creative Computing (the same one that had that rollercoaster game that used a laserdisc); it is for computers that use a S-100 bus (like the North Star Horizon) but includes conversion instructions for TRS-80 and Apple II. It was later re-printed in a slightly larger form in David Ahl’s Big Computer Games (1984), which gives the lines:
5 REM MOON SURVIVAL PROGRAM
6 REM WRITTEN BY STUART RUSH 3/12/81
These lines are not present in the original magazine article. We’ve had plenty of instances of people removing comment lines of this sort but never retroactively adding them (people might add themselves in the credits, but David Ahl was the editor, not Rush). I think what this indicates is that the 1984 form of the game is the original and the one printed in the magazine is pruned down for memory-saving purposes.
Here’s the intro of the 1984 version:
*****************************************
* CURRENT STATUS & LOCATION INFORMATION *
*****************************************
ELAPSED TIME: 0 MINUTES
POWER UNIT: 225 UNITS
OXYGEN REMAINING: 180 MINUTES
LOCATION: You are at Mare Serenitatis. Long eerie shadows from distant mountains and craters cast themselves across the barren landscape.
Compare with, simply: “YOU ARE AT MARE SERENITATIS.”
I’m fairly certain the intent was to put both versions in the January 1982 magazine, but something got messed up in the printing! The end data section has two versions, with Listing 2 being an “Option for Shortened Text”. The two are exactly the same.
Being in the vague “implied public domain” (not really public domain but people played fast and loose with BASIC source code in the 80s) there were multiple versions later, some based on the ’82 code, some based on the ’84 code. If you’re an avid follower of this blog I’m betting you already know one of them.
Via eBay. OK, I know the cover is depicting Quest for Gold, not Moon Survival, but is that a prospector posing for a picture with werewolves in the background?
I pored through many versions trying to find one that matched the ’84 code (including checking a port for the wildly obscure Microbee, an Australian computer — it turns out the DROP command is broken) and the best I could come up with was this copy which has “enhancements” by G. M. Bright. I didn’t know what these “enhancements” were (cue ominous foreshadowing) but it’s the closest version I could find that I could get to run.
From the 1982 article.
It is THE FUTURE, the year 1991, and our craft has crash landed on the moon and our goal is to escape. I admit I was originally excited to see how things would go because the author mentions
Each location described corresponds to an actual moon location taken from a National Geographic map of the moon.
making me wonder if this was going to be set in “true” hard science fiction — that is, we’d be dealing with a real spacecraft and scenario as much as possible. This turned out not to be the case, alas. Surely someone in the early 80s was nerdy enough to do an adventure with a realistic spaceship model, and not just randomly guess what it might look like?
*****************************************
* CURRENT STATUS & LOCATION INFORMATION *
*****************************************
ELAPSED TIME: 5 MINUTES
POWER UNIT: 220 UNITS
OXYGEN REMAINING: 175 MINUTES
LOCATION: You are on a promontary point on the rim of the crater Posidonius, only half visible when seen from below. There is total darkness to the East.
As the screen indicates, there is a constant check over “power” and “oxygen” and the magazine article even mentions
The emphasis is on determining optimum move scenarios, resulting in minimum times and resource use.
That is, the actions you need to do (barring parser annoyance) are easy to figure out, and the hard part is making sure you don’t run out of oxygen whilst escaping. You have an inventory capacity of four, and you start with a power pack and an oxygen tank, both you need while exposed to space.
The “dead” on the right shows the player hitting a dark place, and any step after is death.
The green-marked part is your ship, and has oxygen, so you can simply drop your oxygen to stop using it. (I’m pretty sure that’s not how it works in a real space suit; it took me a while to realize this and was the only “tough puzzle” of the game for me.) Oxygen is tight enough that you do need to optimize both steps while on the moon and make sure you drop your oxygen every time you’re indoors.
LOCATION: You are at Mare Vaporum. The Apennines Mountains rise ominously to the North and West.
##
There is an ILLUMINATOR here.
Quite randomly on the surface of the moon there is an ILLUMINATOR in one place and a SHOVEL in another. Both can wait for later; what we really need to start with are a SEALANT and a KEY from the ship.
LOCATION: You are in the control room, the ships console is before you.
##
There is an ELECTRONIC KEY here.
Starting from the Base of Crater of Plato and heading west has our suit get hit by a meteor shower, and we need to USE SEALANT otherwise we’ll die.
LOCATION: You are at the base of the crater of Plato. A shiney object is seen to the West.
? w
There is a meteor shower. Your space suit has developed a leak!!
? use sealant
Proceeding to seal suit…….
LOCATION: You are standing before a small metal shed. A sign reads ventillator shaft number 2.
There’s a peculiarity of the source code worth highlighting here.
3080 PRINT “There is a meteor shower. Your space suit has developed a leak!!”
3100 GOSUB 4890
3110 IF I2 THEN 2980
3120 PRINT “Proceeding to seal suit…….”:FOR CX=1 TO 1500: NEXT CX
Specifically, GOSUB 4890 is asking for a one-shot command. Either “try” or “use” is accepted, otherwise whatever the player does (even if it is something reasonable like APPLY SEALANT) fails.
4890 INPUT B$
4900 C$=LEFT$(B$,3)
4910 IF C$=”try” THEN 4950
4920 IF C$=”use” THEN 4950
4930 I=-1
4940 RETURN
Then, the player goes through a routine to check the player specified the right item (sealant, in this case) and that they have it in their inventory. This is all bypassing the regular command parser; we’re in a “faked” mini-parser level. This isn’t so apparent with the sealant, but it gave me issues at the next step.
?w
The shed is locked
I first encountered this without the key (I had the illuminator and the sealant) so I went back for the key, returned, and tried many different methods of typing UNLOCK DOOR. I finally realized that the game is treating the locked door with the fake parser again. That is, you need to first try to enter the locked door to trigger the section starting at 4890, then type USE KEY (it won’t work outside of the routine) and this will allow the player to move on.
The next part is all in green so is generally safe without oxygen (except a red-marked exit — if you go straight from the corridor to the hanger, there’s no oxygen, you need to go through the side “air lock chamber” first, and no, the game isn’t clear about that at all).
LOCATION: You are in a lighted space station corridor.
##
?n
LOCATION: You are in the storage room and supply area.
##
There is a CODED BADGE here.
?
The coded badge is incidentally so that a nearby robot won’t think you’re a security threat and shoot you, but given the robot is in a side room anyway, there’s absolutely no reason to worry about the badge. What you do need to worry about is going to the upper floor and finding the nuclear bomb in the hanger (with the oxygen caveat I already mentioned).
LOCATION: You are in the hangar area. The launch area
is located to the South of here.
##
There is a NUCLEAR BOMB here.
Why is there a nuclear bomb about to go off? Where are the people who set it? One could imagine a convoluted situation like Lost but the author has not filled in the gaps.
You can use a “transporter” to a room that gives information about a defuser to the east of where you started. You can’t find the defuser until you’ve seen the message. Where going east from the start point twice previously led to death, now it leads to a new room with the defuser.
LOCATION: You are in the space station’s control center.
##
There is a TRANSPORTER UNIT here.
There is a COMPUTER MESSAGE here.
? read message
Bomb de-activator located somewhere east of Mare Serenitatis on moon’s surface.
You need to coordinate picking up the de-activator while not burning too much oxygen; additionally, there’s some dilithium crystals you need as fuel (…realistic space ship…) that you can dig up with a shovel.
LOCATION: You are at the top of a rocky arete on Burg crater. To the North the center of the crater is thousands of feet below you. To the West, the huge crater of Eudoxus can be seen between crags on a ridge bordering Lacus Mortis.
##
There is a SHOVEL here.
? get shovel
Okay
? d
LOCATION: You are at the base of the Burg crater in Lacus Mortis. The surface is very soft here.
##
? dig
There is DILITHIUM CRYSTALS here.
Incidentally, there’s a walkthrough over at CASA that optimizes things even more by picking up the bomb and bringing it to the defuser rather than the other way around. Unfortunately, in the version I played, the bomb was too heavy to pick up.
This turns out to be a serious issue. I did very careful step counting: the game gives 180 minutes of oxygen, and each step takes 5 minutes. That turns out to be 36 non-oxygen steps.
8 steps are needed at start to grab the illuminator and head to the crash site. You can technically do this part just a little later but it doesn’t save any steps.
For the crash site you can grab the sealant and key. You need to go to where the meteor shower happens, get hit, drop the sealant, and return for the illuminator. Doing all that and making it to the shed (where you can drop the oxygen) takes 13 steps.
14 steps are needed to leave, pick up the defuser (and just that), and return for the defusal, for 22 steps.
That’s 35 steps out of 36, and doesn’t even account for getting the dilithium crystals for the ship to blast off. (You might wonder why you can’t ignore the bomb, get the fuel, and blast off — it says your ship isn’t fixed yet if you do that. I guess there’s some kind of auto-repair function?) If you’re allowed to take the bomb with you, the step count becomes manageable at 17 to both get to the defusal room and retrieve the fuel.
Since the original source does let you take the bomb, and the step count seems impossible otherwise, I’m pretty sure it was intended by the author, and G. M. Bright in an effort to make the game more “realistic” made the game impossible to win.
I decided to change the appropriate lines to make the behavior match the original, went through all the steps, got to the last room where I could blast off, and…
You have no power left, or you have no power source.
You have frozen to death.
You have failed to survive.
Do you wish to try again?
Agh! There’s not just oxygen going down, but also power. This wouldn’t normally be a problem but the “enhancement” also added the bit with a shovel. The original intent was for the player to just dig with their hands. You can even see this in the sample play in the 1984 book:
The steps it takes to pick up the shovel are just enough to exceed the player’s power pack. Unlike oxygen, which has no means of restoration, there is a spare power pack in the moon base, but just retrieving it and walking it to the entrance burns up power (even though the power isn’t needed indoors!) However, maybe there’s just enough to make things work?
Well, no. It has 50 power, and uses 5 power per step. It takes 10 steps to get outside, so you use the power pack entirely just retrieving it!
So not only did adding the “realism” of the nuclear bomb that couldn’t be picked up cause the game to be unwinnable, but adding the two extra steps to pick up a shovel did too.
You know what, if the game is going to be that broken, I’m just going to cheat, since I got to the end anyway:
GOTO 4165
Congratulations, you have just blasted off and are on your way to earth. Your escape time was 355 minutes.
I bet if you try hard enough you can win the game in negative moves!
In all seriousness, putting aside my mishap with the bad version — which says something about even when something is preserved with lots of versions, the act of playing can be difficult — the emphasis on super-exact timing is interesting; we haven’t seen it much before (but have a little; for example, with the games of Paul Shave). However, the timing being this tight removes any real sense of verisimilitude — we can’t pretend we’re just a lucky protagonist when we already know so much to ignore any misstep at all. Somehow this didn’t feel awkward with Atom Adventure, which clearly was an exercise in step-counting, but the initial framing here being couched in realism — up to at least including the real map of the moon — made the slow destruction of the facade a touch more grating.
By the way, if you linger and try to play with the robot or whatnot the moon gets destroyed by an asteroid anyway. Wouldn’t that be more of a problem than the bomb is?
ELAPSED TIME: 405 MINUTES
The moon base has just been destroyed by a large asteroid.
You have failed to survive.
Do you wish to try again?
A recent discussion that happened with Starcross is relevant here. In that game, the player is taking a “test” in an alien artifact; parts of the artifact are failing. One idea brought up (by both Jimmy Maher and Drew Cook) is the possibility that every puzzle in the game is a coordinated part of the test. I discarded that idea given that some characters are independently acting; that is, there wasn’t some way the Master Overlord Aliens could have guaranteed particular things happening, like the “chief” weasel alien being willing to trade their brown rod to the player. So there was a “test” where the aliens had to go out of their way to provide ways for the player to succeed because of certain things going wrong, and they just had to hope they had gone far enough to make the test fair.
What if, instead, it was an evil Demon Lord that made a “perfect test”, and generated a completely controlled tower of traps, with all objects and solutions intentionally given at hand? What if they decided, even if their victim “won”, they wouldn’t play fair anyway?
From the cover of the Firebird edition of Jewels of Darkness. Via Gaming Alexandria.
To back up a little: last time I mentioned all I really needed to “win” was to escape, given I had smashed the gem containing the Demon Lord. As orcs were gathered at the exit, I needed to get the horn (showing fleeing enemies) that was guarded by a goat that butts the player off a cliff.
Rather than thinking in terms of the puzzle, I thought in terms of my unused objects. I had magical dragon’s teeth, a magical bed, a cracked pot, and not much else I hadn’t used already. (There was of course, the possibility of object re-use, like the hammer on the gem, but I went with the logic that I didn’t have many obstacles left and the objects I hadn’t used probably had a purpose.)
The cracked pot, despite being cracked, could be considered as a container. But for what? It isn’t helpful for water, but maybe — studying the part of the map it was located in —
— maybe it could go pick up the jelly (which previously ate up a corpse), only two rooms away? Indeed it could.
Part of what took me a while to come up with this is what I call the physicality limit problem. This is a concept that affects nearly every videogame that aspires to a certain level of real-world integration. This is the moment where it seems like a player’s avatar ought to accomplish some task, given the world’s visual and/or textual description of the circumstance, but can’t.
The first two Divinity: Eternal Sin games lack a jump (unlike Baldur’s Gate 3 which uses the same engine), and this is lampooned in the first game with a simple rope that stops our heroes who need to resort to teleportation, telekinesis, or some other arcane trick rather than just stepping over the rope.
This physicality limit happens all the time in text adventures; all sorts of physical stunts and schemes that seem like they ought to bypass puzzle X but don’t, because the parser doesn’t allow unlimited creativity or, for example, self-reference to body parts. (One reason why I was startled by CLOSE EYES working in Dungeon Adventure is the number of times a body part reference might help in a different game — like one with a medusa — but isn’t understood.)
Typing GET JELLY gets a response of
Don’t be silly!
and I might normally think to PUT JELLY IN POT or SCOOP JELLY WITH POT or something of the like (neither “put” nor “scoop” is an understood word), but at this stage in Level 9’s development it still is essentially using a two-word parser. So I was essentially hitting my physicality limit on anything where a well-specified command would require both a noun and an object. Analogously: yes, I know there’s no jump button, but that rope is still there taunting me.
The thing tripping me up was not thinking “oh yes, FILL POT would be non-ambiguous as to what the pot is being filled with”. Fortunately, when I went to the jelly with intent the right command was not hard to summon up, but just in terms of my general mental puzzle-solving, the limited parser was stymieing my approach to a solution by implicitly providing a physicality limit.
(Put more simply: sure, a two-word parser can express a lot, but that doesn’t mean it won’t throw up obstacles that aren’t just in trying to communicate!)
Getting back to the action, with the jelly-filled pot, and my knowledge that nearby slime made things slippery, I decided it was time to return to the goat with new concoction in hand.
And yes, the horn works exactly as expected: the orcs run away, and the way is free to leave.
I’m happy to consider this (510/600 points) my “canonical ending”; our protagonist got most of the treasures, killed the Dark Lord, and likely retired in luxury. I had lingering puzzles I wanted to check on, but given I already “won”, I was much less resistant to the hints provided by lmari Jauhiainen.
First off, there is a source of light that can fill the miner’s helmet, found near where the roc’s nest is. In the DOS version the roc grabs you right away (and it might have the most absurd solution in the game) so in practical circumstance the second light source likely won’t be found by a player until the very end of the game. Erf. In the Atari version the source is a little more accessible:
Again there’s some parser weirdness; the wisp floats out of reach if you try to take it normally, but for some reason you can catching it while holding (not wearing) the miner helmet. (PUT WISP IN HELMET of course does not work. This genuinely stalled me for a bit trying to think I needed to attract the wisp somehow.)
I still found the roc would always grab the player after getting the wisp, so the roc nest puzzle needs to be solved anyway to escape.
Ilmari rightfully calls this puzzle “ridiculous”. I’m pretty sure I’ve seen SQUEEZE as a verb … somewhere? … but it is wildly uncommon, and it certainly wouldn’t make my top 10 in How to Make a Caterpillar Produce Silk, even with magical rules.
Ugh. In the department of More Reasonable to Solve, but I Swear I Tried It Once, let’s go back to the mystery enemy hurling rocks.
I had tried waving the wand, I thought, everywhere, but apparently not everywhere.
I admit I was imagining something like giants rather than just some person in a chair. I realize the wand’s use before was in an adjacent room so it makes sense here. Oh well.
With that out of the way, we just have the end of the Tower Trap Test. I had 8 out of the 9 needed gems (with 10 available, isn’t it nice how the Demon Lord gives an extra gem to make it super fair on adventurers who get stuck?)
Regarding the snake in the box, Ilmari’s hint was that the snake needed to be dead before opening the box. Hmm. I sort of visualized the box as waterproof, but I realized that wasn’t well-founded, so tried:
Oho! But what about the ghostly strangling hand? My best bet was — given the trap tower was carefully arranged so everything had a solution inside the tower itself — the red-gold ring. The ring killed me upon picking it up without having a leather gauntlet on. At the ghostly-hand room I had tried waving it, rubbing it, all sorts of other actions. I was unknowingly hitting a physicality limit issue again — normally to communicate “I want to throw the ring inside the opening to the room” I’d need a parser that takes both nouns and objects, but THROW RING turns out to map to exactly that (despite THROW almost everywhere else being synonymous with a DROP command).
Even with the strength belt on filling up 10 inventory slots with gems plus the burning driftwood plus the magical case turns out to be impossible (if you have the miner helmet, you can leave a slot free and get all 10). However, since only 9 are needed to enter the door, I went ahead and tried it.
Congrats, you escaped the Demon Lord with wonderous treasure! Now I’m sure it’s safe to leave — oh —
A horde of wights attack!
You have managed to get yourself killed!
This is sort of an anti-Zork. After carefully playing through the carefully-designed puzzles, rather than the adventurer being able to walk out with newfound loot, they (and their full inventory) get killed anyway. The only reason we’re able to get out is our magical case and the fact we can be somewhat meta since the Demon Lord is dead already: swapping inventory around so the crucifix and cross are both being held is sufficient to survive a landing back in the wight house.
Of course there’s no point in going there! There’s no reward for going through the Exit, only death. Rather than a Dungeon Master (or aliens) congratulating us, the whole mini-adventure was revealed as a ruse all along.
Back of the manual for the “wallet” edition, via the Museum of Computer Adventure Games.
Coming up: Back into space, or more specifically, the Moon. Also, part 2 of my Lost Adventures list soon.
One quick thing first: I have managed to resolve my light source issues. The trick here is that when the driftwood burns out, you can just relight it and it lasts just as long on repeat. Frustratingly, while the game lets you re-light the driftwood early, the extra time only happens once the driftwood is out, so it’d be very easy to test this and decide this was a useless maneuver.
Now for my main progress: I had a wrong presumption partly brought on by the exact positioning of the copy protection of the game (right before the entrance to the black tower). In the versions that don’t use Lenslok (like the DOS version I was playing) the game asks you to pull words from the manual instead.
The gates are simply shut and not described as locked. While I was starting to think a collect-enough-treasures method of opening was unlikely and it was instead going to be via magical gizmo, I didn’t realize I had the object to do so quite early. It was an item I had been trying everywhere with no luck, and to be fair, we have the fantasy-vs-realism divide here again (see my last post’s discussion of Starcross) where it’s more of an intuitive reasoning that came up with the connection rather than a solidly logical one.
The whistle is just to a west a bit of the jellies so solving that puzzle is all that’s needed. I do think the authors expected the player to get in here relatively late because the “later” collar security clearances are in here, including a new one (mithril).
The authors really thought carefully through here: you’re in a lair of a giant mega bad-guy who is already dead (sort of, we’ll get to that). What will you find? If you get on the throne, you’ll find his secret control buttons to set people on fire and drop people in pits and so forth.
The list of controls are:
1 pit opens 2 pit closes 3 fill room with light 4 throne moves up to an “odd little room” (I will describe in a moment) 5 throne moves down 6 alarms sound 7 fire jets 8 “Master: I beg to report that all internal eyes are dead and enemies are in the caves. Also, thousands of enemy orcs are advancing upon us.” 9 you get teleported to a secret room at the top of the giant trap tower (will save for later)
This reminds me a lot of AD&D, but I’m not sure if it’s a particular campaign reference. It was delightful to play around with. It also helped explain a game design mystery, as the trap towers seemed to be entirely self contained: they were intentionally designed by the Demon Lord himself in order to dump in unsuspecting adventurers and presumably cackle at their demises. For example, if you press the “1” button and decide to jump in, there’s a sign explaining the 9-gem condition:
The “odd little room” that the throne moves up to (elevator) style has two collars and two treasures.
The “mithril collar” is indicative of yet another pillar. That pillar turns out to be the throne itself. If you’re wearing the mithril collar you can teleport to any of the locations while standing on the throne (red, orange, yellow, green, blue, violet (indigo is a synonym), silver, and mithril itself will warp you back to the throne). I love that the detail makes sense as both a puzzle and as a magical access system someone might design. There’s no logic you can just eyeball and work out — you have to experiment — but at least the Demon Lord’s motivation has been thought through.
There’s a bit more to see than just the throne:
Heading south, there’s a spot where you get picked up by a Roc and dropped in a nest, with both a caterpillar and a rock crystal (both are treasures). Unfortunately, I don’t know a way out! This is more irritating than it might normally because since I just unlocked teleportation across the entire map.
The Atari version has a “powdery peat” area before the nest, but since the DOS version jumps straight to the nest, I’m guessing it is just for atmosphere.
Heading north, you get stopped by ghosts, who explain “We failed the Master once and our doom is to remain here whilst He lives.”
In the Atari 8-bit version, you get rather less information.
Whilst He lives! Yes, as I long suspected, the Demon Lord is dead but not quite Dead dead. Although I didn’t realize it immediately, the place he’s hidden is revealed by pressing button 9.
This is technically a room at the very top of the trap tower, and the exit will (in two steps) drop you down to the swirling-images-of-madness room. The silver collar is of course one for the collection (I have the whole set now, but I don’t know if there’s some ramification of this). The gem starts trying to take you over if you pick it up.
Trying to CUT GEM helpfully responds you need a hammer for that, so I reloaded, grabbed the hammer from my supplies (they were previously used with nails to lock in a zombi) and killed the Demon Lord, this time for good.
This can be confirmed because once you do this the ghosts are gone. There is one catch to all this, which was mentioned by button 8 — there are orcs approaching. If you walking out the front gate, or even teleport to the green tower (which might be the better idea), you’ll be overwhelmed.
My guess is that I need the horn at the goat — the one showing fleeing enemies — and then I can escape. I still am stumped on getting it though! My best guess is I need to drop the bed somewhere (which becomes very large when you drop it — there’s no way they coded that in without it being important) and use it as a mattress to fall on when the goat bumps you off the top of the “stone face”. It looks like the landing place might be right outside (to the southeast or “out” where the skeletons were) but I can’t get there yet because I still get rebuffed by stones getting thrown from afar.
It would make sense in terms of story logistics if whatever item(s) found by solving the trap towers can then go back to get outside the stone face, and that will lead directly to the horn, which will lead directly to getting by the orcs that have gathered at the front of the dungeon. The game hasn’t followed my predictions that well, though.
(Speaking of trap towers, no, I haven’t got past the flying hand yet. I don’t know if you can get past the flying hand. And does the gem I destroyed count as the “10th gem”? The game gives you score for destroying it and the ghosts acknowledge the Demon Lord is finally dead, but maybe there’s a way to keep it around long enough to open that door.)
Just to summarize, the open puzzles I know of are:
getting the horn, where a goat knocks you off an edge
getting by unseen enemies throwing rocks
getting out of the Roc nest
finishing the gem-gathering trap tower area, either getting by the hand or safely opening the snake box or both
(MAYBE?) keeping the gem from soul-stealing without breaking it
the endgame with the orcs, that I theorize needs the horn
(BONUS, NEW) getting by a spot that is “too slippery” by some “evil green toadstools” in the mushroom area — this isn’t marked as an exit but going north has that special message, so it may or may not be a puzzle
Keep in mind this is at its essence a treasure hunt there could always be some secret action somewhere that reveals yet another treasure. I don’t get the vibe this is like Sharpsoft Haunted House which had one of the treasures hidden in a super-obscure way; the Level 9 method has generally been to give at least a stub of interaction to indicate there’s something to worry about.
But also: technically, I don’t need all the treasures. The game lets you leave right away, even, so you could claim you’ve “won” with just a few. I still think killing the Demon Lord is important enough it is a requirement of really “winning” and getting to that point will cause the orcs to appear blocking the exit. Even given that objective, some treasures would still be purely optional, just like Hezarin or Acheton.
I made progress last time mostly on the giant towers full of traps.
From a Your 64 article specifically about the Level 9 trilogy, written by Bob Chappell (author of Cracks of Doom). He raves particularly about their text compression algorithm.
Before getting too deep in, I should mention I’ve now played around with a third port, thus looking through the puzzles I’m stuck on again in a fresh context.
This is the DOS Hercules version. (An early high-res graphics card that came out the same time as CGA, but black and white only.) I’ve always been a fan of black and white and some of the colors in this game have been quite odd, so I thought it’d be worth a try. This is again from the Jewels of Darkness version, so that means I have running:
the 1982 BBC original, from tape
the 1986 Atari 8-bit version, from the Jewels of Darkness compilation
the 1986 DOS version using Hercules display, from the Jewels of Darkness compilation
The Atari version has had shortened text; this is not an issue with the DOS version, which had more space and so is uncut. It essentially is identical in text to the original (still haven’t found any Tolkien references besides the one in the manual, I think it’s only the second game that made them part of the plot) but includes the slight parser improvements (GET works instead of just TAKE, and you can also GET ALL). There’s also the practical circumstance of being able to see more text in the lower window compared to Atari.
The screen above represents one of my discoveries. The valuable dragon-slayer sword, remember, is seeking a dragon to kill, and will not be happy if you try to drop it (it will drop anyway if you eat the shrinking-mushroom). You can still give it to the troll and it counts. This almost feels like a bug, and it isn’t really necessary — whatever treasure you hand over lands in the troll’s room which you need to get into anyway.
I also managed to figure that part out, and this might be one of the toughest puzzles in the game. It required a jump of faith in terms of parser control. The text explicitly says the troll “sees you” so it made me wonder if I can turn invisible somehow. There’s another room just a little to the north where “you keep bumping into objects you can’t see” which is suggestive of a hidden item or group of items.
I typed something like that out in an early draft of this post (really!) and added, as a parenthetical afterthought, (like mushrooms?)
Huh, that isn’t actually a bad idea…
…oho! This is sufficient to sneak in to the troll and re-take your treasure, as well as some “rare spices” that count as a treasure and a red collar.
The pink mushrooms “taste fantastic” but don’t otherwise seem to have an effect. Also, I’m suspicious about the red collar being there, given how I already figured out the mechanism in such a way it doesn’t seem useful to have. I have got red, orange, yellow, and blue; technically speaking blue should be all I need since it gives access to all the other types, and surely this would be one of the later puzzles someone solves. So maybe collecting all the collars is important.
Also, here’s the black and white version of the same room so you can compare.
Staying in the mushroom area, I also managed to figure out the ants. This was the puzzle where I had a shrinking mushroom which enabled me to pass an ant nest, and then on the other side of the ant nest there was a growing mushroom. Shrinking is useful in unlocking one area, but growing again was causing me to get stuck at the other side of the ants.
The resolution remind me of my discussion of Starcross, and how someone who is used to science fiction might have an easier time than someone who prefers fantasy, because the rules of Starcross follow (to an extent) real physics whereas fantasy can have arbitrary rules. The rule I missed was eating the mushroom a second time grows the protagonist even bigger. It’s not an unfair puzzle by any means, but it requires a willingness to experiment with “fantasy physics” that is less predictable than Starcross was.
With the second growth spurt, you are now large enough to simply squish the giant ants by walking into the room. Then you can shrink back down with the original mushroom to normal size (unfortunately you’re too giant to leave and cause carnage elsewhere).
(All remaining shots are in color. Welcome back to Oz.)
Almost ready for trap towers! However, I did make one more discovery via the return of my old nemesis, missing a room exit. How do you miss a room exit in a game that has an EXIT command which lists them, you might ask? There are quite a few “duplicate exits”, like how going “east” and “out” will map to the same thing, and they get listed separately. In one area in particular — with the skeletons and the dwarf — there were multiple exits that went a direction and either up or down.
A demonstration.
So at the skeleton room, I had mapped UP to one of the other exits, but it went up to an entirely new room:
With dragon-slaying sword in hand, the sword “fades away” if you kill the dragon, leaving a golden bed (which shrinks if you pick it up) and some dragon’s teeth (which are magical, and I haven’t found anywhere to them yet, throwing them in a random place does nothing). Unfortunately, the sword is a treasure. I’m unclear if this is the right action and you’re supposed to find the sword later, or if I’m doing something entirely wrong. (I confirmed the sword does not warp back to where you originally found it.) My suspicion is that the dragon was “too easy” a fight and there really is a gimmick I’m missing.
For completeness, I should say there’s a “left eye socket” and a “right eye socket” connected to the dragon room. The layout here has been a face, with the goat guarding a horn (that I still haven’t resolved) at the “stone dome”. There might be some gimmick regarding the face similar to the invisible mushrooms where an action at the right place causes a special effect.
And that’s nearly it for unsolved puzzles outside the trap towers! I also am getting blocked going southeast from the skeletons…
A hurled flint splinters in front of your face, driving you back.
…and I still don’t have a replacement light source (or at least, fuel and a wick for the lamp). The light is short enough that I don’t have a good save file yet with every item in the game stored (I run out of driftwood light before getting them all), making it annoying to test out quick theories.
Finally, on to the towers. Remember, this is an (apparently) self-contained puzzle area entered via a one-way path. With the collars worked out I can teleport out if needed but I haven’t found that useful. (I now suspect the teleport is the only exit, though. The pedestal is in “darkness” and can only be teleported from, not to.)
I tried my best to compress a map here: the stacking means “up/down”, not “north/south”, and the second tower is tall enough I had to split it into two parts. Anything marked light purple has a gem I’ve found, and the goal is to get to the door that asks for “9 or 10 gems”. (This is true in both the DOS and Atari versions, but the BBC version only asks for 9 gems.)
You are on the ramp. A doorway bears the following message: “To escape the dungeon, collect 9 or 10 gems and go through this door. Leaving without the gems will cuase your death”. Clearly you must be in the central dungeon of the Demon Lord.
The salt cellar has a “salt pig” and if you go over to the saltwater and drop it, you can find a pearl. The topaz and emerald are not gated by traps and easy to get, and pushing the sculpture at the top of the smaller ramp lets you get a rhinestone. A sapphire comes from the “reward room” where you needed to avoid the temptation of picking eternal life or world peace.
Now things get trickier. The next thing to resolve is two black spheres that appear nearer to the top of the large tower; one is by the pedestal, and one is in the room where you need to close your eyes to maintain your sanity (“myriad moving images of writhing tormented creatures”). If you keep your eyes closed, you have enough time to leave the top floor room with the black sphere following, make your way down to the other sphere, and enter. The two black spheres will annihilate each other. (Another anti-Starcross moment — this felt like a natural action to test, following the rules of fantasy logic, but I imagine some hard sci-fi types hated it.)
Heading back to the top lets you get a diamond and a shield. The shield can be used on a “door with holes” that lets out spikes. Inside is a corpse with a leather gauntlet and leather blindfold.
Mixing things up, no gem.
The gauntlet can be used to pick up a “gold-red ring” that otherwise sucks your blood like a vampire; it’s enchanted but I haven’t found a use for it. The blindfold can be used to protect yourself from acid, entering another room with an enchanted brooch.
The brooch unleashes a real elephant if you throw it but the room is generally too small for one. Normally that’d be a signal to go to an open space, but the idea here is to go to an “executioner” who is stopping you from leaving a room with an amethyst.
The executioner leaves a hood behind where if you try to wear it you are now the executioner. It might just be a trap. There’s also still a box that unleashes a snake if you open it; I still haven’t found a use. I did manage to get into a room with a “crusher” via a wooden wedge near where one of the spheres was. This gave me a topaz.
The only room where a (non-portable) trap remains is one with a hand pointing at it. Trying to go in has the hand strangle you.
I might think the hood could somehow protect here, but no luck. Maybe we finally bring in an outside item? I’ve got a stick that makes a whistle I haven’t used yet, those dragon teeth, and a … magical inflating golden bed? Nothing I’ve thrown out seems to work.
I hope to get to at least the endgame next time! If there even is one. Maybe it’ll be a single-room ending rather than something extensive, but the room count suggests at least one more area.
Poster from Jewels of Darkness (the trilogy repackaging of the game), CPC version. Via cpcrulez.
I haven’t had time to play much, but I did resolve something major that’s worth a post: how the teleportation system works.
First, though, the puzzle which I realized the solution as I was posting.
This is a case where the coffin is “ajar” and a zombi comes out of it and kills you; you don’t need to kill the zombi, you just need to stop it from coming out. Back at the jelly crossing there’s a hammer and nails nearby, and so, after a little struggle with the parser:
A couple of my other tentative solves fell through (I’m still annoyed about not being able to pick up the needle after turning small and using it as a spear on the ants) so I ended up switching to the BBC Micro version for a bit to see if (just like with the man with the wand in the forest) there were other parts made clearer via the expanded text. The dwarf says explicitly you’re looking for ore (rather than just “a treasure”) so my moment of confusion would have been cleared up faster:
As you wave the skeleton staff they all clank off, leaving the dwarf.
“Thank you”, she says, “You saved my life. I’ve found a rich vein of ore above the stone face and will share it if you visit the area!”
While I still haven’t figured out the goat yet, the horn has a description suggesting its use which isn’t in the later version:
You are on a smooth rock dome, a narrow path
A fierce goat is on guard
A large horn lies on the ground
EXAMINE HORN
It is very valuable!
It is enchanted!
The horn is decorated with pictures of fleeing enemies
Apparently the octopus solution was supposed to be another pun/proverb:
The octopus waves its arms and you can see. Thus “many hands make light work”!
You are in a second dead-end black room.
A staff of polished bone is here
A yellow collar is here
Let’s focus on the yellow collar a bit — remember I needed to use that to get through a particular exit because otherwise I wasn’t authorized. I had some urgency to try to figure out the teleporters because I found out (horrible!) the light source of the burning driftwood does have a time limit, and it is a tight enough time limit I might need to optimize my travel. (Might is because I still have a lamp that lacks wick and fuel; it counts as a treasure so just might be that, but surely such a device would be used for more than a treasure?) I’ve found optimizing somewhat fun before, but only in very small scenarios; when it’s a big game like this requiring many objects be tested on many places, it becomes irritating to run into a situation where you run out of time simply because you didn’t have the right inventory at hand.
I tried all sorts of antics with the yellow collar while on the teleporter. I didn’t do every single verb on the list…
The BBC version is different; for example, CHOP is accepted, but GET rather than TAKE is not.
…but I tried all the ones that seemed reasonable, and collars in different combinations as well. I finally turned to the possibility of voice commands and it worked!
Jewels of Darkness needs a “SAY” in front. The BBC version does not.
After playing around a bit more, I realized the security level setup was something like
red < orange < yellow < green < blue < indigo < violet < silver < "darkness"
although oddly, "Indigo" is a word in the BBC version but not the Atari one. If you have an orange collar on, you can only access the red and yellow pedestals. If you have the blue collar on (the best I've found) you can only access the red through blue pedestals. You can still teleport from the higher security pedestals with a lower collar, just not to them.
Now, looking at my previous map, I did not have “indigo” (but since it doesn’t exist in the Atari version I’ve been playing, it likely just doesn’t exist) but I also didn’t have “green”. This is a pedestal that can only be reached via the teleport system, but sadly, it doesn’t unlock anything noteworthy; it lands you inside the mysterious tower from the start of the game, with no new objects or locations otherwise.
The one thing that helped tip the puzzle towards being a little easier was the “SAY PASSWORD” puzzle I referenced last time — it meant that the game did have a SAY trigger with particular words, so the possibility was in my head as I was testing through the various collar manipulations. I don’t think the authors were intentionally tutorializing part of the game, but I’ll take a lucky accident.
I’ve finally hit the scene such that this cover (used on later printings of the game) makes sense:
Because when you think “dungeon adventure” your mind naturally goes to weird sideways mushrooms and ants. From Launchbox.
I’m just going to divide areas up by region this time and not bother with sorting out what order I did things (I bounced around a bit using multiple trips and it didn’t resemble a “narrative”).
Region 1: Jelly Central
A Tall Cavern with lots of exits is where I had met carnivorous jellies last time. I was getting eaten trying to go farther.
I clearly needed some kind of “meat” given the carnivorous nature, but there was nothing I could think of from my objects that met the description. Eventually it struck me that the “corpse” that I had found a short bow and orange collar on could maybe be picked up; often this sort of object-dispenser is just “scenery”, but given we’ve been using a belt of super-strength it wouldn’t be that weird to tote around a dead body.
Voila! Many more exits were unveiled:
This led to me getting a hollow stick (that can be blown to make a note), blue collar, rancid fried potato, jar of cold cream, cracked pot (breaks if you drop it), a hammer, and a bag of nails. One thing to be clear about is that the game is quite systematic in mentioning if something is a “treasure” and if something is “enchanted” (in D&D terms, our character has a personal spell of Detect Magic running). I knew from that, for example, that the “jar of cold cream” was enchanted, making it easier to make the connection with this room:
Going west kills you, unless you’ve used the jar of cold cream first. I likely would have tried it anyway (eventually) but the magic amped up the chance that “cold cream” really is enough to protect from getting melted by flame.
Inside the Hot Alcove there is a “sun medallion”, and again the consistent messaging helps: it is described as “valuable” (it counts as a treasure) but not enchanted. Therefore, I don’t have to go around at any point waving the sun medallion around hoping it triggers a light spell or the like.
Relatedly, I was able to cart the “rancid fried potato” over by a “giant rat” and it ran away due to the smell. This gives access to the rat’s nest with a “star pendant”, and again it just is “valuable” as opposed to enchanted. This is essentially text as UI, “coding” things in the world consistently to make it easier to see what their function is.
Before moving to our second region, I should highlight the “yellow pedestal” I have marked there. In addition to the red pedestal from right at the start of the cave, and the yellow on this map, I’ve orange, blue, violet, silver, and black. Each one lets you climb on, but I have yet to be able to cause activation. These are no doubt teleporters but in Adventure Quest it took a while before I could activate them. I’m not sure if that’s really the case here; the game is much more willing to be wider-branching in sequence, and the yellow collar, orange collar, and (later) blue collar I’ve found are suggestive that there is some link. (Only the yellow has been useful for a “security” exit.) I will need to experiment more.
Other than housing one of the pedestals I don’t have any questions about the jelly region, so let’s move on to the next, near where the skeletons were from last time.
Region 2: Undead Antics
To recap from last time, I had entered a room with skeletons while holding a bone staff, and they reacted and left when I waved the staff. This left behind a grateful dwarf who was going to lead me to his treasure.
However, let’s pretend we didn’t save the dwarf yet since that leads to Region 3, and stick with the immediate surroundings.
We get stopped trying to go southeast (or “out”) because we have stones hurled at us; this is an unresolved puzzle. Going SW reaches one of those pedestals I talked about (orange)…
…going down leads to near the front of the cave in a one-way trip (there are multiple exits like this scattered around, likely to save walking time), and going north leads to a vampire. You need to have the jeweled crucifix from outside in your inventory to survive the vampire, or a veneered cross which is just to the west of the vampire, or both.
The passages after seem to have you crawling around the inside of a giant stone face…
…eventually arriving at a “wight house”. Everybody hates wights. In original D&D they’re the ones that drain your levels.
A 1st Edition AD&D wight.
Having a crucifix is sufficient to plow your way through, except the center of the room (with a blue pedestal) where you need the crucifix and a cross. I didn’t realize dual-wielding holy relics was a thing.
On the south side of the wight house there’s a coffin and a trident. If you try to take the trident a zombi comes out and gets you.
I think I know how to solve this but I’m trying to avoid having to make yet another post update so I’ll save my theory for next time.
Let’s get back to that dwarf. If you go “off track” the dwarf will let you know you’re going the wrong way to the treasure. The right way to go is up from the “Stone Nose” to the “Smooth Rock Dome”. It has a goat and “ornate horn” and if you try to take the horn the goat kills you.
This I have arbitrarily designated as part of…
Region 3: Stairs and Bridges
…a place where the map gets stretched vertical, at least the way I was making it.
Since that map is hard to read, I’ll give a meta-version of the same:
As you follow the dwarf up the steps, there’s a sound of a boulder bouncing from above (a similar trap was in Adventure Quest); as you keep falling you get into a “protected gully” in the nick of time.
This is just south of some “ore” which I suppose is the dwarf’s treasure. Heading north further down an aqueduct goes by another pillar (silver) and one side of a locked door which I believe connects to a “Strong Room” you’ll see later. Going yet farther takes a one way trip to a salt cellar which I’m saying is the start of Region 4 (Ramps).
The Ramps area has a highly unusual gimmick but let’s finish off the region we’re in first. Going back to those steps, once they are boulder-free you can keep climbing up to find a gatehouse where you are told to “say the password”, and I really wonder how many times we’re going to see this puzzle.
Going farther leads to everyone’s favorite, Lenslok, which I wrote about with Colossal Adventure. I won’t go into detail again but I should mention the app I’ve been using (LensKey) now is slightly broken in Windows 11 and the area that you select ends up marking a different part of the screen (but the same size). I got around this by moving the emulator window to the center of the screen, marking the Lenslok region, and then shifting the emulator window so the Lenslok area is right under the part the software actually used.
Then the door of the black tower is locked. D’oh. I assume this bit must come later in the game. Heading back instead to the “Steps” adjacent to the Jelly on my meta-map (there are two exits which go back to the Jelly Central region, and they are two-way), there’s also a “rotting bridge” next to it and some “psychedelic mushrooms”. If you try to head north the game asks if you’re joking, but if you eat the mushroom first, everything’s just fine! Welcome to the “magnificent golden pathway”.
I incidentally don’t know yet if there’s an equivalent to the golden eggs from Crowther/Woods that I can get back from the troll; I just picked one to toss away at the moment (the coins) to keep exploring.
Down one path you can find some more mushrooms where eating them makes you small (you drop your inventory). Then you can head north into an area with “giant ants”, and yet farther north again to some more mushrooms. Eat the second set of mushrooms and you grow back to being big, but the problem is the ants are now blocking you.
The small-ness is useful for another spot nearby where there’s a “crack” that you can take into a “Strong Room”. There’s a chest there (too big) and a bolt for a door locking it from the inside (you can reach, and unbolt it). This means, I assume, the sequence is
a.) get small
b.) unbolt the door
c.) deal with the giant ants somehow while small
d.) become big with the other mushrooms, and by having dealt with the ants you can escape
e.) head back to the unbolted door and get the treasure chest
Arriving here, as I already mentioned, is a one-way trip. It almost feels like a self-contained mini-adventure, except there’s no reason that outside items can’t be used to solve puzzles (except I haven’t managed to do that yet). You get trapped on two very very tall ramps, and a variety of rooms, many of which kill you. (This feels like prequel to the movie Cube but with an even lower budget.) Within this area you can find gems like rhinestones and diamonds and there’s a door that asks you to “collect 9 or 10 gems”. This hints at perhaps we need the gems to be able to get out. Gem rooms light purple:
In some cases the gems are in the open or simple to find, like a sculpture you just need to push to open a secret door.
However, a lot of the doors on the ramp just kill you, or have things inside that just kill you.
You can pick up the box, so I assume you give this to an enemy so they get hit by the snake instead.
I’ve managed to resolve a weird series of rooms with buttons:
The “best” is 9, because, well, Level 9. Or you can just skip this room by going west with no consequence.
You want to pick 4 for the mystery object and get a sapphire.
I’ve also managed to sort-of resolve a room at the very top where you get paralyzed by “writing images”.
CLOSE EYES, shockingly, works to get through (I can’t tell you how many times reference to a body part might help with a puzzle but it isn’t allowed!) Unfortunately, there’s a black sphere inside that will start following and then envelop you after enough turns. There’s a second black sphere in a different room and I tried to get them together to be friends but my timing must be off.
The top floor has a shield and a diamond, and I assume the shield is useful for stopping acid and/or spikes (both are also ways to die). There’s additionally a bouncing boulder going down one of the ramps (where you can duck out to avoid it) but there’s a wooden wedge that I think is somehow used to re-direct it. I have yet to play with any of these things much so I’d rather report in next time when I can give a coherent account.
The presence of a black pedestal suggests you can just teleport away after the mechanism is worked out. However, the “9 or 10 gem” door gives off the vibe it is meant as the “escape”, which suggests, in a structural solving sense, that you can’t make the pedestal teleporters work until after you’ve completed the ramps region.
I finally seem to be out of rooms to map, so I’ll have to start testing out theories. Since the inventory limit was increased you can theoretically tote every item around in the entire game with you, but it means logistics are still a pain as you have to drop the case, go in to the right room, take what you need (while dropping items as well), and come back out. I’m up to 172 rooms total on my map, and Level 9 tended to use a max limit of 200 at this time, so I think the only substantial place left is the endgame section (past the black tower, maybe?)
This time around I’ve stopped at a good progress point to give an update rather than getting stopped by the game, so that’s a good sign.
Via the Museum of Computer Adventure Games.
The character of this game is very different from both Colossal Adventure and Adventure Quest. I might even declare it easier than both of them but I know things can always ramp up. For an outside observer not used to adventure games they might seem enormously similar; even the graphics are being rendered from the same set (notice the forest hasn’t changed over three games).
In Adventure Quest the very first biome after the start was a desert with a sandworm puzzle where a player will generally map it out first while being harassed by the sand worm, and only later reach the insight that it was being attracted to the sound of your movement (so stopping would reduce the danger); this represents a “large-scale” puzzle over many rooms. The swimming sections involving keeping track of your breath had me breaking out the paint program (well, vector software) in order to count steps. I had to think holistically about the entire route and plan my object placements accordingly.
Colossal Adventure (really just Crowther/Woods Adventure for most of it) requires complex mapping and dealing with puzzles and solutions that are far apart from each other; especially in the Level 9 incarnation which had a 4-item inventory limit, this ends up making for a large-scale logistics puzzle as you have to coordinate your travels carefully.
Dungeon Adventure is (so far) more compact. It has (again, so far) many more single-room puzzles than Adventure Quest, and gives items and the things they solve not far apart. Even with things a little bit spread out the games seems more focused on small “riddles” more than large-scale coordination. (I described Adventure Quest as approaching the feeling of a time travel game where you keep track of space rather than time.) It also has everything (yet again, so far) packed in, and nothing even resembling a maze or the wild interconnections of Colossal Adventure.
I am of course hedging with “so far” because all this could go awry at any moment. It wouldn’t even be a bad spot of design; perhaps the authors wanted to “bottleneck” with an easier section at the start before things get complicated. Clearly, from the comments on the inventory limit (where they changed it due to popular demand) they were thinking about user feedback; maybe they wanted people to actually enjoy their games a bit before they start bringing out the brain-breakers.
Or maybe the light timers are really tight. I have “finished” the outside section and there’s a sunset going while this is happening, and once darkness hits you’re likely to be eaten by a ghoul. The area is so small it isn’t hard to optimize in such a way that you go in the cave before the sun sets, but maybe the light source you can make (which I’ll get to later) will burn out in the underground section unless you handle things optimally.
With the outdoors, last time, I had a puzzling scene with Rakshasa.
As Andrew Plotkin pointed out in the comments, in conjunction with the “flames of your soul” reference this might have to do with the classic science fiction novel Lord of Light (1967), by Zelanzy.
Art by Jack Kirby, coloring by Englert for a later poster printing. This art was made for a theoretical Lord of Light movie that never happened, but the script ended up getting re-purposed by the CIA in order to rescue US citizens stuck at the Canadian Embassy in Iran. There was a movie about this that won the Best Picture Oscar.
However, the Rakshasa, being from Hindu mythology, entered popular culture through all sorts of vectors. One appeared in the 70s TV show Kolchak: The Night Stalker and that specific episode (where Kolchak used a crossbow) was confirmed by Gary Gygax as the inspiration for D&D’s Rakasha monster type, which requires holy bolts to defeat. On top of that the manual for Dungeon Adventure claims D&D inspriation:
Dungeon Adventure is based around the D&D magic system as modified and used by the Cambridge University Wargames society in the mid 70s. All items and architectural features can be made under this system (or equivalent ones including extensions for demon-produced items), and if you are a D&D player you might like to work out how this can be done.
Still, the “soul” treatment feels very Lord-of-Light-ish, but maybe thinking about the D&D reference in the pencil and paper campaign led to the other one?
The reason the scene was puzzling is I couldn’t get it to trigger again. I ended up trying out the BBC Micro 1982 version (text-only) because I remember from Adventure Quest the RNG working slightly differently. While it wasn’t quite that, what I found is just making a beeline to have the Rakshasa scene first before anything always works.
Saying YES does seem to be a literal RNG die, and you will die if you get 1 to 3 and live if you get 4 to 6. (There is a way to tweak this which I’ll talk about later.) I still don’t know what effect this has.
I theorized the scene might give me a free resurrection, but trying it out failed. The manual mentions anyway how resurrection can work:
Resurrection is possible, and uses a machine which is initially situated very close to where you start the game. By default it only works while you remain close to this machine, and you must register your body pattern for it to work at all.
The “machine” is that button that scans your body inside the case that you can carry around. (Now that I know pieces of this are taken from a D&D campaign, was the Mordenkainen’s magnificent mansion spell in 1st edition? That gives an extradimensional building you can tote around just like this game.)
I had incidentally (in the effort to make my move count as low as possible) tried to nab the driftwood and case before having the Rakasha scene, and while they don’t appear if you make the side trip, clearly something is trying to happen.
This also looks like a scene from Lord of Light. The Atari version of this game seems to be buggier than its predecessors.
With that resolved, what about the other puzzles! Two of them were solved by the same object, specifically, a poppy seed pod that makes loud noises when you drop it. I had kept playing with the BBC version for a bit and noticed the bird on the nest is described as having “large ears”. The same description is in the graphical version but somehow my brain didn’t zero in on the hint in that setting. (This may have been a circumstance that I’ve mentioned before where playing the same section in two different ways — even if there’s no change in text at all — can have my brain approach it “fresh”, like I had a second person helping cooperatively over my shoulder giving advice.)
I also tried the noise out on the siren; while it didn’t get her upset, it made my protagonist deaf long enough to approach.
Heading further north (at the moment) is death because one of the six branches of the tree grabs you; I’ll return to this later.
The mirror left behind is described in the graphical version as “very valuable”, “enchanted”, and “reflects things”. In the BBC version, instead of just “reflects things”, it says
This mirror reflects more than it should
(I don’t remember this much difference in the previous games! I guess they were running out of room on the disk by game number 3?)
This takes care of the sleep spell in the forest (the one which kicked off the story, and the one you can run into later and land elsewhere). This time the BBC version is much clearer about what’s going on. Atari first for contrast:
Now BBC Micro:
Your foot breaks a twig: SNAP! A masked man leaps up and flees
You are in a clump of bushes on the edge of the forest
An assortment of coins is here
A magic wand is here
A dice rests on the ground
So the masked man is omitted in the graphical version. I admit I might be worrying the twig was a puzzle somehow in the Atari version. (And yes, I started thinking maybe I should just swap over to text, but given I’ve been showing off the graphics of the other two games I want to take this to the end. Plus: sometimes having less text can be helpful, because it reduces obsessing over details that are there just for color. One thing I can say is that I have found zero Tolkien references in the original ’82 version except for a Minas Tirith reference in the manual.)
The coins are just “valuable”, the wand is described as having “Z-runes” — I haven’t used it yet, so I don’t know what means — and the dice are described as being weighted. Yes, if you take them over to the Rakasha now you can use them to cheat that die roll so it’s no longer RNG. I was able to test this in the BBC version only. Still no detail on what the result is.
It’s a 6! YOU WIN! The Rakshasa envelop you briefly before leaving
Now, back to that tree with the branches. You can throw things and the tree will grab them. However, the tree is very specifically described as having six branches, so:
Say YES to the Dryad: she will give you a “valuable” carving and make the tree drop all the stuff it is holding. (One thing I should point out that Level 9 has been doing that not many companies have — this puzzle does not care which objects you throw, only that there are six of them. The berry I threw at the giant at my last post can be any item at all. The mere presence of a object sometimes solves things in Level 9 games, without reference to what that object is.)
That’s everything (?) outdoors. There’s nothing going on with the giant tower, although the BBC version includes a reference to it as a “ruined tower” in another description. I think it’s either for decoration or going to be the last place visited in the game. Colossal Adventure had a plot twist once you gathered all the treasures; this might be going for something similar where we still have to defeat some Ancient Evil for the real ending. Still, maybe not, especially because the game lets you flat-out leave whenever you want. Back at the sleep-trap the exit to the east has a “referee” announce that going that way will end the game, and you are welcome to do so and take whatever points (and treasures) you have gathered. The world is not described as ending because of this.
A hollow voice intones: “This is your referee speaking. If you continue on this road you will return safe to civilisation and the game will end Are you sure that you want to?”
Going indoors, my incomplete map so far:
The flame that’s near the trap-treasure room can be used to light the driftwood. The miner’s lamp may be a fake-out (it counts as a treasure, still) or it may be a wick and fuel get found later and the driftwood will run out before we have time to finish our treasure-gathering.
This is an “explore an direction you want” hub, although SW gives the message “archers only” and SE gives the message “not authorised”. Both of those are taken care of by nearby items. For the archers, going west leads to a pillared hall with two rooms. One has a metal cube (that sticks to metal); I haven’t used it yet. The other has a corpse with a bow and an orange collar described as magical.
Holding the bow allows bypassing the “archer” barrier and to some steps with skeletons that kill you. (I have the solution to this, but we’ll come back later.)
East from the hub leads, straightforwardly, to stables and a haystack. The word “needle” is recognized but any type of SEARCH HAYSTACK is for naught, unless you happen to be holding the cube. (There’s been multiple “passive” solutions where the player just needs to be holding an item. This makes the larger inventory kind of interesting since you can luck out into things. I think part of the reason authors of this time were very tight about inventory is to avoid this situation, but the Austin brothers seem to be fine with being more player-friendly with this game.)
Northwest of the hub is a “black room” with an octopus figurine (described as enchanted — this seems to be true of any item that has a magic use so people won’t be waving their coins everywhere). Northeast is a room too dark to see anything, unless you happen to be holding the octopus (passive solution again) in which case you’ll find a staff of bone and a yellow collar.
The yellow collar works on the SE “not authorised” exit. This gives two branches, one leading to some carnivorous jellies I haven’t dealt with yet…
…and a door with three stones. If you PUSH or ROTATE each of the three stones the door will open, as “no stone is left unturned”.
This is part of what I mean about this game being more about “riddles” than the other two games.
This is followed by a room with an exit blocked by a boulder, but the boulder is on moss, and seems to be another proverb reference (“a rolling stone gathers no moss”).
PUSH BOULDER takes care of the issue, leading to a dead end that has a sword in some stones. The sword is marked with a dragon and if you try to drop it the sword talks to you, saying you really should be using it for dragon-slaying instead first.
Finally… if you’ve been watching the items and thinking about the obstacles out there, you might have thought that the bone staff would have something to do with the skeletons, and you’d be right.
Shake the staff after you enter and the skeletons will scutter off and the dwarf will offer to lead you to a treasure. There’s plenty of juicy exits but this seemed like enough info-dump to deposit on everyone at the moment.
Here’s my item list so far:
packing case (the portable house)
axe (use on the tree to summon the Dryad)
ripe berry (tastes bad when you try to eat it, no apparent effect)
resinous driftwood, serving as a torch
a carving (from the Dryad)
metal cube (magnet, used to get needle)
jeweled needle
coins
magical mirror (reflected the sleep spell)
octopus figurine (lit the dark room)
a jade egg (treasure from the nest)
magic wand (unused)
weighted dice (can cheat at soul game)
poppy seed pod (noises, twice)
bone staff (controlling the skeletons)
short bow (hold to get by “archer” exit)
yellow collar (other restricted exit)
orange collar (unused)
sword (magical, wants to slay dragons)
The only obvious obstacles I haven’t resolved yet are the carnivorous jellies I already showed off, and one exit back at the hub; there’s a demon if you go north and you die. This might just be a trap, as there’s a pride of lions over the door (“pride cometh before a fall”, given the two other proverbs). The “red pedestal” in the room is also unused, though.


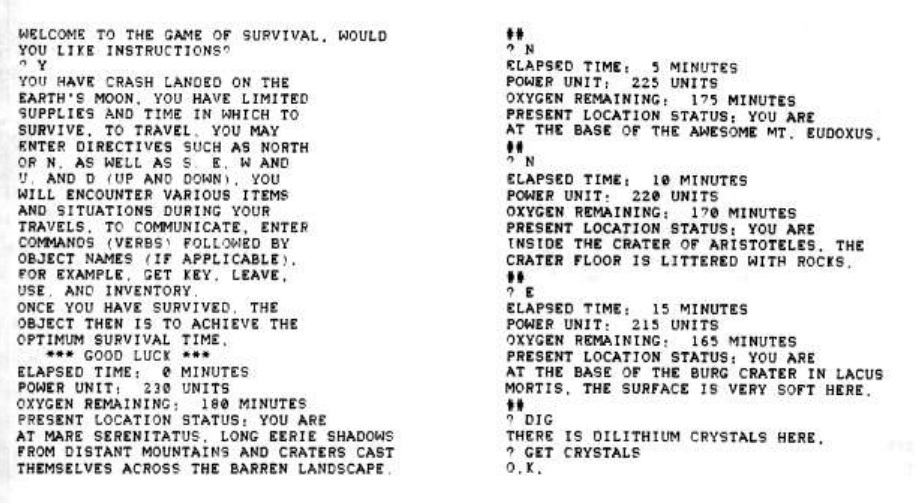


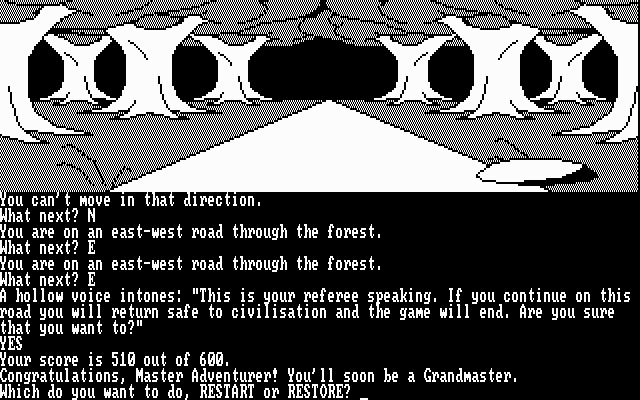

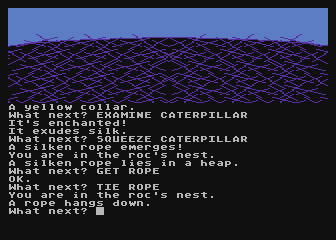


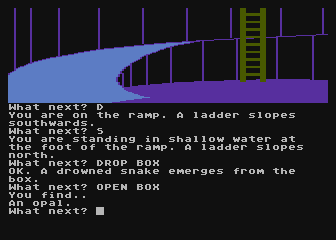
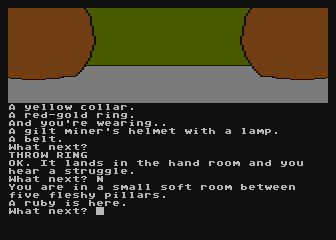
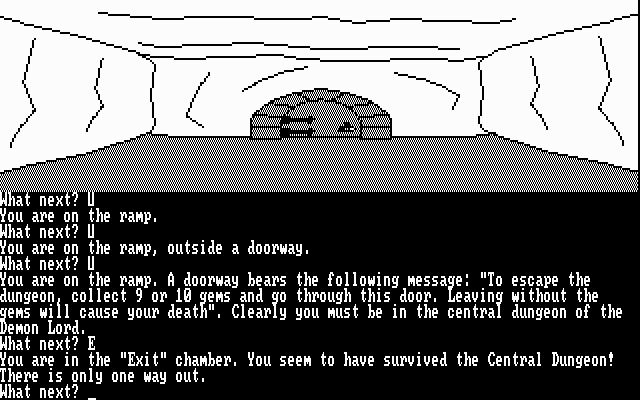


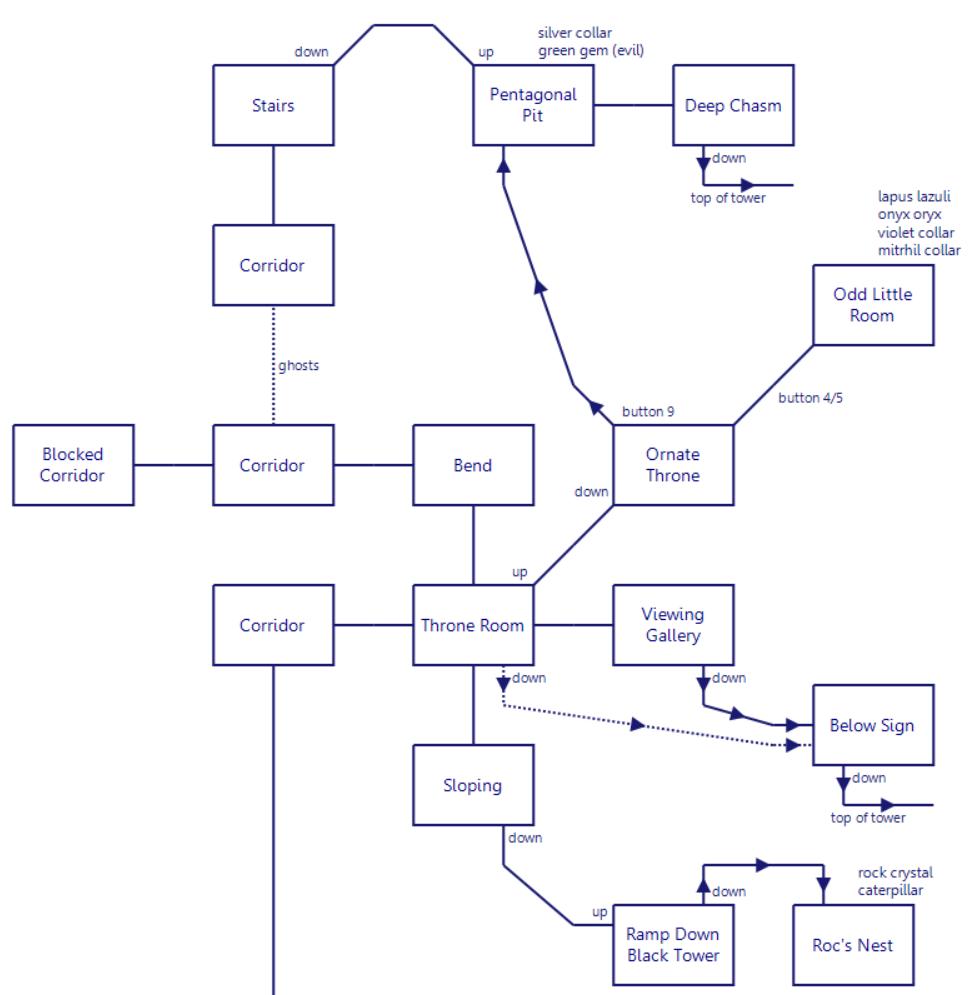
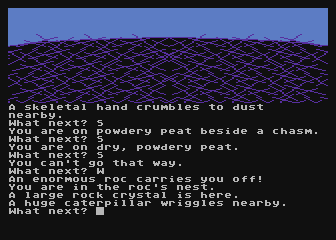


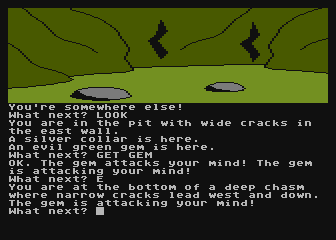

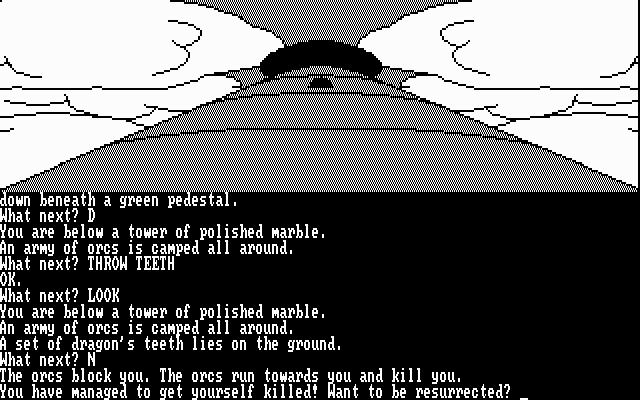

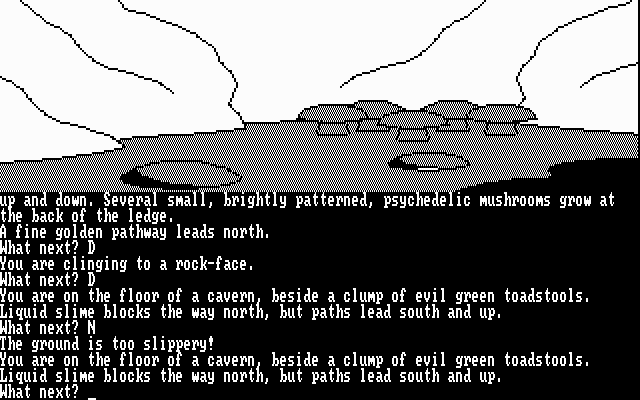


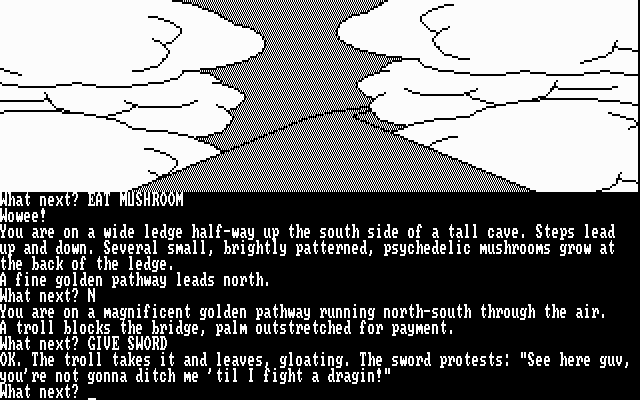
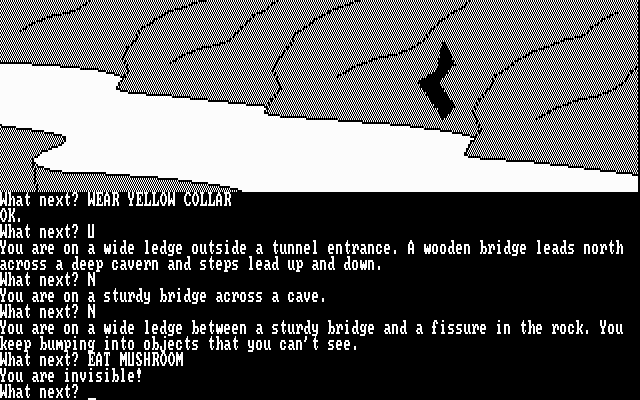
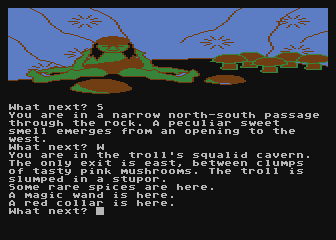

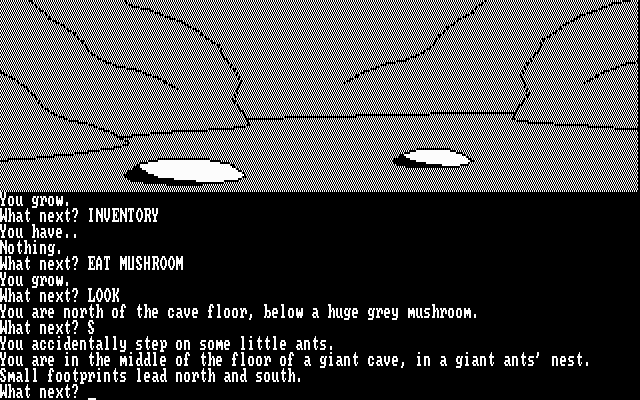
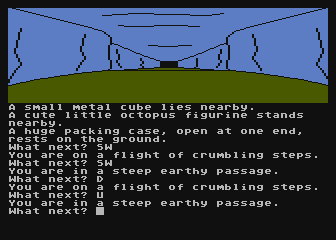

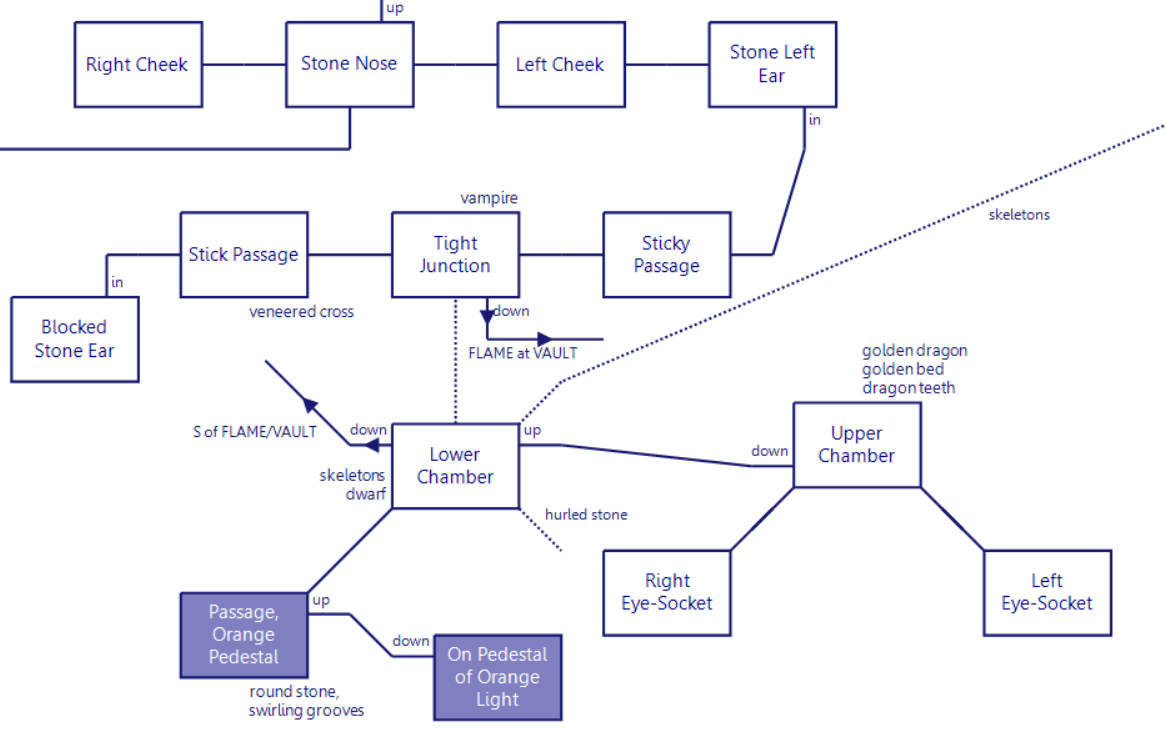
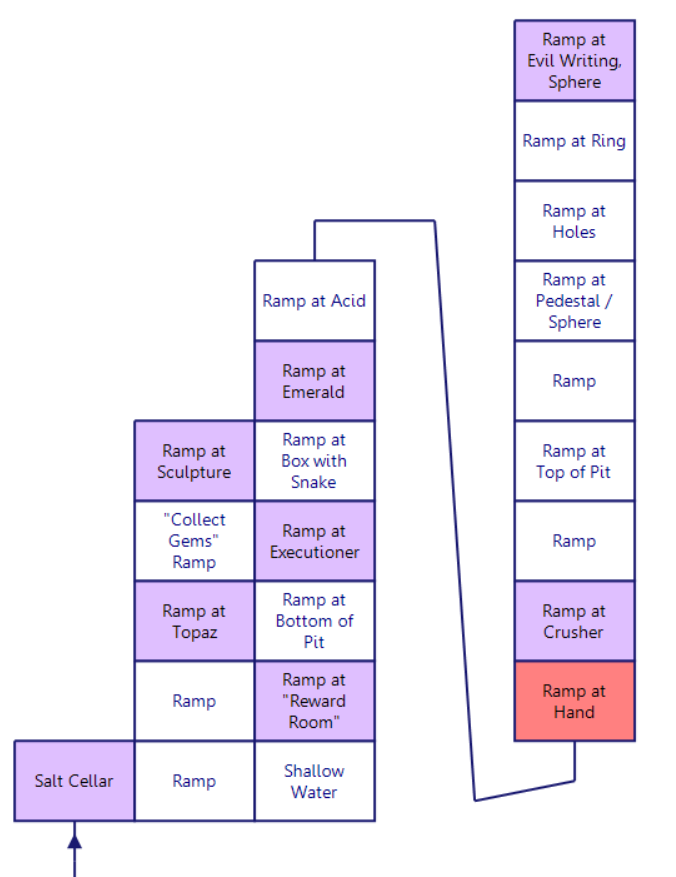

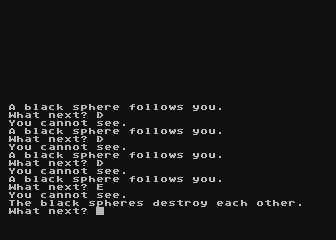
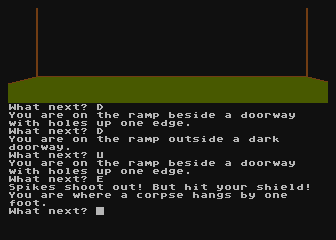

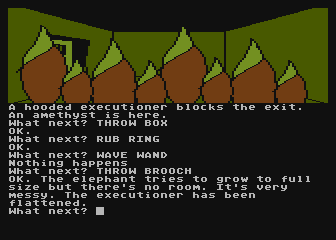


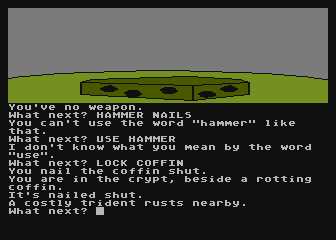

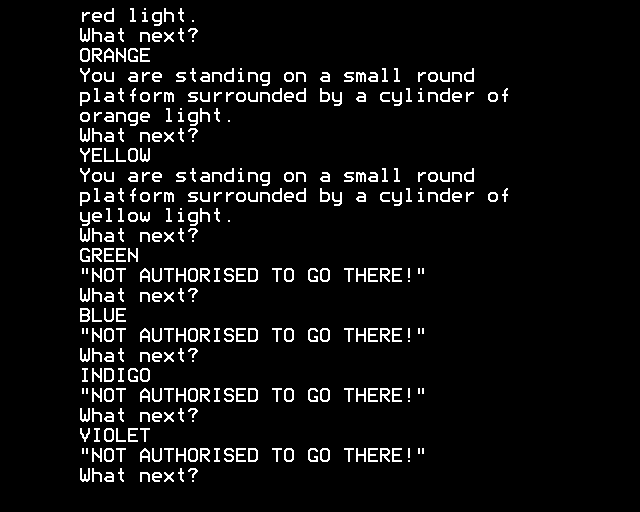
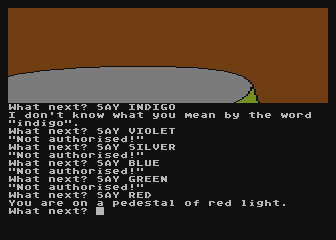


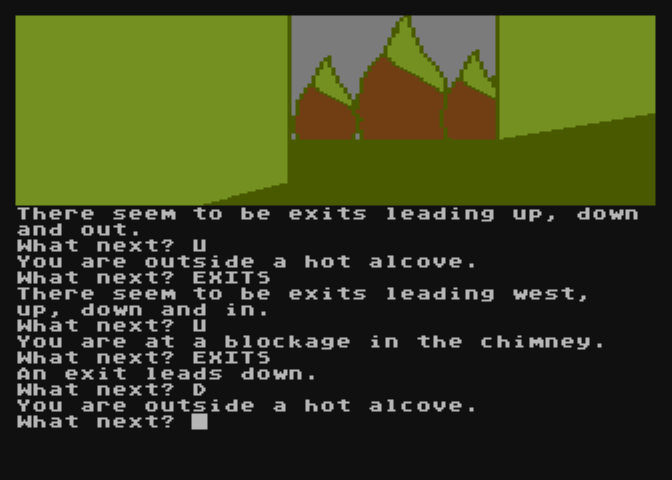
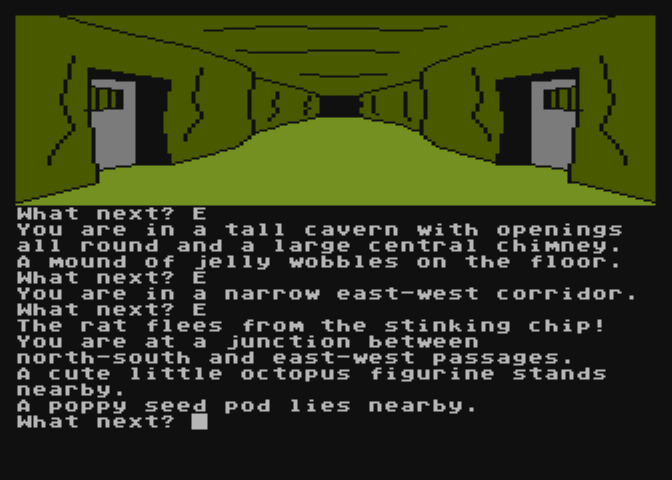
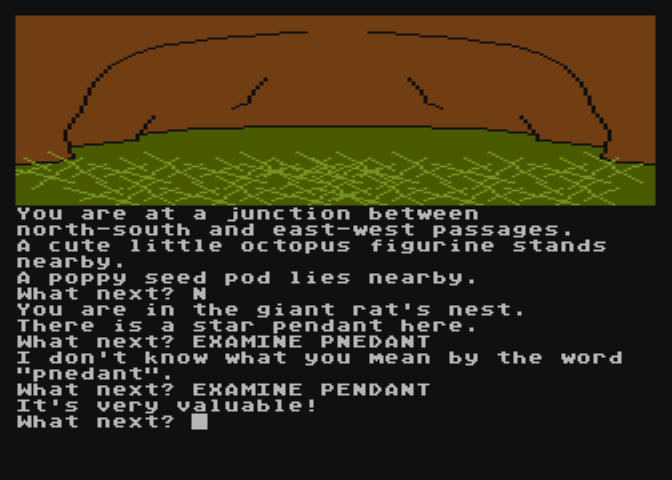
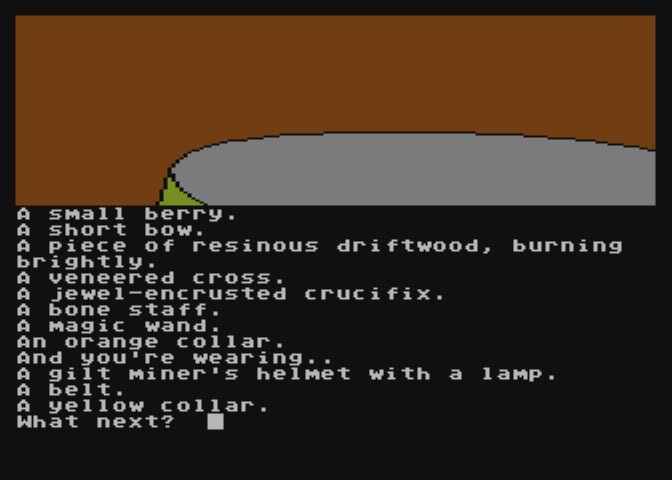


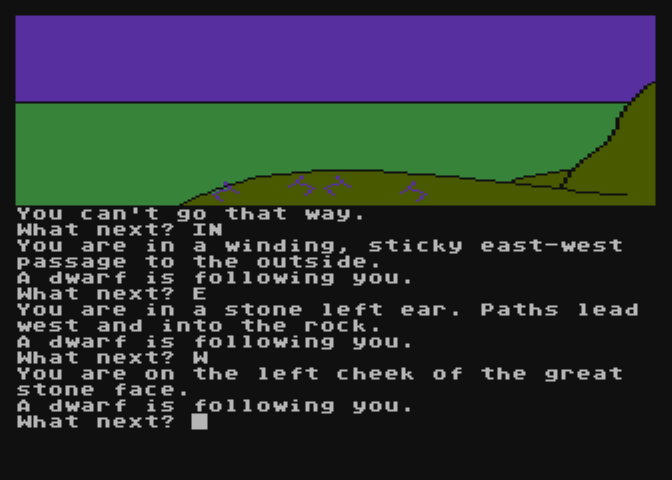


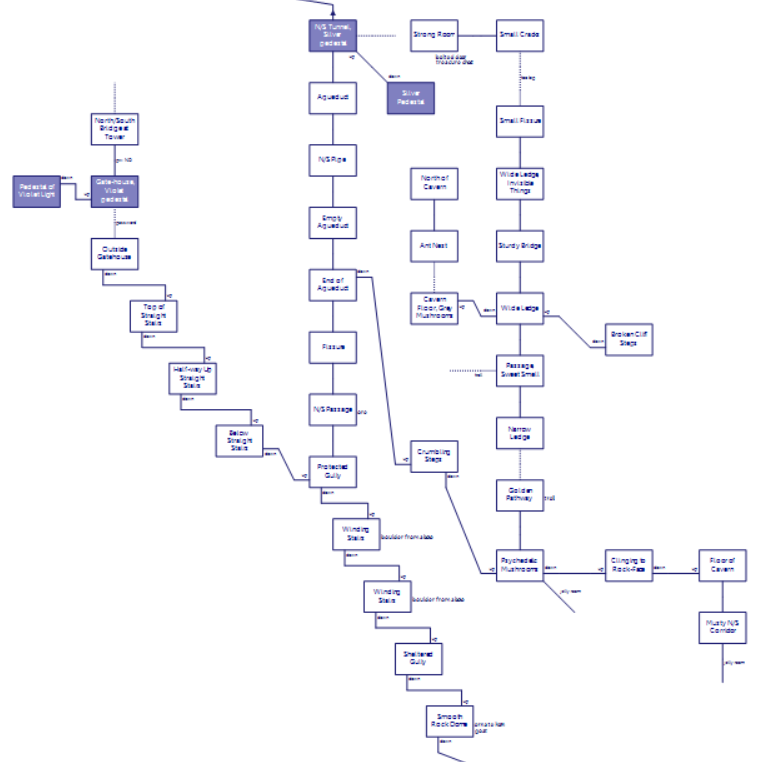


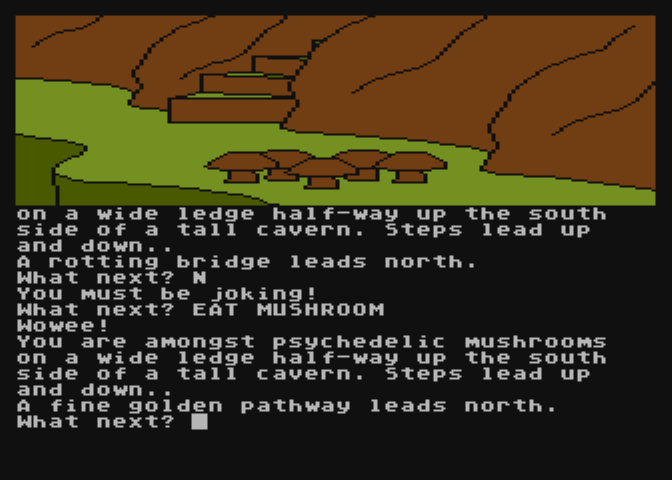
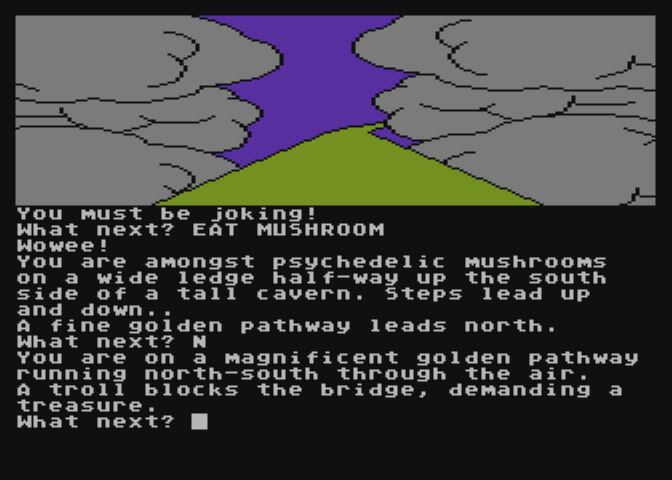

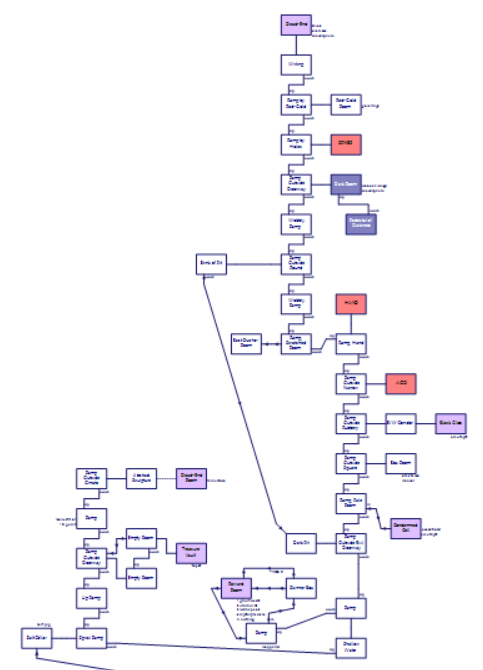


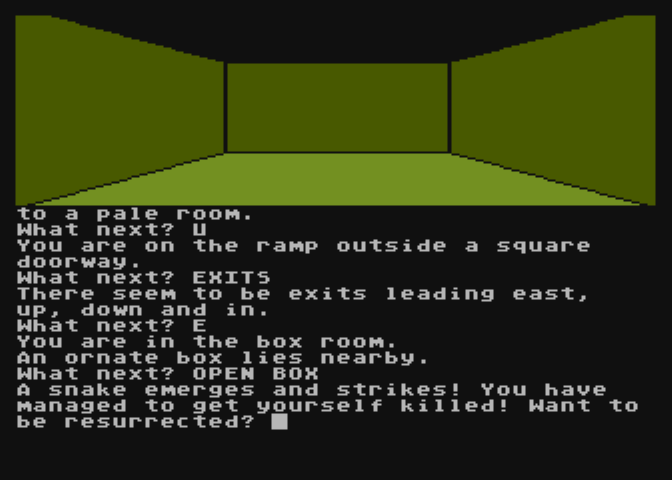


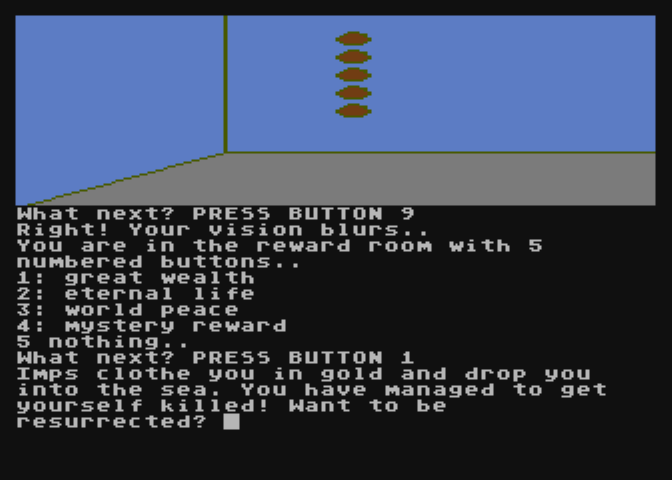


