Well, I held up some dignity.
As usual for my end game posts: spoilers for absolutely everything, and you’ll want to have read the rest of the series first.

Via the Museum of Computer Adventure Games.
I figured out two cheeses that were very important.
1.) Normally, if you save your game immediately before going into a room talking to the Oracle, you will always get the same piece of information. However, if you do an extra turn (going in an impossible direction, for instance) the random generator will “rotate” and the Oracle will give a different clue. You can repeat this process (restore save, run into a wall twice, go east, talk to oracle; restore save, run into a wall three times, go east, talk to oracle; etc.) in order to eventually pump the Oracle for all the possible hints. On the saved game I was using as my “final run” (no particular logic, I just decided enough was enough) I managed to extract these relations:
powerring: belrog
truthring: lightring and flute and akhirom
shield: dagger
lightring: powerring and rope and nergal
vial: talisman and mitra
skull: okkan
sword: rope
defeat satyr: sword and negral
defeat troglodyte: spellbook and crom
defeat sprite: skull and powerring
defeat minotaur: sword and shield and powerring
defeat scorpion: talisman and powerring
defeat nymph: flute and okkan
(The one monster I never saw a hint on was the nine-headed hydra, but it has its own special circumstances.)
Some of them cause dependency chains; for example, you can’t get the truthring without the lightring, flute, and akhirom spell; you can’t get the lightring in order to get the truthring without the powerring, rope, and nergal spell, and so forth. (Nergal isn’t an item, but a spell — that explains away my confusion last time, since it’s just a magic word and not a noun.) It would have been utterly impractical to play without the list above.
2.) Perhaps even more important than #1, the earthquakes that happen at random and block exits do happen based on time passing, but they are not inevitable. That is, there is some random chance at minute X that an earthquake will occur, and if you get unlucky, you can restore a save game from far enough back and find the next time minute X passes there is a different result (that is, no earthquake).
Despite a few workarounds (the powerring lets you just plow through blocked exits, for instance, and the spell CROM clears them out but it takes a while to get) this was the key that made the game playable. It is possible (as Voltgloss indicated in a rot13 hint) to “wait out” a blocked exit (they eventually “rotate” places based on further earthquakes), but the end result is often followed by yet another blocked exit immediately after, and it becomes too hard to track monsters that move around (and in the early part of the game, items can move around as well as long as the sprite is still alive).
Even with these extra edges to my game, playing was very difficult and intense. The main issue is that inventory capacity is very tight; in practical circumstances you can carry at most three items, but sometimes even two or one. Inventory is especially hard to juggle when a JUMP or just climbing up a staircase is necessary. For example, to get to the “escape room” where treasures are stored, you just need to go UP from the very first room of the game. I found a ruby out in the open, and carrying the ruby and only the ruby, I wasn’t able to make it up the stairs! I had to make a full loop around — as I mentioned last time, there’s a pit in the bottom floor that will go to the right place. Even then, the JUMP at the end to the last location can be unsuccessful!
To make progress, the first thing I did was go after spells. I did, finally, manage to get the mushroom and food together after great effort. (Remember, this first step isn’t mentioned in the original manual, only the one for the Dragon! I’m not sure how anyone back in the day made any progress.)

Fortunately, as shown above, you get a “thread” to follow for all subsequent spells. To “activate” each spell requires bringing an item to a particular room and the previous spell; the rooms are all described as “crackling with magic” and are spread across the map almost entirely at random.

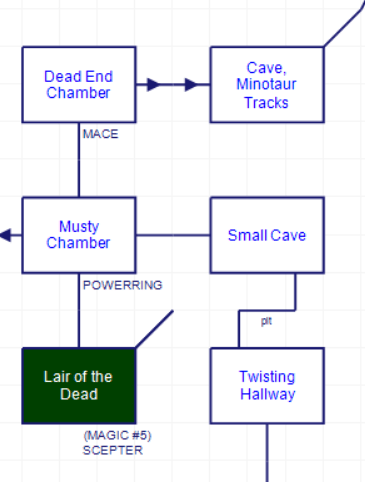
Green-marked places crackle with magic. I think it is always 1 room on the first floor, 3 on the second, and 4 on the third floor.
Getting to each step was essentially like solving a logistics puzzle. For example, Nergal requires a vial. The vial needed a talisman to get (and a previous spell I already had, Mitra) so I had to loop around, get the talisman, then take the talisman to the place I knew the vial was lurking (the minotaur lair) which only had one way out, down to the maze level. Then I tried to jump from the maze to the first floor, but I kept dropping the vial in the process. I ended up not quite having enough strength (it’s a depleting resource; it can be reduced by getting hit by monsters, failing jumps, and casting spells) so I had to leave the vial behind, grab some food, and loop back and keep my fingers crossed I could handle getting the vial to the first floor.

Once I finally managed it, I wasn’t done yet! I had been eliminating “magical crackling” rooms (only one spell per room), but I still needed to figure out the right one to take the vial to.
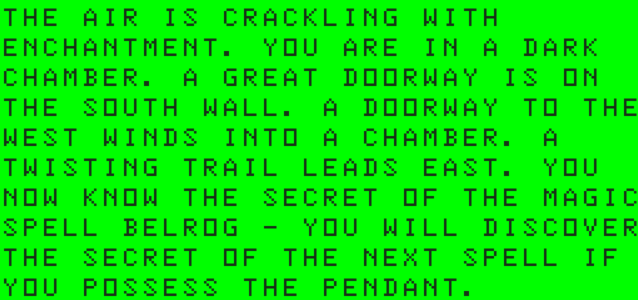
Up to here the spells had been, in order, VETAN, MITRA, OKKAN, AKHIROM, NERGAL. I hadn’t gotten any of them to do anything yet! (I figured it out later, and they’re mostly very specialized.) However, BELROG (as obtained in the screenshot above) turned out to be intensely handy, because it forced a jump into working. This meant all the spots I had trouble navigating because I would drop an object trying to go in a particular pit or over a particular chasm I could just spell my way over.
Quick example: this portion on the northeast corner of the third floor map is only reachable by jumping over a pit, but the pit was such that I couldn’t jump over with nearly anything in my inventory. So I would have one essential item but be stuck in getting it to that area. With BELROG I could get it over no problem. The only downside is it eats up health.
BELROG made the actions after go a bit smoother. I managed to get CROM and then finally ISTHAR without too much trouble after. Despite me looking forward to CROM because of the earthquake issue (remember, CROM clears blocked passages) I ended up not needing it because of Cheese #2! ISTHAR, on the other hand, originally gave me a surge of joy — it teleported me directly to the forest where all the treasures go! But it stopped working, and I found it later it only gives a couple uses before being entirely gone (the spell does not “regenerate”).
Still, after ISTHAR, I had the full set of 8 spells, and each spell gave me 10 points, so I already had much more progress than from the 0 I had before. Next I wanted to take down the monsters; each of the monsters (except one, which I’ll get to) had a treasure, so I knew I had to take them down. I figured, even if I made no more progress, I couldn’t leave a game called Madness and the Minotaur without killing the minotaur.
I wanted to go after the sprite first, so I didn’t have to be paranoid about items being shifted around the map any more. (In practice, it didn’t happen much, I think because I was very tight and efficient as far as saved games go due to avoiding earthquakes.) This required getting the skull and powerring, both which fortunately only required spells to be in inventory (so I didn’t have to juggle the “required item tree”).

The treasure dropped lands in an adjacent room.
I wanted to tackle the nymph next, but the nymph required (in my iteration of the game) a flute, and the flute was in the room with the nine-headed hydra, and the hydra is unique amongst the monsters for pushing you out of the room when you try to enter. So I tried valiantly to handle the hydra (given I had no oracle hint) but failed enough to look up hints; there’s a fixed solution here.

That is, you’re supposed to use an action on a noun that is not present in the room the action is done in. This breaks one of the implicit adventure rules pretty hard, but given how tough everything else was, I couldn’t be disappointed.

Once I tied the hydra up I could go in, but even the walkthrough I consulted had me confused; it indicated you could STAB with the DAGGER, but that was unrecognized. Using the sword was futile, as shown above. I eventually resorted to trying every spell (I remembered the manual saying one of the spells could defeat monsters) and hit paydirt.

The NOTHING SPECIAL HAPPENS is a bug — that’s what the spell normally does, and the fact it worked here didn’t override the text.
The most difficult monster after was the minotaur. This was because three items were required (sword, shield, powerring) and remember the weight limit is extremely tight. I essentially had to max out to full health (with a mushroom) and race as fast as I could with the three items to the right spot. I failed the first time (an item gets automatically dropped when your strength no longer sustains your inventory) but managed it the second by optimizing my movements even tighter:

For my last monster, I was stuck longer than I should have been. I saved the satyr for last, which the oracle reported I needed the sword and negral spell for.
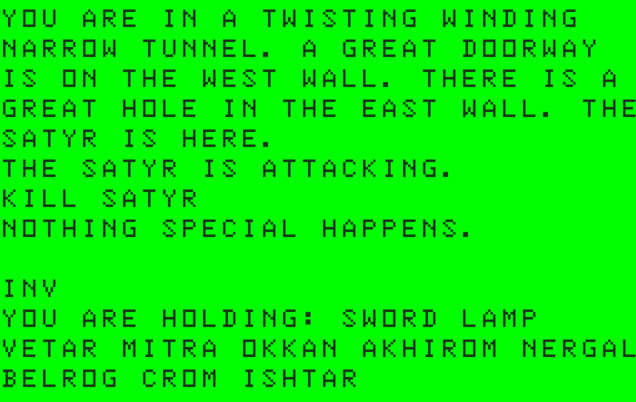
I baffled for a long time before realizing I had, in fact, killed the satyr — that’s the message when a monster doesn’t have an item. One of the six randomized ones (not including the hydra) has no treasure, so the satyr was skippable on the map I was playing. (I was fooled for a while thinking the Oracle was lying to me — the manual hinted that could be the case — but the Oracle can’t lie. I’m guessing it was a cut feature, since the truthring is an item that exists but does nothing mechanically in the game.)

So the next step would normally be to go find all the treasures … but I’m honestly fine stopping here. I’ve got a little loot (shown above), I’ve eliminated the threats, I got a full bevy of spells. I think I can call the expedition a success.
I did look up some of the treasures, and there is a little puzzle-solving involved. Unfortunately, the brutal inventory limit makes it very hard to experiment, and find things like:
- there’s a parchment with music, and a flute; if you take them to a room where you hear “music” on the maze level, and play the flute, a ledge appears; with the rope you can get a treasure from the ledge
- there’s a packrat with an item that it will give you if you are holding some other specific item; the specific item it wants you to be holding is randomized
- there are two openable “crypts” that require all items dropped and the player to be at full strength, although one you can use for a powerring for (not the other!)
- there’s an item in a random spot in the first level that can be found by turning the lamp on in a particular room (!?)
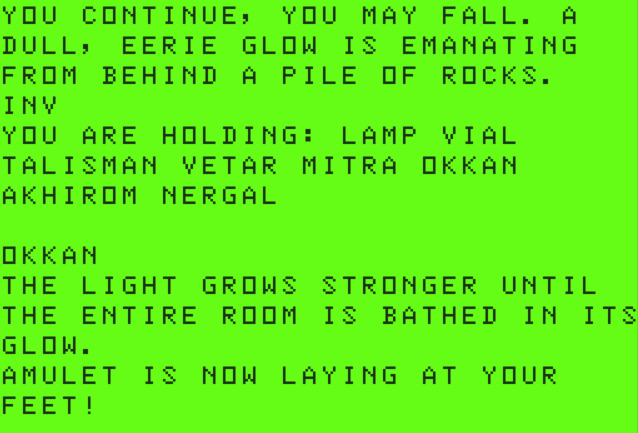
- there’s some glowing rocks where an amulet appears if you cast OKKAN, which is used nowhere else (I solved this one, but never bothered to get the amulet on my “final save”)
Despite — or perhaps because of — the majority of the game being dominated by logistics — figuring out which route to get to the next item, juggling inventory, keeping enough saves to handle if an earthquake happens — this was distressing to play in a unique way, like the game came from an alien world with different ideas about “entertainment”. Oddly, the game can be forgiving in certain aspects; the food, for example, randomly appears somewhere else after you eat it, so you never “run out”; the lantern has a pretty forgiving oil timer, plus there’s an URN with extra oil and after you get the last spell POOLS OF OIL start randomly appearing (and if you use one up, another randomly shows up elsewhere). So the game tried hard to be “fair”. It also made every effort to make the mere act of traversing the map painful, and over half of my expeditions ended in failure as I couldn’t make it over a pit, or an item I expected to be able to take got stuck, or I just simply got confused in the maze.
In a design sense, the prominent question is: did any of the randomization work?
1D4D: 1A ; TROGLODYTE
1D4E: 45 0B 38 80 ; AX, SCEPTER, MITRA
1D52: 23 7D 80 ; SPELLBOOK, CROM
1D55: 43 07 3B FF ; DAGGER, SHIELD, NERGAL
1D59: 1D ; SATYR
1D5A: 46 3B 80 ; SWORD, NERGAL
1D5D: 44 2B 38 80 ; MACE, LIGHTRING, MITRA
1D61: 23 77 FF ; SPELLBOOK, VETAR
1D64: 1E ; MINOTAUR
1D65: 46 07 2A 80 ; SWORD, SHIELD, POWERRING
1D69: 44 0F 0B 38 80 ; MACE, VIAL, SCEPTER, MITRA
1D6E: 45 3B FF ; AX, NERGAL
The above is clipped from the source code. This indicates the different combinations possible for different monsters, and it does seriously change some of the sequences — just needing the ax and nergal spell for the minotaur would have meant I could kill him relatively early in the game, for instance, and not have to finesse with great difficulty in order to carry three items at once.
However, the randomization essentially set a “strategy game” background, as the “adventure game” parts — like the layout of the map itself, and some of the puzzles — were fixed. The overwhelming difficulty of the game makes it hard for me to evaluate how successful it really was. I could see with some nudges to a lighter difficulty the system being more successful. There’s at least one more chance to try out the idea, as there was a follow-up game to Madness and the Minotaur. Quoting John Gabbard again (I quoted him back at my first post):
The first program I wrote for Spectral was Keys of the Wizard. I use the term “wrote” very loosely, because the underlying code was from Madness and the Minotaur and most of the “writing” I did was in the form of map changes, dictionary changes and room descriptions changes. There were a few code changes and additions that changed the way battling creatures worked, and that gave a few of the creatures the ability to “catch your scent” and follow you, but it was mostly Madness code.
So, we’ll see if Keys of the Wizard holds any redemption for the ideas. I can say personally this game made for a weary week and I’m glad for the time being to put myself to more traditional pastures.

I enjoyed reading the other entries for this one. I skimmed over most of this to the end to avoid the spoilers but WOW this one seems incredibly difficult. I am not looking forward to having any time with it lol
I’d recommend Voltgloss’s rot13 hints from the last post at least. I clung pretty hard to doing this on my own, but it honestly might be more fun asking for help (and because of the randomization, once you get a lot of information it still can be tricky to implement).
“I’m not sure how anyone back in the day made any progress.”
Oh, that’s easy: we didn’t. In my first write-up of the game for Mobygames, I included a line (that they insisted I remove) about a grown man breaking a cheap plastic computer over his knee from frustration.
that they insisted I remove
Clearly a missed opportunity.
I’m sure I’ve said it before, but I’ve never meant it more than I do now: Well done for persevering with this (infuriating) game!
I echo that sentiment!
Check out the source code and discussion here: https://computerarcheology.com/CoCo/MadnessMinotaur/
I like the DRINK SPRITE response he added to the game.
Way to go figuring out everything! I had to disassemble the source code:
https://computerarcheology.com/CoCo/MadnessMinotaur/
If you are in the room with the SPRITE, try drinking it! YOU MUST BE JOKING. I guess it isn’t a refreshing beverage.
You did a very good job with that! Ever thought of tackling the sequel?
https://bluerenga.blog/tag/keys-of-the-wizard/?order=ASC
Well now I am thinking about it! Thanks for the link!
I am most morbidly curious about the gun
doing so much work to get the gun and bullet together, then having to do 1 damage to an orc was peak comedy