In some of the later printings of Level 9 games they included this paper you could send by physical mail for a clue. From the Museum for Computer Adventure Games.
I was very much on track to win already; the problem with this sort of game is you never quite know if you’re inches away or miles. All that is really needed to finish from where I ended is
1.) getting all four stones plus the talisman together at the end, which is more trouble than it sounds like
2.) also bringing the “onion” that’s really garlic (except I found out after the fact I didn’t need to tote it around at all)
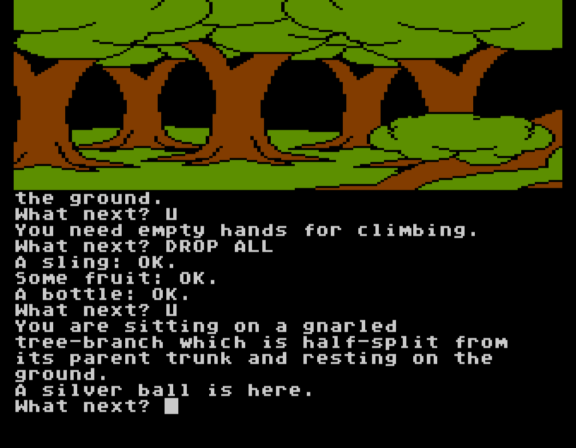
You get “locked in” at the last part with all four inventory slots spoken for, so it turns out you don’t need to laboriously bring over the silver ball, the stick that makes fruit, etc.
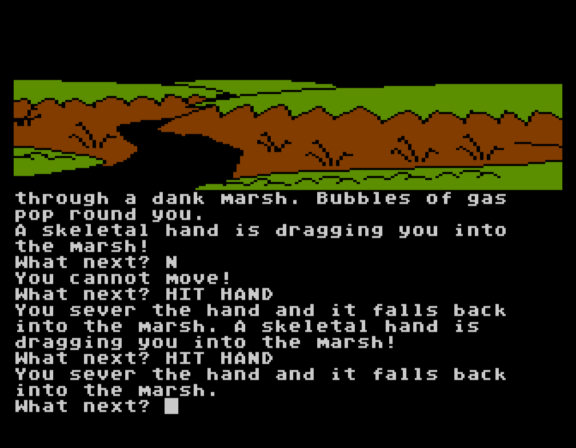
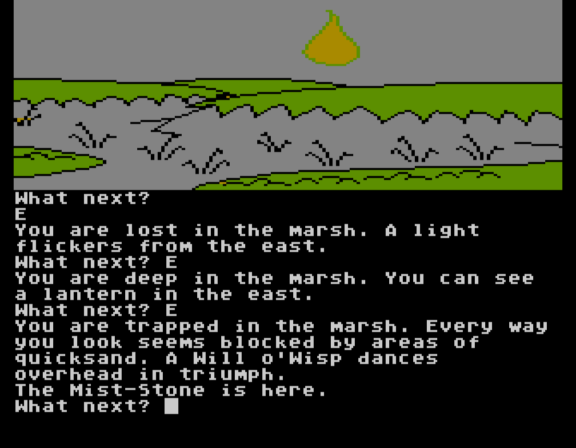
I left off on a marsh where I found a Mist-Stone and teleported to escape (you find boots later which let you just trudge back through quicksand, but I only found them after I already had the stone liberated). The whole marsh area is tricky insofar as hands keep trying to grab you, and you need to HIT them with your sword to shake them loose. The sword occupies one of the four crucial inventory slots.
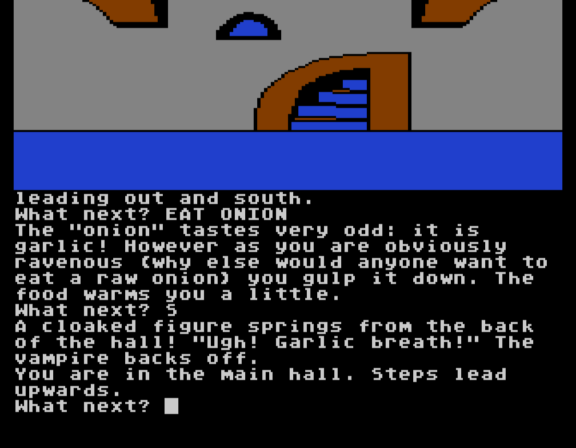
For a while, I was toting the sword and the insulated cloak and the magic lamp and making runs back and forth to tote items forward using my one available inventory slot (it turns out there was a faster way, but just like with the boots and the Mist-Stone I only realized this after the fact). Still, in a text game it doesn’t take that long to shove things forward, and eventually, I had the Stones plus the talisman. I also brought the “onion” (garlic) along because I had found this building on a side path in the marsh:
Gee, I wonder what’s inside?
I first thought I needed to cut the garlic or throw it, but you’re actually supposed to eat it, attaining permanent garlic breath. I could have done this at the very start of the game, even.
At the top of the building are some boots (the ones that protect from quicksand) and a window. The window is one-way but you can pitch all five items (Stones + talisman) before going through. Then it’s just a short walk through more quicksand (hope you kept the boots) and the Black Tower.
In the room back at the lake that sucks down items, they go to the quicksand room. I found this out after doing most of my work toting things through the biomes of the game, though.
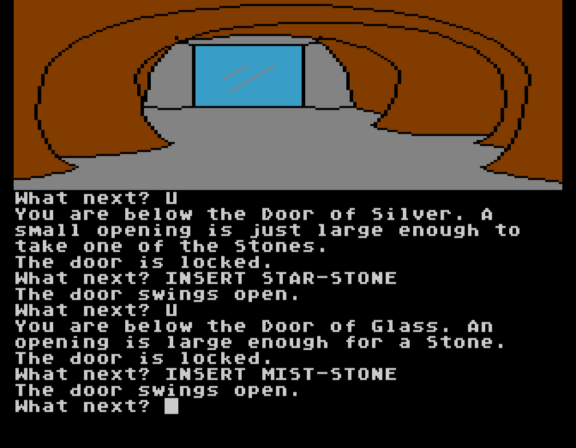
What follows is simply a series of doors of different colors, and you insert each of the stones. This is a satisfying sequence despite — really, because of — the simplicity of it. The work is already done, you’re just proving it.
At the gold door and above you are locked in one-way, which is why — as I mentioned before — you are stuck with all four of your inventory slots full: three Stones, plus the Talisman. This was honestly helpful because it meant I could stop tracking all those previous items in the game thinking they’d may yet be useful. (Maybe the picnic table from the very start is useful in the final battle, who knows!)
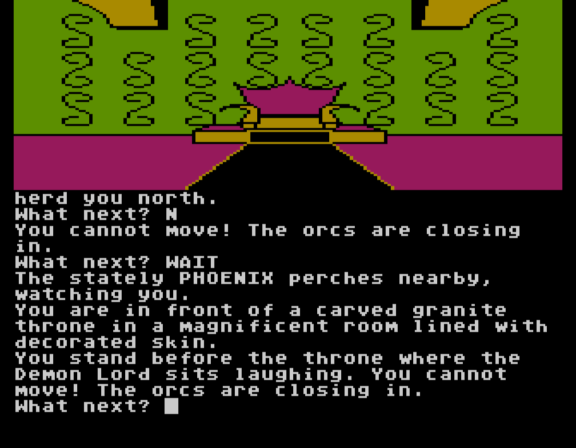
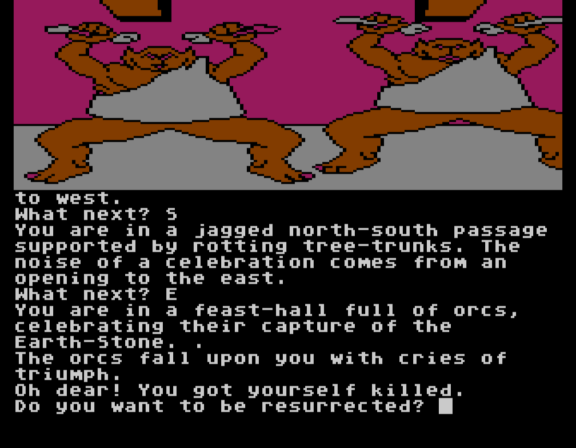
Once on top you get a forced sequence where you are surrounded by orcs and pushed to the face-off with AGALIAREPT. Given there’s only one inventory item left it isn’t hard to figure out what to do.
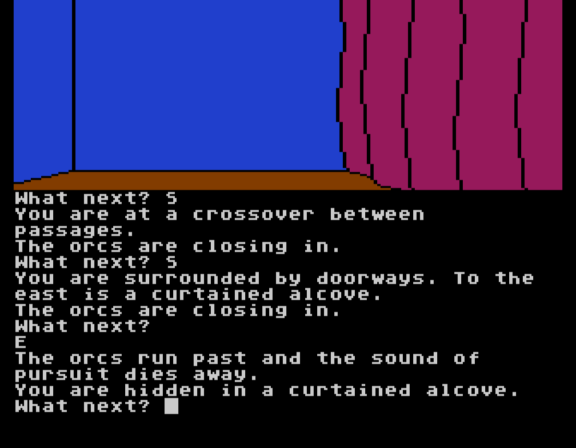
You give the demon chase; the orcs chase you. This is a very short section where there are tunnels with dead ends but you just need to find the right room to hide in.
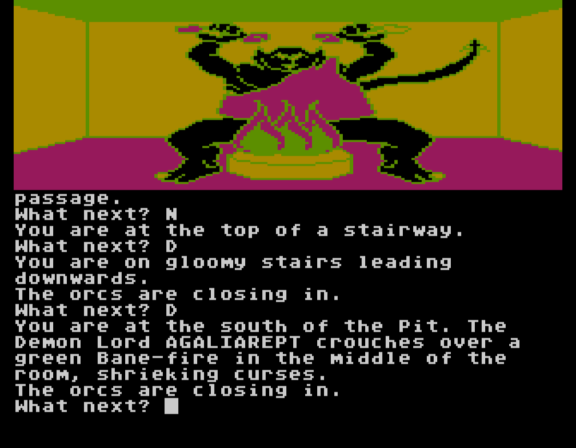
Having juked the orcs, you can go down a previously blocked passage to find the central lair of the demon.
The Phoenix has been following us around (as visible if you just stop and WAIT or LOOK) and now is its time to shine, as was told in the prophecy:
No idea what’s up with the point system, I don’t care much but I am not surprised there’s a wide possible range. The structure of this game led to more alternate solves but in an unusual way. That is, there are some puzzles you can simply ignore.
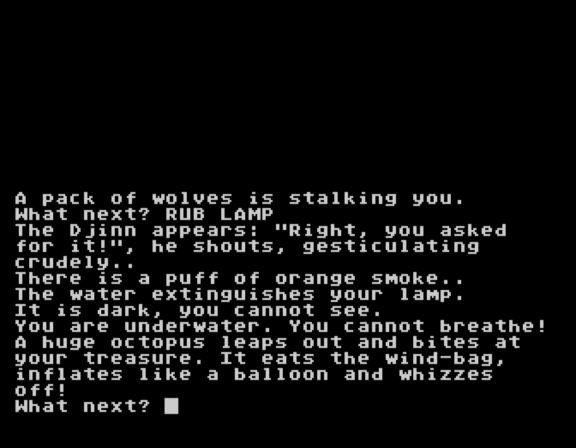
Remember the octopus I killed with an air-filled bag? You don’t need to fight it at all. It lurks at the white dot in the lake, and there’s a black dot right at the final quicksand that goes there, but there’s no need to use it. You can either a.) properly anticipate which items should be tossed through the window to the final area so you don’t have to go back or b.) use the magic lamp to teleport instead. Shockingly, giving how much magic lamp use I had in the game, I went with a.
The moor where you get cold? The insulated cloak works (I was keeping it because I was using the fire-stair at the volcano) but you technically can walk all the way from your teleport landing point to safety without it. Or you can use the brazier (the one that was “glowing like a commercial”) by dropping it so it provides warmth. Or you can eat a fruit (according to Ilmari Jauhiainen, I never even discovered that). And if you’re out of fruit, you can drop the stick which provides more fruit, and finally I understand why the item exists.
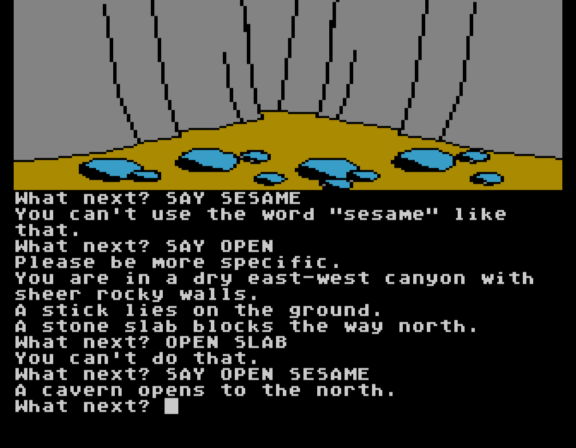
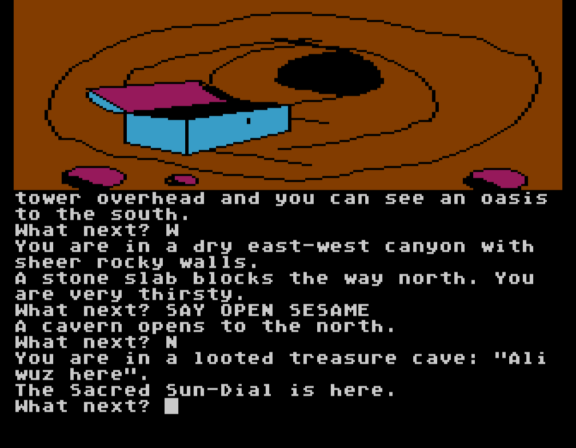
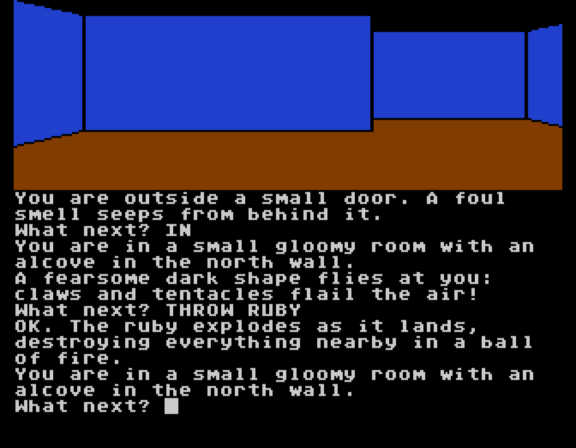
Again, I want to emphasize: the unusual aspect here isn’t alternate solutions so much as the ability to ignore the existence of a puzzle. I had no idea removing the djinn from the oasis was meant to be a puzzle until later. The fact you could run by the tentacles really suggests that the authors purposefully engineered a way to ignore the whole sequence in getting the ruby and throwing it. This means someone could blissfully skip the unfair puzzle at the slab (SAY OPEN SESAME) and maybe even think it was scenery and not a puzzle at all! A player could even skip the sphinx, snakes, and priestess; at least it seems clear you’re intended to solve something there. But it’s definitely still possible to at least skip the sphinx and think that maybe teleportation was the intended route!
While I eventually found the lung-fish model, I ended up never strictly needing it; even lighting up the dark portion of the underwater was optional. You might think that there’s no way someone would pass by dark rooms and without realizing there’s a puzzle, but at the very start of the game — in the first building — there’s a dark room that never gets lit up! With teleport luck you could probably bring the jellyfish down into the well but maybe the authors never even bothered to give the room a description and you’d see a glitch.
I will admit I would only recommend Adventure Quest to others under very specialized circumstances. The mazes weren’t bad — except for the very start I wouldn’t say the game had mazes as much as tricky geography to keep track of — but the four-item limit is really obnoxious after a while, and it gave me tension the entire game wondering if I needed to go back yet again to my stash (a convoluted operation) to test another object out for solving a puzzle.
The endgame was satisfying, though. It was in a way very quick and easy, and I think designers are afraid of something like that — making a gameplay denouement when the plot is at its climax — but it works, as the game was all about pre-planning, so the ending is just showing the result of all the player’s planning falling into place.
Trilogies help. Adventure Quest sells as people play Colossal. Middle Earth was a convenient fantasy setting. It was a way of telling people the type of world they were getting.
Level 9 eventually got called the British equivalent of Infocom. I don’t think they are there yet with this game — the parser is still completely basic, the design is still too tedious in parts — but at least I get the fringes of what is meant, as there’s ambition for some fairly complex overlapping systems at a grand scale. So I’m still looking forward to their next game, but I hope you understand when I say there will be a large gap before we get there.
We’ve had a big chunk of both concentrated fantasy and concentrated Britishness, so for our follow-up let’s go in a different direction. Next up I’ve got two games from the United States: a building that wants to kill you, followed by a hard-boiled detective story.
It is a good time once again to peruse the Scroll of Lore Dumping™ that was provided at the start of the game:
Take the Talisman to the Black Tower through the four elements twice. It can defeat the Demon Lord, but only a companion can bring victory at the end. The Talisman is nearby, but you will also need four Stones to gain entry and these are guarded by servants of the Demon. The blessing of Typo, God of Adventures, goes with you.
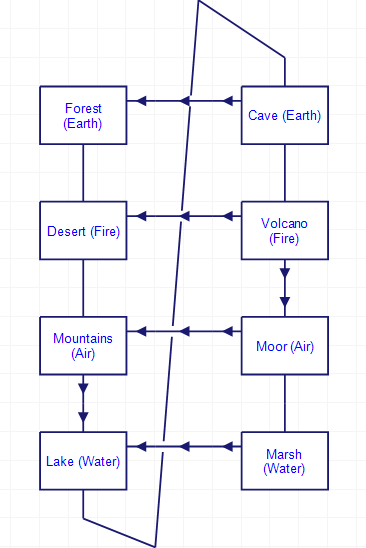
I technically have found all four stones (not all in the same save file, but I just need to go through the process). Even with those I still need to track down the exact location of the black tower. The scroll gives the super-structure of the game as a whole, which is important for wrapping things up. Namely, this is a biome journey that goes: earth – fire – air – water – earth – fire – air – water. Each of the later biomes has a warp back to its previous biome of the same element, in the form of an exit marked with a black dot; the landing point is marked with a white dot. Here’s a meta-map of the situation:
Some biomes let you travel back and forth (for example, you can go from the starting forest to the desert and back again) while some are one-way trips (to get to the mountains to the lake you have to use the rapids). The lamp seems to be oriented to only teleporting to the places on the left (except for the glitched moor trip, but I’ve since been back the normal way).
This is important in that the inventory limit of four is fairly restrictive. At the very least the endgame needs all four Stones plus a talisman, so doing some shuttling back and forth is a necessary part of the game, and in one case (as I’ll show today) you have to be careful with a particular puzzle in order to not shut off a method of passage.
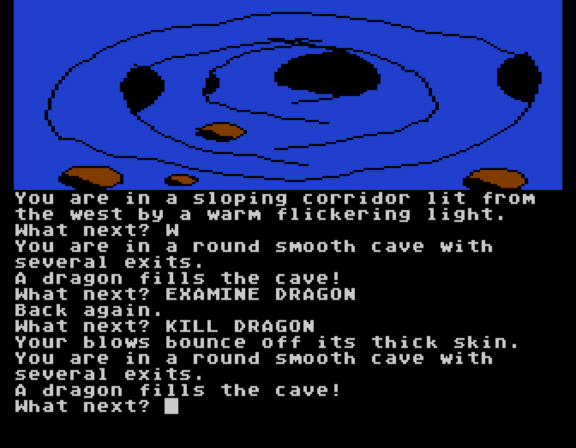
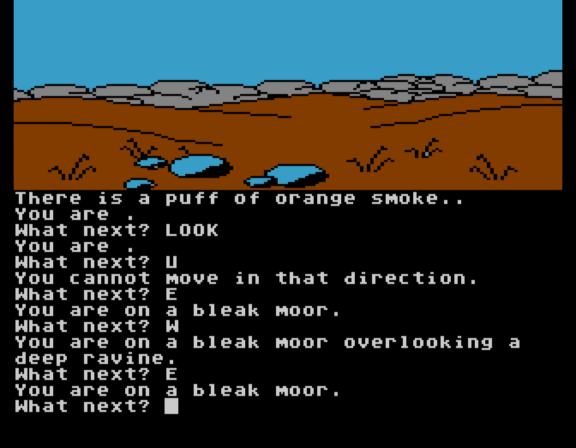
Last time, I had two threads I was stuck on: finding anything else in the bleak moor, and getting by a dragon in the cave. While I used my teleport-glitch game to explore the bleak moor some first, I’m going to trace the path starting from the dragon as it will segue into the moor eventually.
The dragon has the particular attribute of swallowing anything you throw at it, so I decided to do the equivalent of clicking on every item in a point-and-click adventure to see if anything would budge:
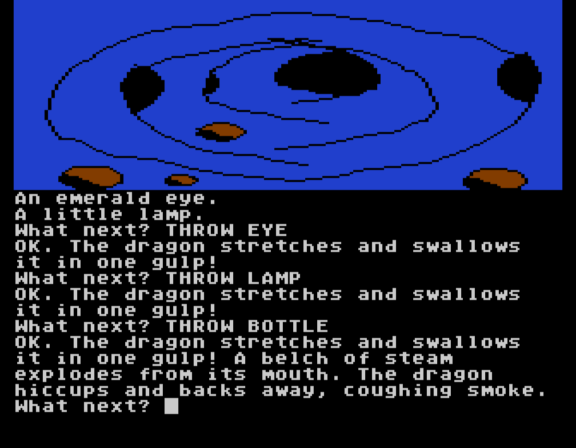
I suppose a bottle’s worth might be upsetting to a dragon if it was insulated really well so it didn’t turn into steam before even entering the gullet, but — well, I’ll accept it under the fantasy physics clause. At least I made it forward, enough to grab an egg from the dragon’s lair to the north, and to be able to enter a volcano crater to the west.
A map, to clarify:
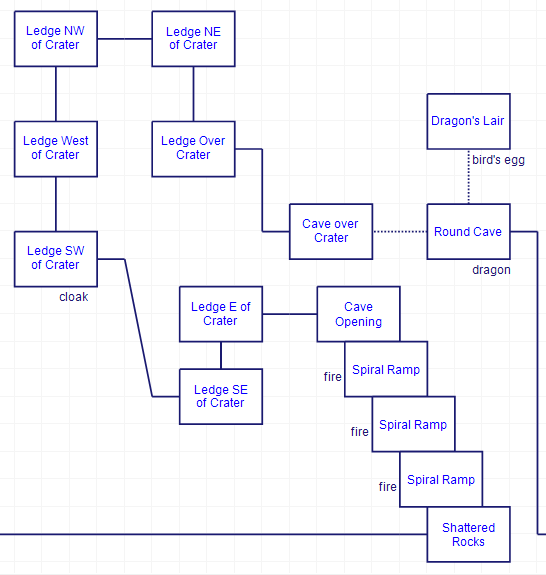
Starting from “Ledge Over Crater”, you need to make your way along the path while fireballs go whizzing by. This is just a simple timing puzzle where you need to wait one turn at each step before going on to the next one. Halfway through the trip you pick up an “insulated cloak”, which is good for the next obstacle, a “sheet of living flame” that harasses you as you go down some stairs.
At the very bottom there’s some burning coals where you need to THROW CLOAK in order to cover them and walk across. You can, importantly, TAKE CLOAK after you pass (even though the cloak isn’t
listed as an object in the room!) If you don’t take the cloak again and teleport out (or even just progress to the moor, which is a one way trip), then you are forever unable to get down past the living flame, meaning you’ve quite possibly softlocked your game, so be careful!
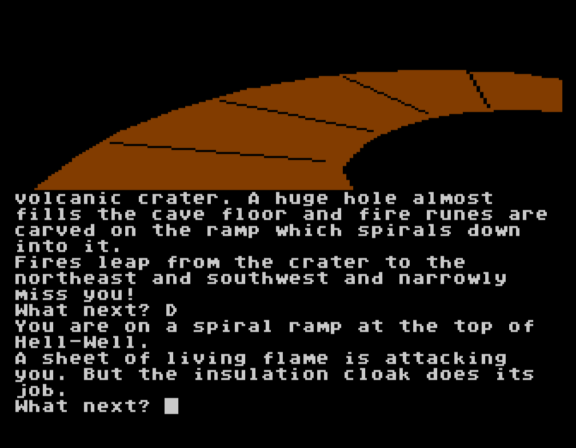
Also at the bottom you can find a burning nest, where the egg can be tossed in to summon a phoenix. The phoenix doesn’t follow you, although if visit the top of the crater again the phoenix will make a cameo, so it is clearly active. I suspect it is the “companion” from the scroll who will bring victory at the end.
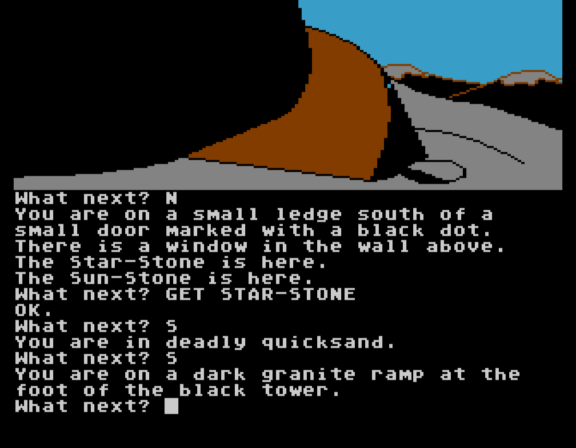
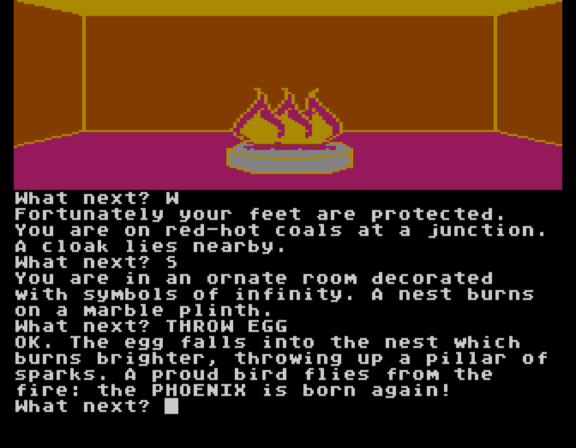
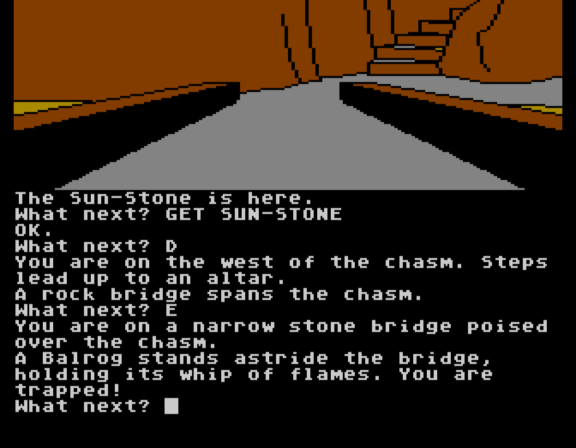
There’s incidentally a black dot door to the north if you feel like warping back. To the west there’s a “rock bridge” which spans a chasm, and on the far end there’s the Sun-Stone.
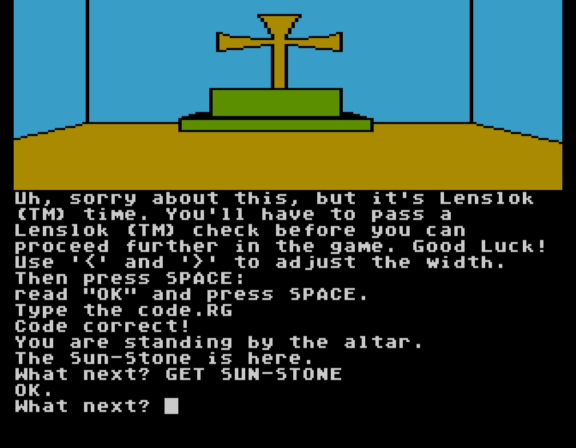
There’s also copyright protection. I went over details with Colossal Adventure so I won’t repeat them here. This time I managed to get the Lenslok software LensKey to work properly.
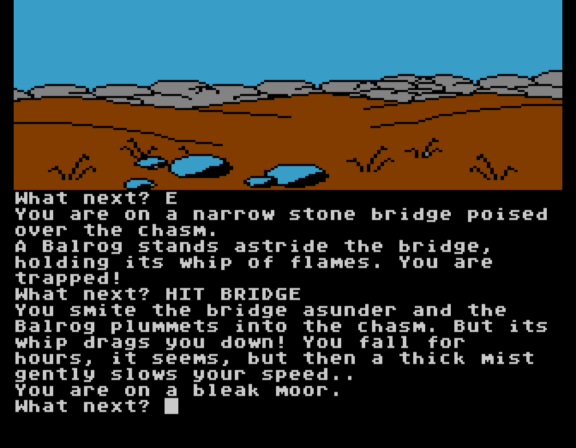
When trying to leave with the Sun-Stone, you are confronted with the Balrog.
Oh, you are at the balrog stage! That’s… let’s say… not one of the believable puzzle solutions in the game.
I did manage to solve it without hints, but I also knew enough Tolkien to imagine I was re-enacting the scene from the book. The movie version should give you a hint:
The visual depiction in the game is a bit off. It is meant to be a narrow, crumbly bridge, not a firm, solid one. Plus, we’re supposed to imagine ourselves as Gandalf with magic and so forth, and probably shout YOU SHALL NOT PASS for role-playing purposes which is how I figured this out:
The version I was playing also describes the bridge as unstable if you examine it.
Especially without the EXAMINE description that’s not fair at all. The other wildly unfair puzzle also used external knowledge (OPEN SESAME). I sense a pattern.
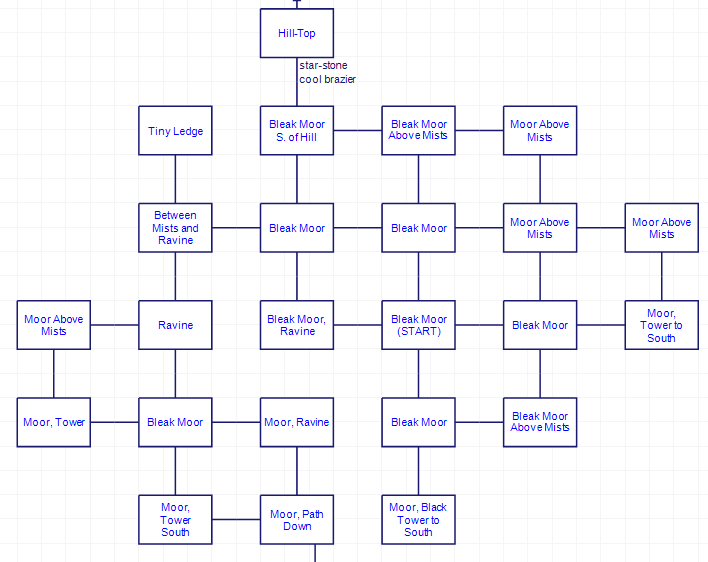
Moving on: this lands you in the same place my glitched teleport did. The insulated cloak (assuming you remember to snag it up) prevents you from freezing as well as heat, so it makes the map much easier to create:
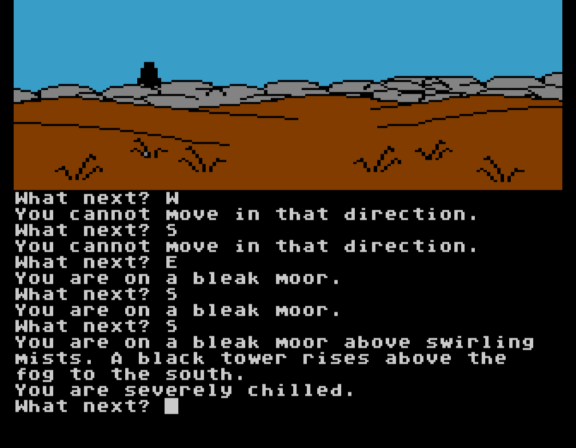
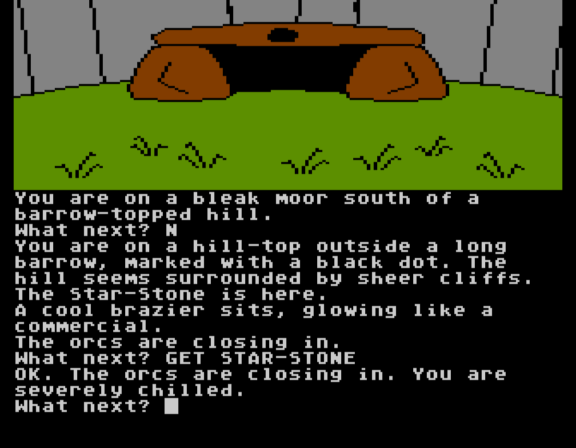
Other than the cold gimmick, and the Star-Stone at the barrow (which I mentioned last time), there’s no other gimmicks. For the Star-Stone you either need to teleport out via lamp or use the black-dot door to wrap; either way you go backwards, meaning if you forgot to grab the cloak, oops!
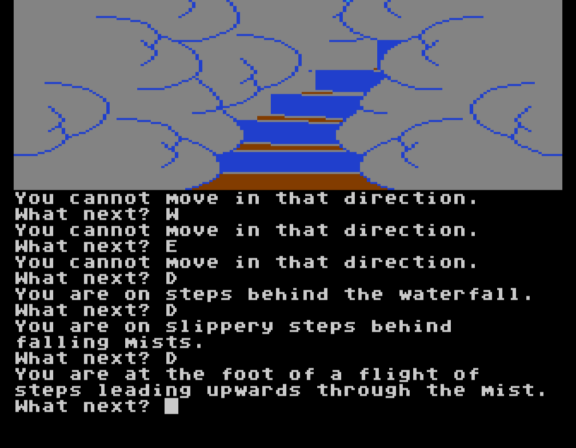
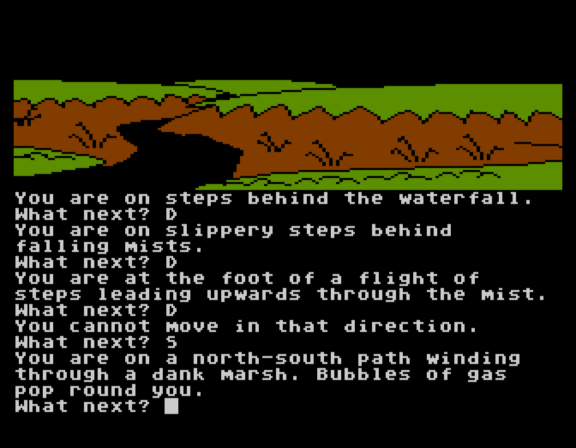
To the south there’s a stairway that leads you out of the cold-zone behind a waterfall…
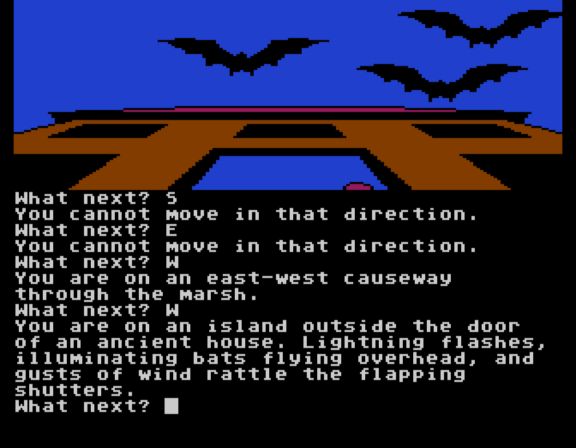
…and into the eighth biome, a dank marsh.
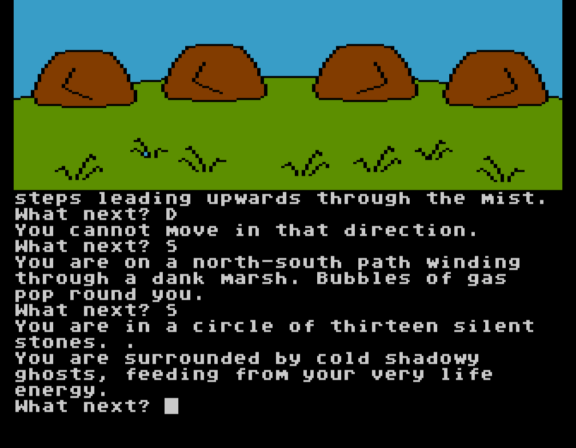
Just a few steps in there’s a circle of silent stones, where you are assaulted by “cold shadow ghosts”.
Fortunately, escape is just a manner of moving backwards two rooms to the waterfall. Going back to the circle, the ghosts are no longer there. (I wasted time at first fussing with the Talisman of Life, but it seems to have nothing to do with the puzzle.)
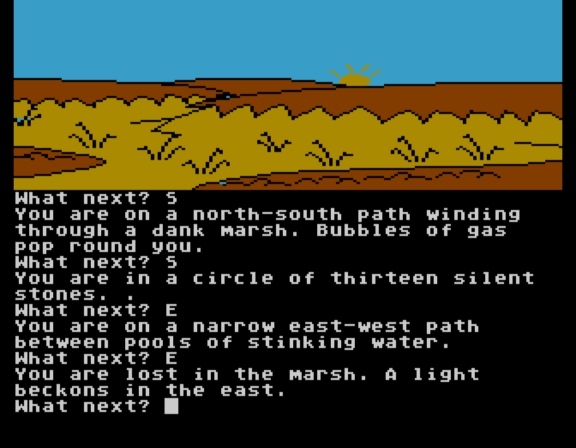
Moving forward, quicksand is many directions, but to the far east you can see light.
Once at the Mist-Stone you can just grab it and teleport out (any other direction leads to quicksand), so unless there’s something else that needs be done with the Will o’Wisp, its triumph is short-lived.
I still have more directions to explore to get out. I haven’t found the black-dot exit nor what I assume is the final biome transition, making it to the black tower. Given I have the four stones and am physically close to the end I think we’ll have a win soon, but I wouldn’t put it past this game to have a very long endgame to reckon with before the final showdown with AGALIAREPT.
(Prior posts here, and definitely necessary for understanding this one.)
Via Mobygames.
So I’ve now rotated my conclusion about the teleportation in this game back to it definitely being random, definitely being chaotic, and (at least in the version I’m playing) definitely designed so you can “short-circuit” a puzzle if you want to.
Everything is normal. T̶̰͚̞͓̞͇̬̍̍̄̓̎ͅh̸̢̧̞̬͙̪͎̺̭͐̾̽̎͜ę̷̣͖̝̥̰̓̐̓̇̽͗̍̌r̴̨̧̮̬̱͙͆̉ẹ̷͔̜̩͍̲̤̳̈́̈́́̉̐̓̐̕ͅ ̸̦̫̯͖͚̣̭̃͋̓͆͒͊̓͛̊ͅị̷̧̫̜͚͇̙̙̉̾͛͋̚͝s̵͔̠̿̀̆̔͛͆̓͆͆͘ ̶̨̨̡̝͚̆̂͠ͅṉ̴͎̳͇͙̬̓̀ỏ̵̭̬̾͊̂̍͑̈̀̇́͜ ̷̢̖͈͖̜͖̹̟͉̈́̒̈́̄͋͌̓̔̚g̸͕̯͍̘͊̓̾͠ļ̷̛̲̯̠̮̼̦̙͑͌̏̔̒̌͊̈́͜ì̷̖̭̟̝̫́͌̇̉̅̄͠t̷̼͉̼͓͚̟͉̪͍̏̅̃̈́̓̏̄ͅc̵̡͖̟͔̘̬̝̮̐̈̍̓ͅḧ̸̝͖̪̄̀͊̊͑̎̇̃̓.̴̜̫̞̮̼͈̹̺͈̤́̐͂
Since last time I popped open the BBC Micro version of the game and tried to go through the same puzzles I had already solved, thinking maybe the text description would be ever-so-slightly different in a way that inspiration would strike.
However, I found that the teleportation steps I found before did not apply at all, and while my first teleport was to inside the oasis in the version I was playing, I could not get inside at all whilst in the BBC Micro version.
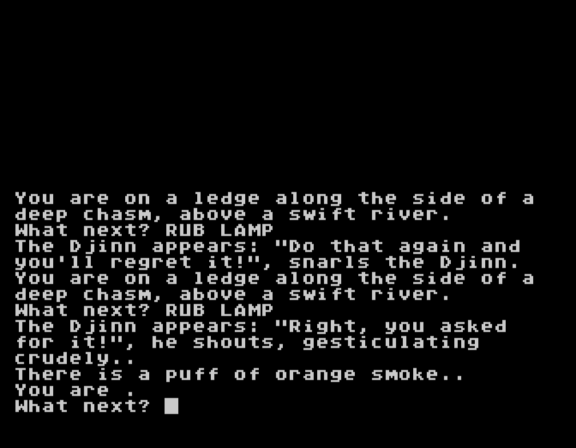
I had also found, via experimentation on the graphical edition, that you could kick the djinn away from blocking the oasis as long as you used the bag…
…the problem is that the bag is behind the tentacled creature, where I needed the magic lamp to escape, and the magic lamp is behind the djinn that is blocking my way in the BBC Micro edition. I clearly had short-circuited the puzzle in my other game.
Using some meta-structural thinking, I decided to go back to working out how to solve the tentacle-puzzle without jumping ahead. I figured even if the puzzle turned out to be technically optional if you toss in the teleports (it is) it would help eliminate some of the clues I’ve been stuck on and narrow things down for solving required puzzles.
So rewinding all the way back: from the forest I was able to get a bottle, keys, Talisman of Life, silver ball, sling, fruit, an “onion” (really garlic), a stick, and pan pipes. The sling and silver ball I finally got working on the giant, and I swear I had tried this before:
You just have the silver ball in your inventory and it works. I don’t know what my issue was before.
Passing the giant, I could then get the snowman and push the rocks, killing the orcs on the tower. This left the open puzzles as:
– black tentacled thing
– rapids from going down the rope
– a slab near the oasis that did not respond to anything I tried
Going back to the slab, and knowing I was stuck with my item set from before (bottle, keys, Talisman, ball, sling, fruit, garlic, stick, pan pipes) I tried various combinations but nothing seemed even remotely able to knock over a slab of rock. CUT ROCK suggested my blow bounced off, further suggesting if I had a lot of power I could break through, but I otherwise started suspecting there would be no item involved at all.
So if not an item, then what?
errrrrrrrgh no, the phrase doesn’t get mentioned anywhere and yes, I worked this out without checking hints.
There’s some “Arabian Nights” style theming so I thought I’d try the themed answer out. A very similar puzzle appeared in Time Zone but in that game I came up with the solution right away; I think the presentation (and the penchant Roberta Williams has for random fairy tale references) made it more obvious to try than in that game than this one.
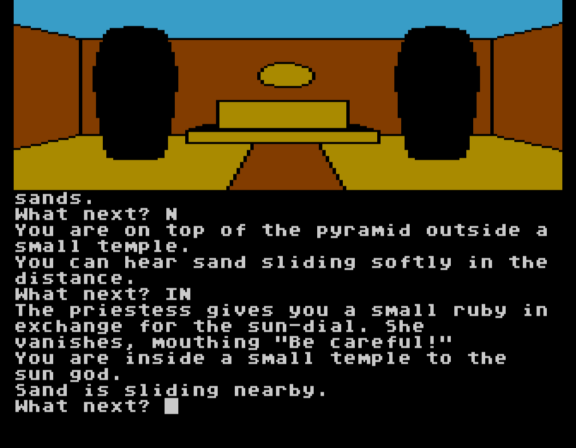
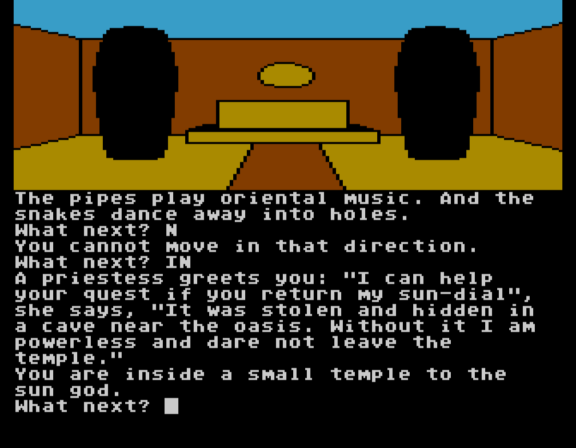
Nevermind. Sun-dial in hand I could return to the temple and deliver it to the priestess.
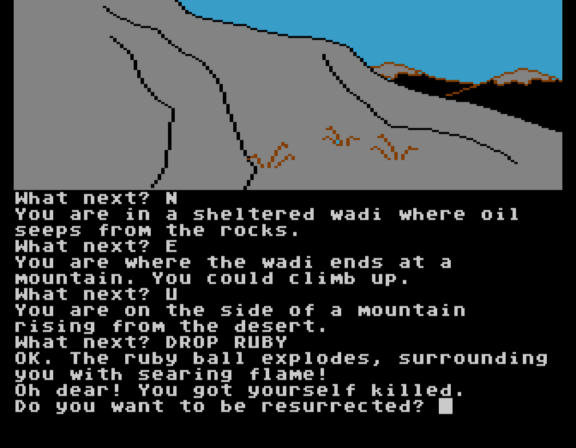
I discovered the ruby dissolved while in water and also kills you if you drop it.
Given blowing things up is not helpful for navigating rapids, I tried the tentacled thing instead:
This opens up the way to the emerald eye and the bag that blasts air. You can then (in the BBC Micro version) blast the djinn into the lamp and go pick it up. Technically speaking you can go on a teleportation spree after that, but teleportation wasn’t helping with the rapids, so I decided to keep going no-teleport and see if I could resolve the issue:
You can teleport to them or teleport away, but end up dying at the end.
Again I quickly decided my item list was of no help, so I contemplated a no-item solution. Swim against the current, maybe?
Just typing SWIM oddly enough gets no response at all from the game — it seems like it is broken, but at least it acknowledges the command. This led me to go through trying SWIM N, SWIM S, SWIM E, etc. until I got to SWIM UP.
I found out later CLIMB UP works too, but the ability to somehow grab and stop ourselves on the rapids and climb up is not even close to my visualization of how the rapids operate. I think maybe the text version of the game would’ve been easier here.
Up on the ledge you can find a “model of a lung-fish”, and if you pick up you start being unable to breathe. This is a magic item that was fun to figure out: it inverts your breathing from water to air or vice versa. The inversion happens when you pick the item up, so if you enter water-breathing mode, to switch back to land-breathing you need to do DROP LUNG-FISH followed by GET LUNG-FISH.
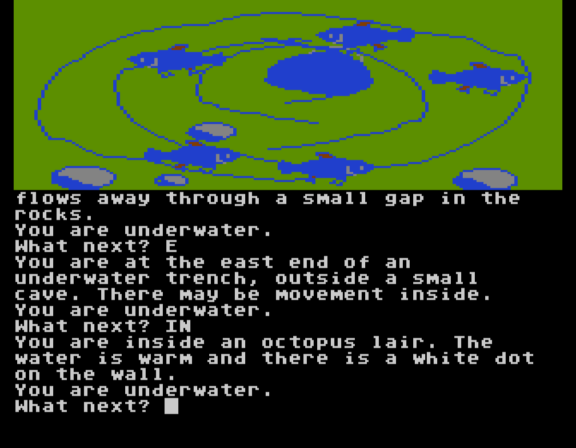
Breathing underwater made it easier to get to the octopus lair. I used the (intended?) lamp teleportation in order to get my items down at the lake, including the bag you need to use to defeat the octopus.
Regarding the white dots: they seem to all simply be teleport destinations. That is, there’s a black dot at the door-that-needed-oil that teleports to the white dot at the building; the white dot in the desert no doubt has a matching black dot somewhere, and they’re all one-way trips. I worked this out because I found another black dot. You see, once the slab was opened up, the destinations of my lamp changed. I was able to land (via teleporting) inside the sun-dial cave, for instance, as well as land on the ledge above the rapids. And from there I went into the glitch-i-verse, as seen on the top of this post. Fortunately I could pick a direction (like east) and end up back in normal-land:
Well, kind of. This is a new area! Wander around too long and you freeze.
Our first sighting of the black tower.
However, just to the north I found another one of the elemental stones: the Star-Stone.
I’m not sure what they were going for with “glowing like a commercial” but it’s evocative nonetheless.
So, two more stones to go? More teleportation brought me back to my regularly scheduled areas, and I’m still stuck on getting by the dragon. The dragon will swallow everything I throw at it so I think I just need to find the right thing (the garlic, if you’re curious, doesn’t work).
I was stalling on writing this post until I also had teleportation figured out, but I’m still at a loss to completely explain it. I’m starting to suspect there’s a completely random aspect but the game is still demanding some parts be done more exactly?
From MSX World.
To continue from last time, I first went back to prod at the various locations of my map to see if I had missed something. Way back where I had received a scroll explaining the quest, I had a “loop” on my map, because I was unable to move any farther up:
What the game had actually done is moved me to a new room but not described the room nor changed the graphical screen. If you LOOK you will find you have, in fact, entered a new room, with an item I previously missed:
The stick, when dropped, grows an endless supply of fruit. I already had fruit from elsewhere and I still don’t know what it is for.
The stick grows incredibly as it hits the ground. Buds form, leaves burst and drink in the light, and the stick is a mass of flowers! Fruit swells and falls onto the ground and the leaves are shed. It is just a stick again.
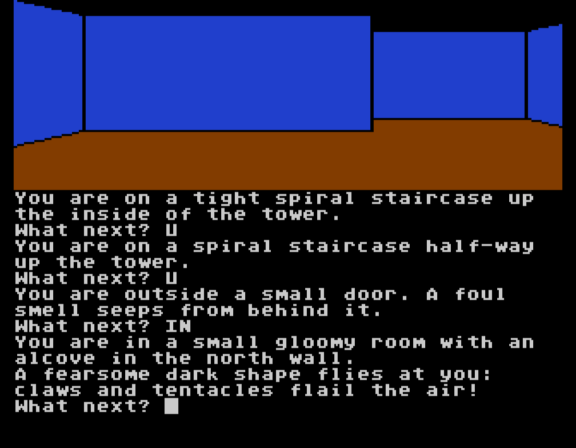
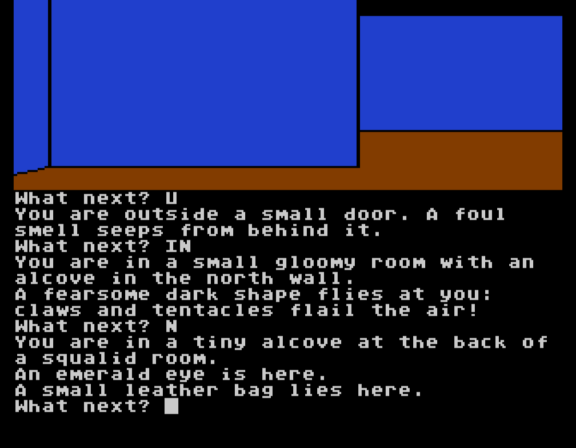
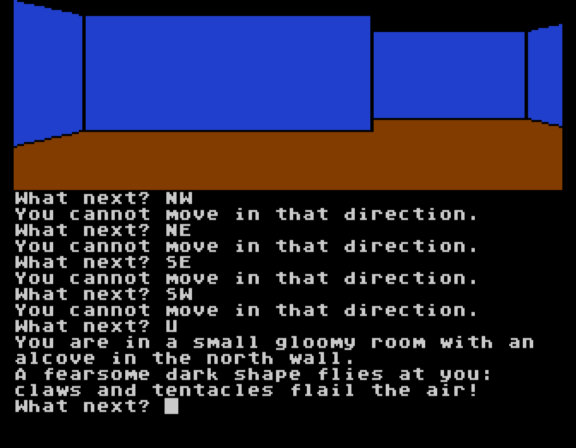
Another part I prodded at insufficiently was in the tower surrounded by orcs (or at least previously surrounded, if I used a saved game where the snowman had taken care of them). On the top is a tentacle creature which I still have yet to handle.
However, you technically don’t need to handle the creature — maybe — as you can just walk on by. This is different from the sphinx, giant, djinn, and dragon, so I was implicitly assuming the same applied, but no:
This incidentally might still be “wrong” as the creature will now kill you on sight if you enter the room again, so if there’s some item you get via defeating it this will skip by. On the other hand, it seems like the authors had to special-code letting you waltz by, so maybe there is no way to defeat it.
Opening the bag says “A blast of air roars from the bag.” It took me a long time to realize where the bag went but I do have it resolved. (I’ll show you later, feel free to guess! It is one of the obstacles we’ve already seen.)
The emerald eye, on the other hand: I knew exactly where it went, as I had a statue back in the cave with a missing eye.
This gave me a weapon past the ARMED INTRUDER door so I immediately tried whacking the various obstacles with it. The dragon? Still no dice. But the spider:
Now you need to give the orc chase. It runs past the “ambush” point, but fortunately the presence of the Earth-Stone apparently now has all the hostile orcs distracted, as it is now an “unguarded” lair.
The earth-stone is stashed in a nearby storage room so you can just grab it, but rather like Adventure 200, the problem is not getting in but getting out.
But given I had just obtained a shiny new sharp implement, and there didn’t seem to be anything else to do in the orc lair, I realized I could Indiana Jones it with CUT BRIDGE:
You sever the rope bridge, preventing pursuit.
There are no orc issues in the cave past this point. There’s a still a dragon (would love to get the water trident in there and see what it can do) and some blocking giant rocks (which I think might be the solution to getting the water trident in).
The Earth-Stone itself I haven’t been able to do anything with (I’ve tried waving it, throwing it at things, etc.) so it may just not activate until we reach the final climax.
Frustrated, I went back to trying to decipher the teleport mechanics. There seems to be some sort of background timer. That is, I could be at step 5 of my teleport sequence, wander back and forth ten turns, and jump to step 7. Wander some more and I could jump to step 9. However, I was stuck at 18 (the death rapids) where no matter how much wandering I did the teleport sent me to death.
I would have thought maybe that was that, but then this happened:
This is directly in the temple past the sphinx and the snakes. I think on this particular run I hadn’t even taken care of the snakes yet. I definitely hadn’t reached here before via teleport. Where I had this happen was immediately after entering the building at the start of the game.
Maybe the white dots are part of this? (As far as I can tell, other white dot rooms like the pillar in the desert and the small cave next to where the snowman is don’t have the same effect.) In any case, after my “reset” I had a much more erratic sequence of teleport destinations which I believe is truly random. For example, I went west of the building to some “biting insects” where there’s a direction that loops and tested different number of SOUTH commands before rubbing the lamp twice. I used this same procedure with the Oracle in the game Madness and the Minotaur where I needed to “rotate the RNG”.
from biting insects –> zero steps –> underwater at well
from biting insects –> one step –> lake bed above deep trench
from biting insects –> two steps –> tiny alcove
from biting insects –> three steps –> tiny alcove
from biting insects –> four steps –> wide stone staircase climbing up, narrow path west
from biting insects –> five steps –> brick of rapids
from biting insects –> six steps –> at tentacles
from biting insects –> seven steps –> at tentacles
from biting insects –> eight steps –> at tentacles
from biting insects –> nine steps –> at tentacles
from biting insects –> ten steps –> at snowman
from biting insects –> eleven steps –> outside south door of guard tower
from biting insects –> twelve steps –> outside south door of guard tower
from biting insects –> thirteen steps –> outside south door of guard tower
from biting insects –> fourteen steps –> outside small door, foul smell
from biting insects –> fifteen steps –> underwater, belfry
from biting insects –> sixteen steps –> in rapids, one before brink
At “zero steps” I teleported to the dark room under the building. If that somehow could be done from underwater I could safely take the jellyfish over to see what’s in there. At “two steps” and “three steps” that teleported me directly to the alcove where the emerald and bag were, bypassing the tentacle creature entirely!
The fact that some teleport locations last for multiple turns and some last for only one suggests to me that teleportation is now really, truly, random. I still strongly suspect I’m missing something here.
All this random teleportation did lead me to accidentally solve a puzzle. Remember the bag that blasts air?
I cannot say I had any grand insight. I just happened to have it in my inventory when I hit the right room. I’ll take the luck, this game is an uphill climb enough.
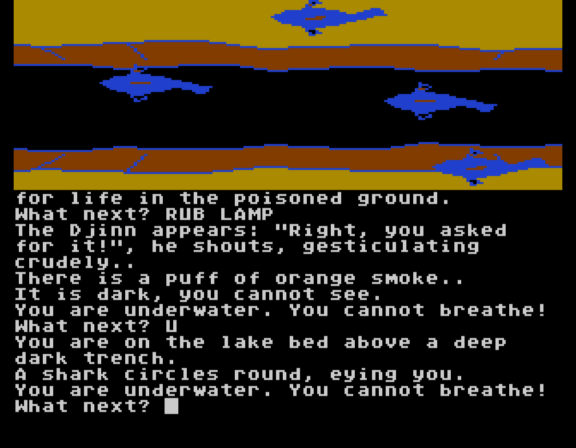
Next up: actually getting light to the octopus-free room (is there an item now?…) and maybe trying to get it in the well too, but that sounds like a major pain. Other than that I really just have rocks to deal with. Also, a shark which I never saw before but now seems to be circling. I think it is a delayed like the wolves and I just hadn’t got “lucky” yet:
My last solve (but the first one I’m going to talk about) came from a simple misreading.
I had interpreted this scene as the snowman was “on the loose” and something still needed to be done. However, it struck me (upon retrying this scene) that the way the bear worked in Crowther/Woods Adventure still required you to GET BEAR even after it had been pacified, so maybe I was just lacking that. And indeed, you can just GET SNOWMAN and have him walk around with you in his inventory.
Further down the mountain are some large rocks. Earlier I had tried to PUSH ROCKS (being on a mountain, thinking they’d roll down and maybe hit the giant) but I was told they were too heavy. The Snowman seemed like he’d be strong, and indeed:
This gets rid of the orcs at the tower and you can go in and encounter the rope and the shape-with-tentacles at your leisure. You can also walk around the giant, suggesting maybe the giant doesn’t get defeated at all.
The big catch to all this is that the mountain path past the giant occurs near the very end of your long teleport-route. If there’s some reason the orcs need to be scared off earlier (maybe the orcs on the mountain are the same as the ones in the cave ambush?) then there’s still an issue.
For my second solve, I was still fiddling around with the sandworm in the desert. Remember I had done WAVE TALISMAN and it caused the rumbling of the worm to decrease. I realized (because of the brutal inventory limit incentivizing me to test) that I could WAVE KEYS or any other item and it would work equally well.
I later realized — rather more later than I should have — that in fact WAVE was simply passing time, and any action that wasn’t walking would work, even just WAIT. That is, the sandworm was tracking when you move, but could not hear you if you were standing still!
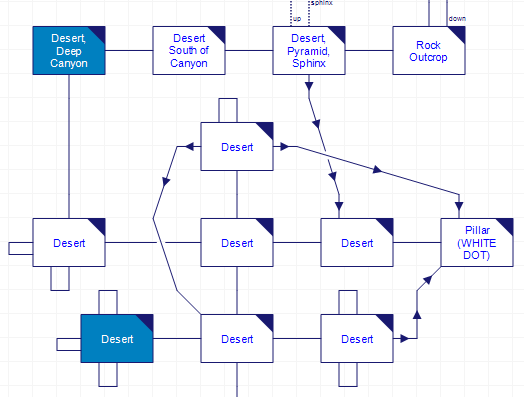
My updated, now-accurate desert map.
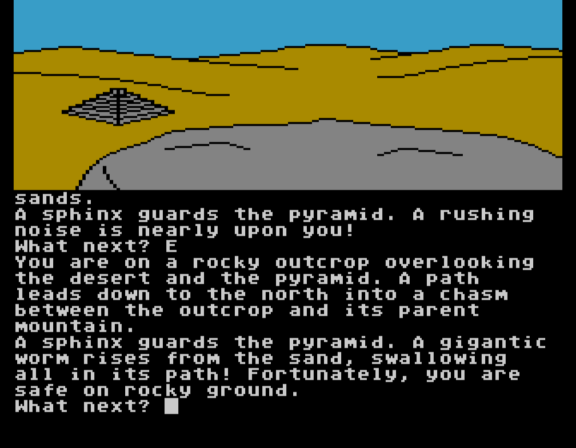
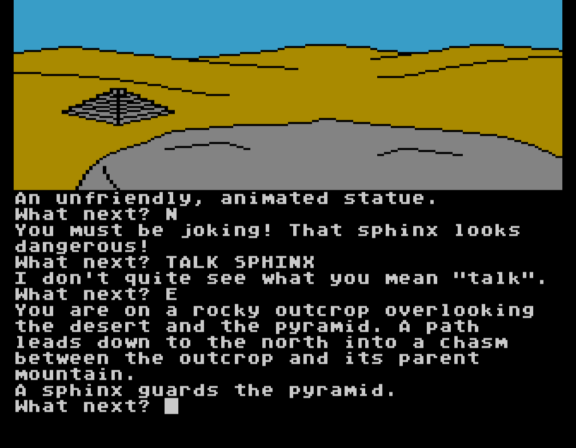
I also got to thinking about the sphinx, and it seemed rather suspicious that the worm was swallowing up “everything” when it surfaced. I had also found — by moving south out of the desert just at the right moment when I was experimenting with the worm in the first place — that you can just barely evade the worm and have it surface anyway.
Combining the two facts together, I messed with my timing so that the worm was just about to appear while I was right next to the sphinx. Then I ran east to the “Rock Outcrop” on my map:
The fact you can see the sphinx from here was another hint this might work.
While it isn’t explicit from the text above, the sphinx is now gone: it has been swallowed. You can freely go to the snakes at the sun temple, charm them away with the pipes, then meet the priestess who tasks you with finding a sun dial.
Just as a reminder. One very long shot is a place to the west of the oasis with many large rocks, kind of like the ones at the mountain. Maybe the Snowman is meant to go down here first and help move these rocks before taking out the other ones? But that would mean I’d definitely need to take out the giant first. Which I feel like the sling has to be meant for (see: David and Goliath) but I still don’t have a small stone to launch.
So yes, those were the easy puzzles. Now we get on to the monster.
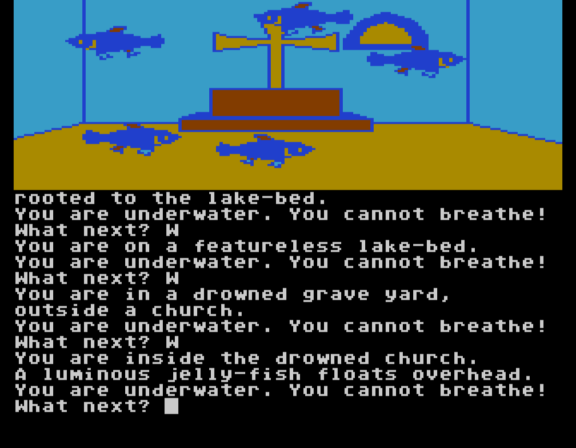
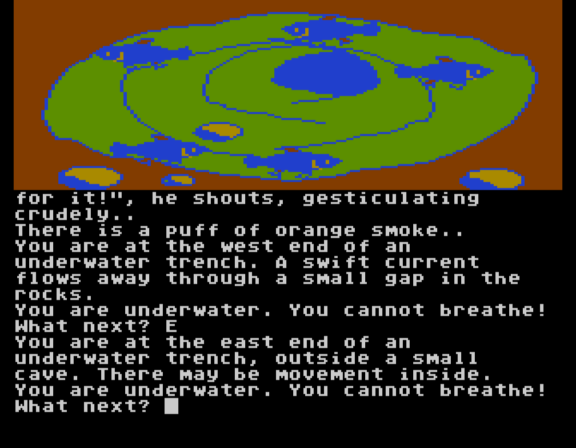
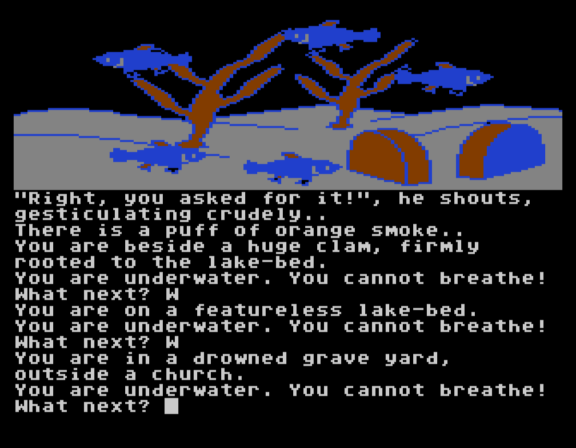
This kicked off with an observation, while messing around in the underwater church, that a jellyfish that I thought was scenery was probably meant to be a thing you could take.
Mentally I parsed “A luminous” with the sentence before that as a single paragraph, but on second glance the “A” would clearly have come on the prior line if it was in the same paragraph. Being in the same paragraph would mean I couldn’t pick the jellyfish up, but since it is on a new line, it is takable.
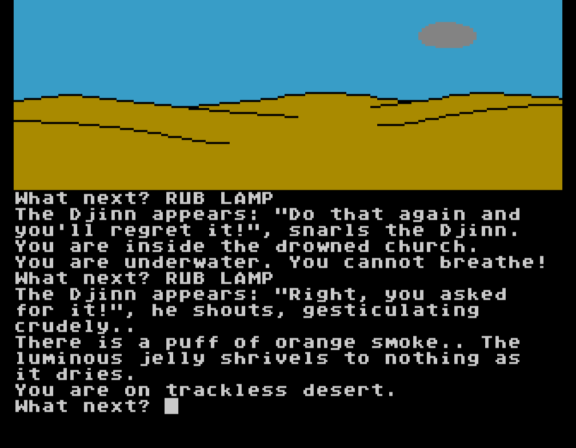
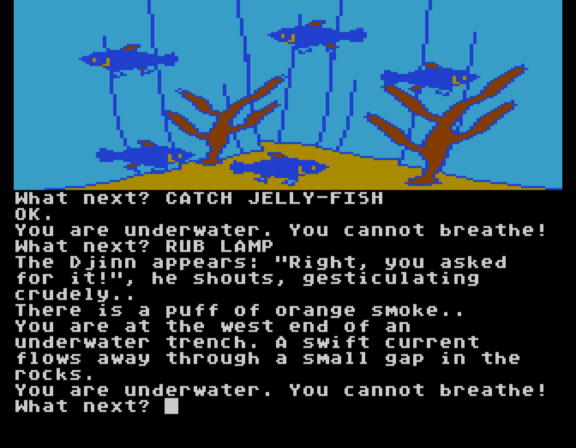
After finding out I could refer to a JELLY-FISH (just FISH breaks the parser here) I decided the nearby fish net had to be used here. With some fussing about I was able to CATCH FISH JELLY-FISH but died immediately afterwards being out of breath.
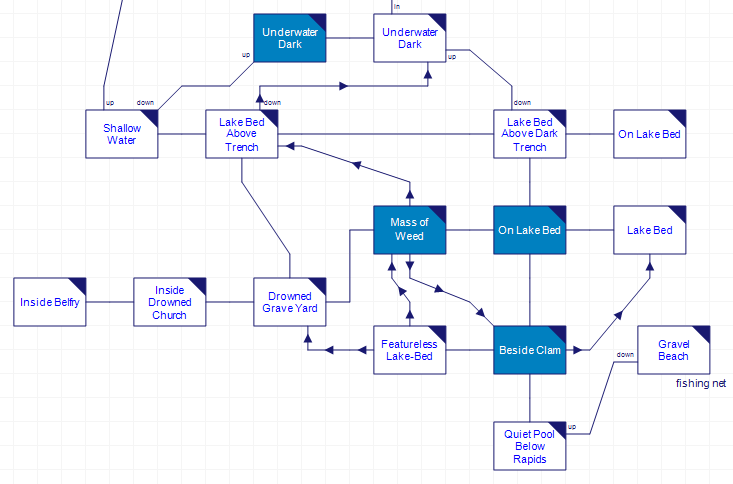
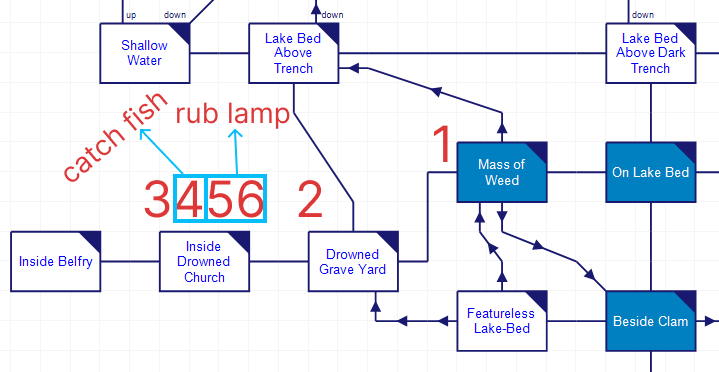
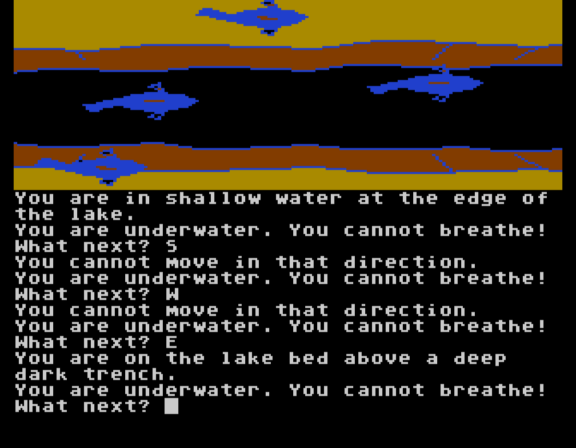
Let me go back to my updated map of the lake, as the positioning is very important for the puzzle. Note the blue locations are teleport landing spots.
You have exactly six actions you can take underwater before you die.
So you can walk from the Gravel Beach (taking a deep breath) down to the Inside Drowned Church, but die immediately upon catching the fish.
1.) down to Quiet Pool
2.) north to Beside Clam
3.) west to Lake Bed
4.) west to Graveyard
5.) west to Church
6.) catch fish
(dead)
Additionally, if you teleport to an underwater place, while teleportation resets your breath-o-meter (that is, you can teleport from underwater to underwater on turn six and still live), your arrival to a new underwater place counts as an action for the purposes of the fresh set of turns.
For example, you could teleport to the Mass of Weed, fairly close to the church. As already mentioned starting underwater causes you to immediately give up a turn, but this still gives you enough turns overall to catch the fish and teleport out:
1.) arrival via teleport
2.) step west to graveyard
3.) step west to church
4.) catch the fish
5.) rub the lamp
6.) rub the lamp again (remember you rub it twice to teleport)
Unfortunately, this kills the fish! Let’s go back to that teleport sequence from last time.
1: inside the oasis
2: at the clam, lake
3: path through forest
4: north of oasis
5: rapids
6: inside guardroom, tower
7: at underwater weed, lake
8: trackless desert
9: tight spiral staircase inside tower
10: lake bed (south of trench)
11: south of oasis at trident
12: underwater (dark), lake
13: road north of building
14: desert south of canyon
15: top of pyramid
16: track up mountain past giant
17: mountain at giant
18: rapids (DEATH)
Being at the underwater weed is step 7. So when you teleport, you go to step 8, the trackless desert. Guess what happens to a jellyfish in a desert?
So despite it being close enough for the full sequence, the teleport start at the weeds is out for catching the jellyfish. What to do?
One thing to keep in mind here is the ultimate destination. The jellyfish provides light, so we want to not only get the jellyfish but bring it somewhere dark; in the lake this means the underwater trench, which conveniently is one of the teleport landing spots. Working backwards, here are the previous two spots:
10: lake bed (south of trench)
11: south of oasis at trident
12: underwater (dark), lake
All three are underwater, good! Jumping between these will not kill the jellyfish. However, the teleport spot is exactly one room to the east of the weeds, meaning you need not six but seven moves to make the jellyfish heist; what to do?
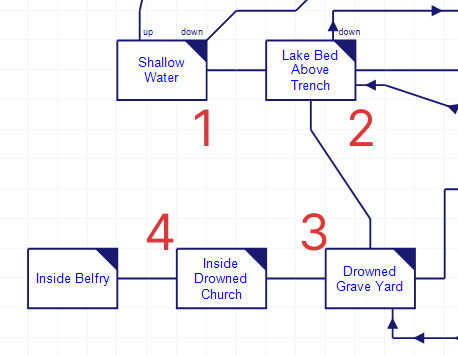
If you go to the Shallow Water (far northwest) and go up, you get on land and can breath air. So if you use that as a starting point…
…it looks like you still don’t have enough moves, because that takes four moves, and you need one move to catch the fish and two to rub the lamp and teleport out. 4 + 1 + 2 = 7.
HOWEVER!
The two rubbings of the lamp do not need to happen one after the other. This is irrelevant to a path that starts and ends underwater, but if you can start on land, and rub the lamp once before entering the water, then you only need to rub the lamp one more time before a teleport. That is, the sequence is, starting from just above the shallow water:
This is exactly six steps and it teleports you to water (south of the Oasis, inside the pool itself). You can then teleport again to land at the dark trench and light it up.
Dropping an item here sucks it down a hole (the small gap). I don’t know if this is useful.
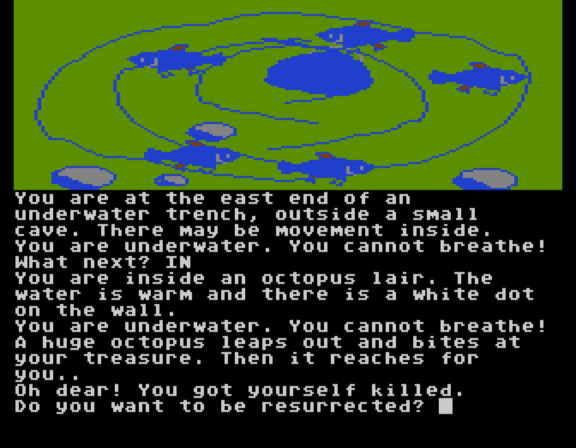
Just to the east there’s more trench and an entrance to a cave.
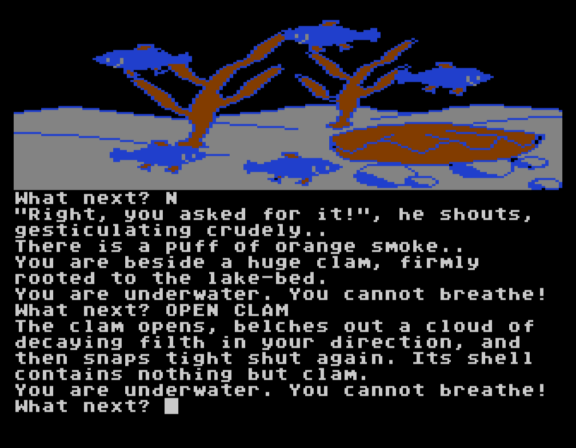
Then inside, an octopus. Which kills me instantly. Of course.
Reaching for your “treasure” happens even if you are carrying nothing. I also tried bringing in the trident and I had no way of using it in time.
Still, that was exceedingly elaborate and required keeping far closer track of teleport destinations than I thought it was going to need. The situation is still even a bit worse, because even given my experimentation I’m still not sure what’s fully going on with the lamp.
You see, sometimes it skips destinations. For example, even though you have two steps from the jelly-fish (10) before the dark trench (12), I’ve sometimes had the game skip from 10 to 12 and I don’t know why. The order still always seems to be the same otherwise (it won’t ever go back to a location the teleporter already skipped) but given how complicated the jellyfish puzzle was, I’m sure mastering what’s happening with skipped destinations is important for winning the game. Maybe there’s still more teleports past the fatal one (18?)
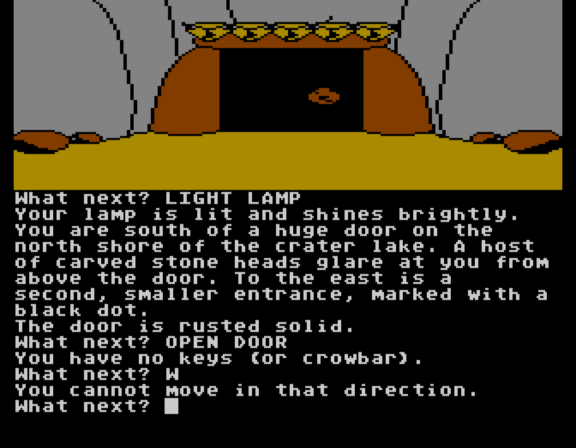
I was correct on my guess last time that I just needed to bring the oil and keys over to the locked door in order to get by; the oil works on the rust.
I should be careful saying “just” because, as mentioned in a prior post, the inventory limit here is brutal. Teleporting around requires holding the lamp in hand, leaving three slots; this puts the keys and the bottle (for holding water to get through the desert, then oil for the door) in the remaining places. I also was needing a fourth space (maybe) to grab a trident. The sequence on teleportation goes:
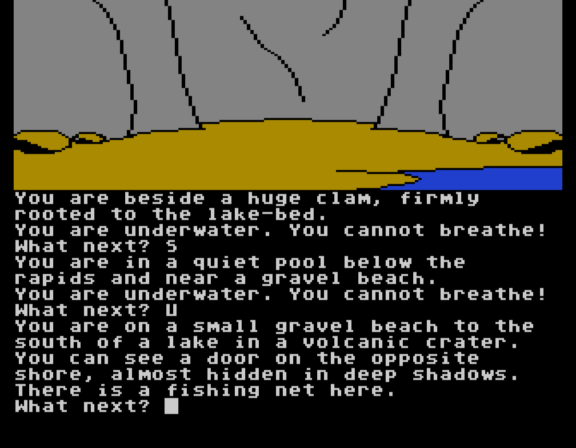
1.) teleport to inside the oasis — this happens trying to enter it and seems to just introduce the mechanic
2.) you can then go south and pick up a trident that, when thrown, generates water bubbles (you can re-fill the bottle with water)
3.) the getting teleported (either by trying to go back in the oasis, or rubbing the lamp directly) sends you underwater by the clam
4.) swim over to the door
From 3 you have a second choice. You can go south a little to pick up a fishing net. You can’t then swim to the door; it is too many moves and you’ll run out of breath.
It is possible the best move is to ignore the trident, get the net first, and then keep teleporting (you’ll eventually land close to the door again) but all this requires major inventory shuffling. As all this is implying, despite it coming off as purely random the teleportation does happen in a fixed order, specifically:
1: inside the oasis
2: at the clam, lake
3: path through forest
4: north of oasis
5: rapids
6: inside guardroom, tower
7: at underwater weed, lake
8: trackless desert
9: tight spiral staircase inside tower
10: lake bed (south of trench)
11: south of oasis at trident
12: underwater (dark), lake
13: road north of building
14: desert south of canyon
15: top of pyramid
16: track up mountain past giant
17: mountain at giant
18: rapids (DEATH)
The last line means the 18th use of teleportation via Djinn will kill you.
This is all a little hard to get a handle of, so I made a meta-map which has numbering on the regions showing the sequence.
This suggests there might need to be some seriously complicated resource juggling and also some constraints. For example, the “top of pyramid” is by the temple where you were asked to find a sundial in a cave; if the cave in question is the one that’s up the mountain and the sphinx can only be bypassed via teleport, then the giant needs to be bypassed before teleporting to the temple. Or maybe the sphinx doesn’t require teleportation hitting the temple early is just a “sneak preview”.
Also, as you can tell from the meta-map, I have not been able to connect up the lake area or the area past the locked door to the main map as of yet. It is faintly possible they don’t connect at all and teleportation is the only way to reach that section, so you’ve softlocked if you need to back there but have already rotated your teleportations too far. (That is, by the time the teleport reaches the second visit to the forest, stop 13, there are no more teleports to the lake.)
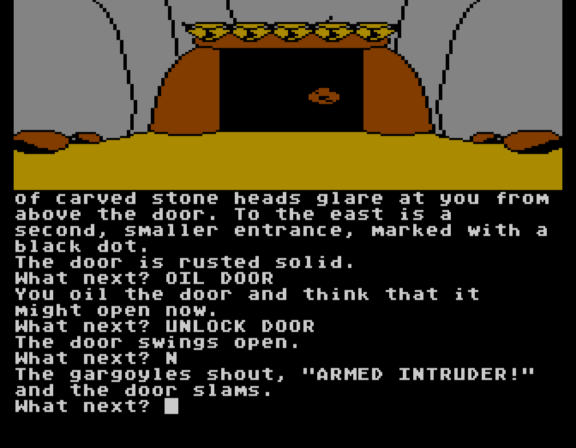
Enough stalling, though, as I’m sure you want to see what it looks like past the locked door:
Sadly I had to drop the trident off for now (the “ARMED INTRUDER” thing). There’s a puzzle I found quite quickly where the trident would have been useful.
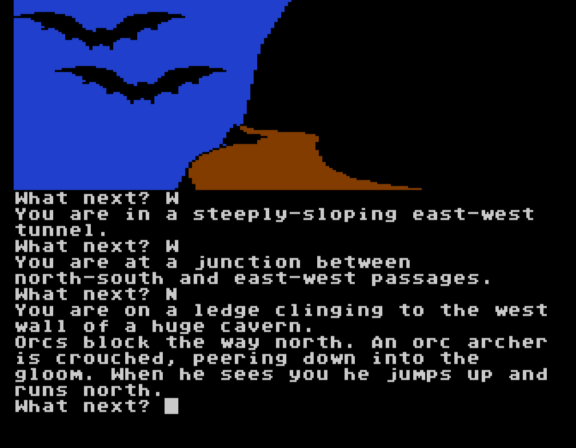
To the northwest there’s a dragon, and the game implies this is a rematch of sort with dragonkind as we defeated our last one with fisticuffs. This one does not fall as easily.
The water trident would surely work? The dragon blocks off two exits with fire; I have no other ideas what to do.
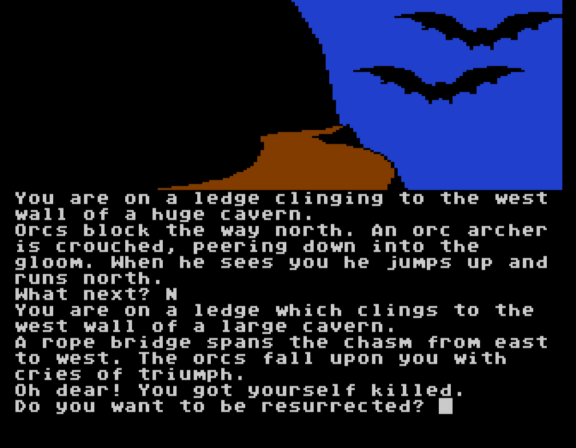
The east side there’s two areas where arrows get randomly shot at you by orcs, and if you hang out too long you die. Fortunately “too long” seems to be a decent span, I essentially had to get hit intentionally:
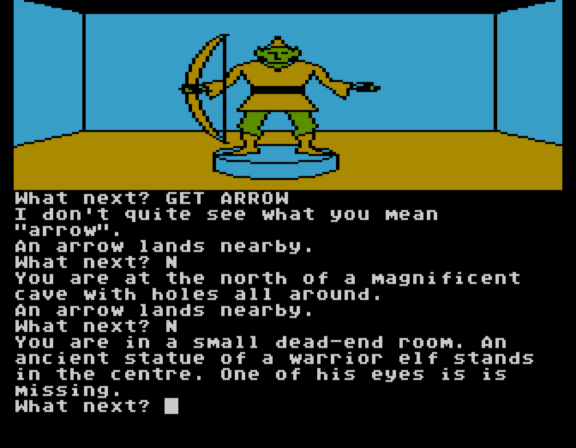
You can climb a web to get to a spider, and the earth stone, one of the four doodads we’re collecting so we can have our final showdown with the demon.
The spider only kills you if you try to take the stone.
To the north there’s an elf statue with a missing eye that suggests a gem or the like that fills in the gap.
There’s two other obstacles; one is an exit blocked by giant rocks, which may match with a spot on the mountain on the other side. Maybe this is the way of getting the trident through.
There’s also an orc who spots you and runs off, and if you try to proceed further you get ambushed.
This also happens if you try to do this sequence in the dark.
Noteworthy is that the arrow-shooting area stops being a threat if you let yourself get spotted by the orc but don’t proceed further. Presumably all the arrow-shooting orcs have now moved to new ambush spot. This suggests maybe the orcs can be distracted or blinded first where the arrows originally happen, or maybe stopping the steady drop of arrows in the east part of the cave is more useful than I realize.
Given the widely-spread out puzzles, inventory limit, and messy transportation it gets hard to just “test everything on everything” but that may be what I need to do next. For the record, my open puzzles are:
figuring out the white/black dot system (everywhere, the only black dot so far is at the locked door)
anything with the chapel or graveyard? (lake)
statue, dragon, spider, large rocks, orcs (cave north of locked door)
sphinx (desert)
giant, abominable snowman, other side of large rocks? (mountain)
blocking orcs?, dark shape with tentacles (tower)
Regarding the snowman, I did use the keys to unchain it (just like the bear in Crowther/Woods) and it doesn’t attack, but it doesn’t follow me around either. I feel like I need something else for friendship and then he can move some rocks or tear up a giant or something.
My items are (deep breath) a bottle, keys, lamp, fishing net, trident, Talisman of Life, silver ball, sling, fruit, an “onion” (really garlic), and pan pipes.
This doesn’t strike me as a lot to work with. I do want to test the silver ball out at the statue with the missing eye, but otherwise nothing obvious is occurring to me. (The sling, by the way, says, “Wave it to violently propel stones” but when I try to WAVE SLING it says I don’t have a sling stone.)
I still feel like I’m making regular progress, so no hints yet!
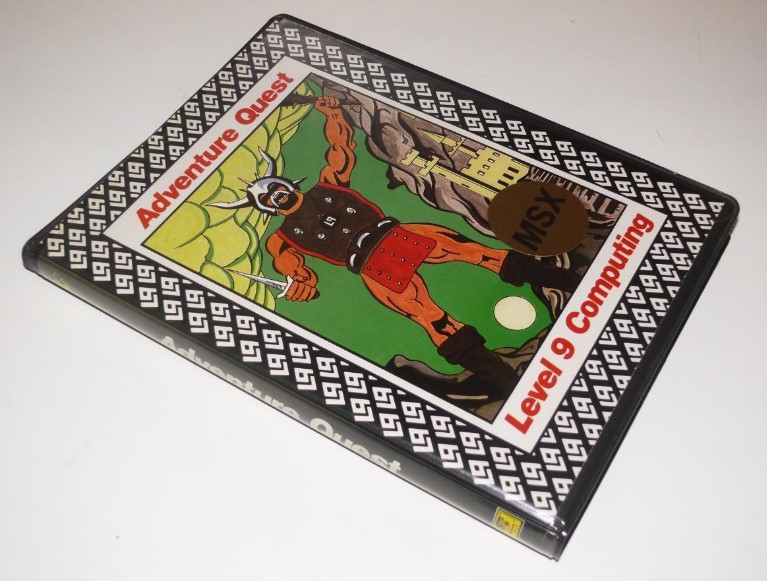
From Mobygames. This feels like a “grab from public domain” cover like the one from my last post. It is weird to have two versions like that in a row (usually, there’s a “public domain” version, then the company has the money to pay an artist for a reprinting). I’m not sure if this is the game’s 2nd or 3rd cover.
One of the more remarkable items in the mainframe game Warp is a portable hole.
The hole, being the absence of anything, is impossible to inspect.
You can place it down anywhere and it will randomly warp you to nearly any room in the game. The actual teleportation isn’t the remarkable part (that’s happened ever since XYZZY) but rather the total chaos of letting you teleport essentially anywhere, including in places with unsolved “blocking puzzles”. Some of these represent puzzles that you have to solve anyway, but at least in one case (because I did it) you can bypass a puzzle — I skipped a pyramid puzzle involving rotating rings that was one of the biggest pains of the game. The only catch is that the teleportation is random rather than controlled so it requires a lot of false moves.
I admire the willingness to push against caution, though; most adventure games try to make very, very sure you don’t skip any puzzles, and here comes a game that cheerfully gives what is almost a cheat code (I’m guessing for most players fairly late in their gameplay, but still).
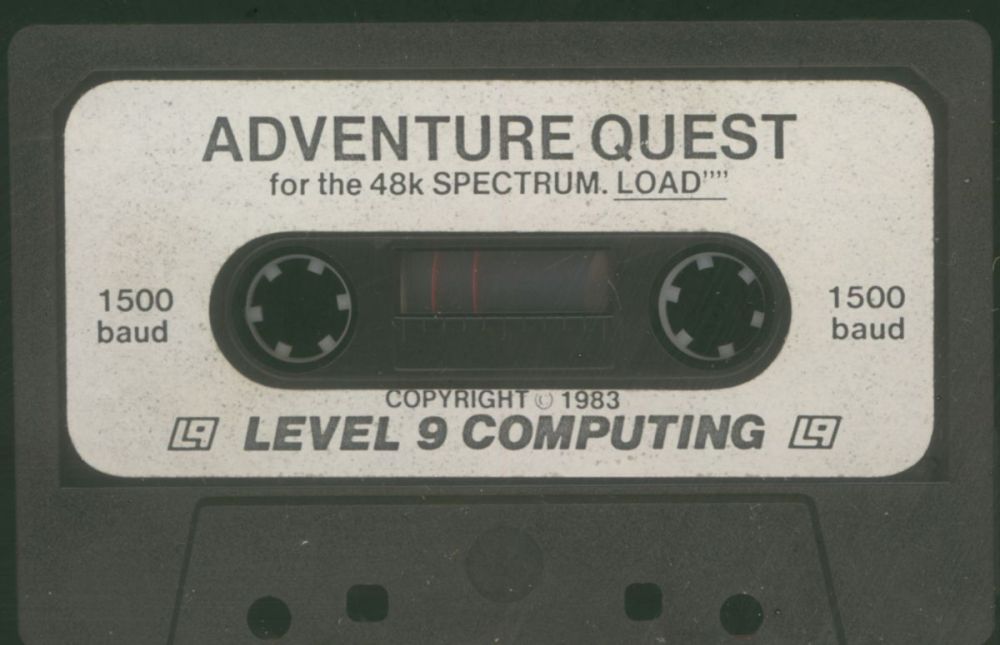
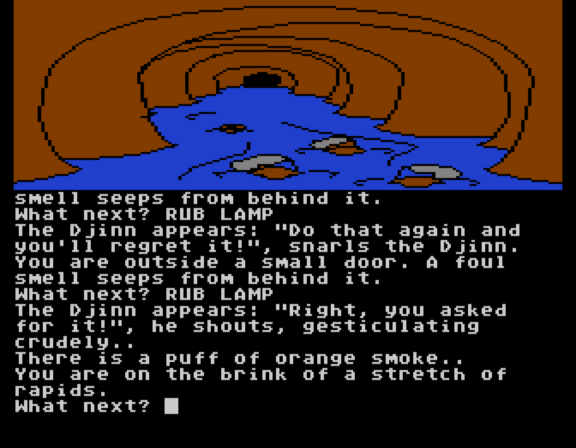
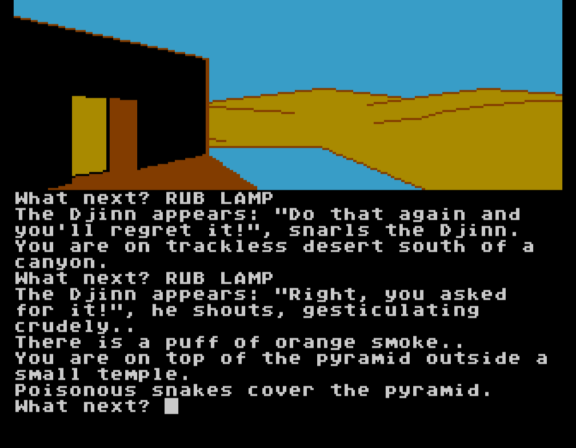
With Adventure Quest I left off last time on a Djinn that teleported me. I didn’t realize at the time the extent of the teleportation. You can pick up the “lamp” at the oasis and then rub it at any time (twice) in order to get an angry Djinn to do another teleportation, and it really comes off as arbitrary indeed:
You can get by what are clearly puzzles; for example, you can teleport to the pyramid that’s past the sphinx, and use the pan pipes (from back in the “relics” grove) to charm some snakes to get in.
(You can’t get out again, though, because there’s still a sphinx! You have to keep teleporting.)
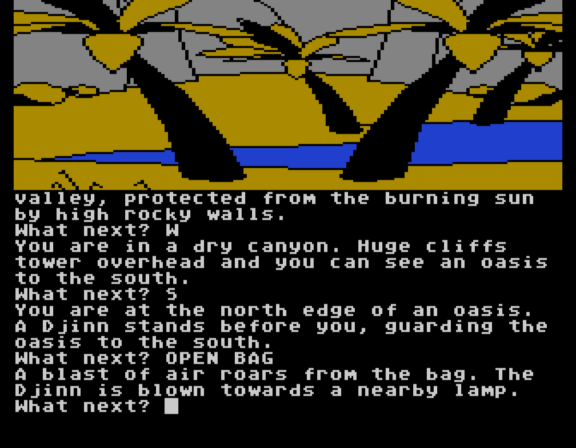
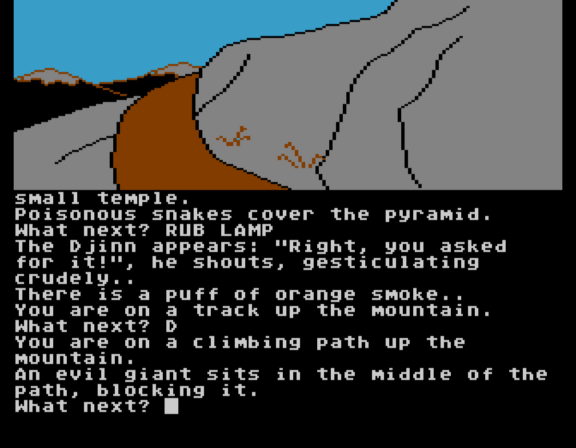
There’s also a mountain path (just opposite of the canyon) where you can walk your way up and get blocked by a giant, or you can teleport to land just past where the giant is.
If you do this, even though you’re entering from the “wrong end”, you are not able to go back up again.
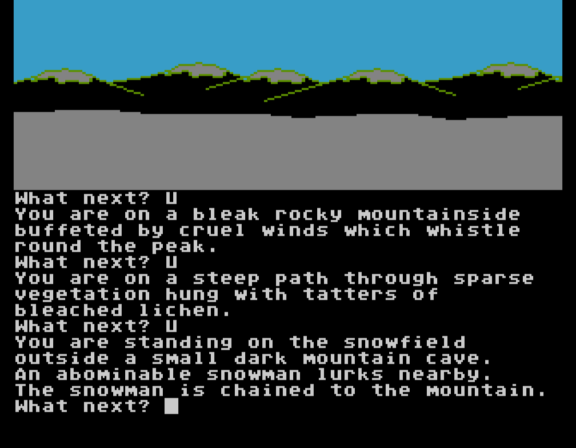
If instead of going down to the giant you rather go up, you run across an abominable snowman (chained to a mountain)…
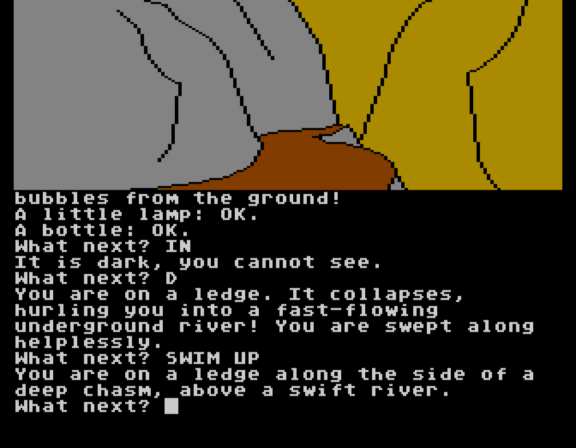
…followed by a cave (with a white dot, see those come up again!)
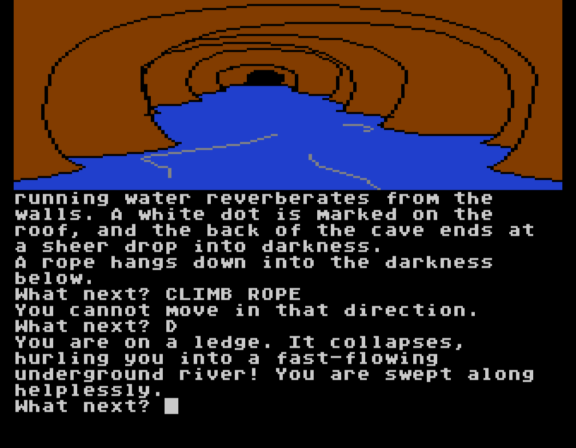
Weirdly, you can take the rope (seen from a post-teleportation screenshot earlier) and climb down here, but that just lands you in the raging river (seen from another screenshot) which seems to serve no purpose, since you eventually die in the rapids in a way that doesn’t seem possible to prevent.
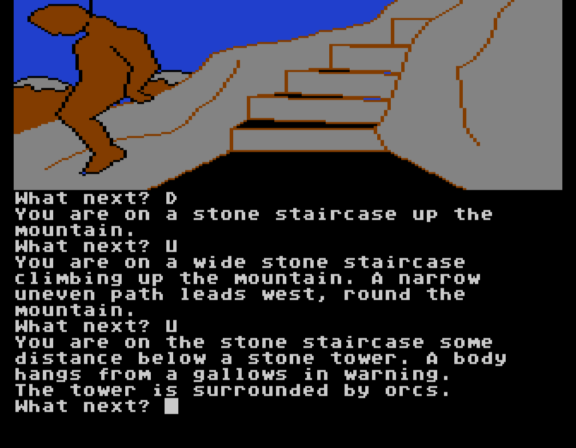
Incidentally, that rope is in a tower surrounded by orcs, and seems to be the tower, that is, the Black Tower that is our quest! We may even be able to have an early confrontation with the demon, although it’s hard to tell if this is really the demon or a sub-monster on the way to meeting him:
You don’t teleport directly here, you just walk from the room with the rope.
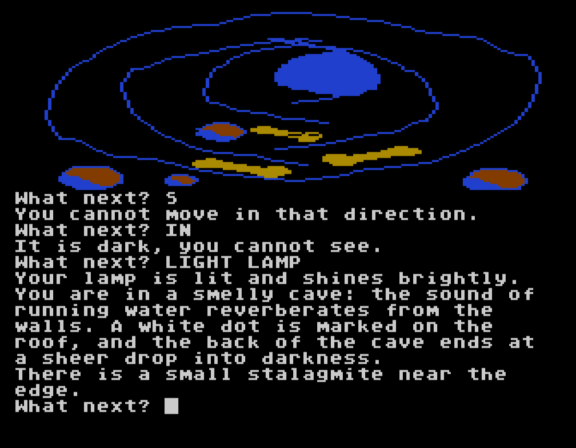
Another possible teleport stop is in a lake, where there’s several places to land. I have something approaching a partial map; it took me a while to realize how everything linked up.
The whole section is especially tricky because it is underwater, and you only have a limited number of moves before dying, although two bits (the south and north ends of the lake) let you get out and breath.
On the north side there’s a rusted door, too rusted for the keys from way back at the starting building to work. Intriguingly, there’s also an exit with a black dot (not white) and if you walk in, you get teleported back to the starting building with a white dot. I don’t know if all black dots have matching white dots, or if this is a “rotating” scheme much like rubbing the lamp is.
I do know a place with some oil which might allow the keys to work, but testing anything (given the inventory limit and teleportation requiring multiple jumps) requires a lot of juggling so I haven’t gotten to it yet.
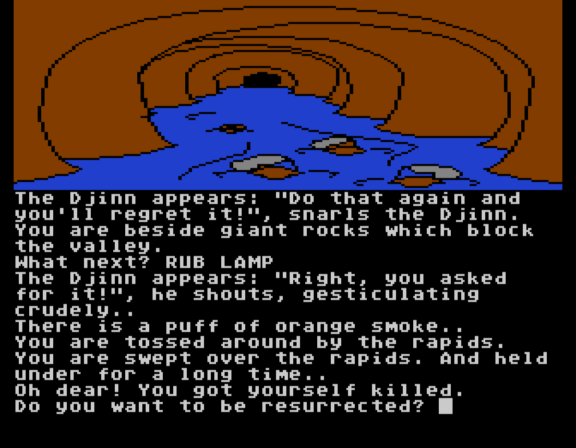
While the teleportation feels random and bypasses some puzzles, after sufficient testing I can say it always goes through the same sequence of places, eventually reaching instant death. Rather than dropping in rapids where you have time to teleport out, it drops you at the end of the line:
This means the teleportation is both terrifyingly open and potentially restrictive at the same time. It may be that you need to make the best of visits to particular places because teleporting is the only way to reach them at first, and you need to have exactly the right items in exactly the right order. This means the teleportation really may not be chaotic in the end but rather presenting an quite demanding puzzle. The end result for now is for me having to fill in a lot of map, though.
A very zoomed-out view of what I’ve mapped so far. I have no doubt this will change over the game.
I will say, as a general pattern, the game is trying very hard to frustrate mapping. The mountain has been the only “safe” region, and that’s just been going up or down for the most part; you can get blocked by the giant or run across that Black Tower from “the other side” but there’s no confusing exits or time limits.
Going higher is death, but you can reach the same room from the other side (via the room with the rope).
I’ll try to collect everything together and solve some puzzles next time. (Other than getting trapped in a temple and going down a rope to nothing in a cave! Incidentally I thought that cave was going to be the one with the sundial, but I saw nothing to indicate a hidden area. Not wanting hints yet, I’m still making progress.)
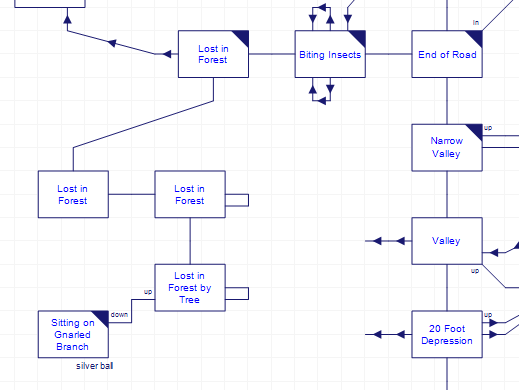
I’ve managed to map out and “clear” most of the opening area. I will show the map in a moment but I do want to first show a part of what it was like in progress.
This is showing the initial room (End of Road) with the stream going south, and the forest maze to the west as far as I had mapped it. At the time I was still having trouble with the wolves (another thing I’ve now managed to clear up) so I was only able to do the object-dropping method a little bit in the Lost in Forest area before dying. Both “Valley” and “20 Foot Depression” on the map also enter the Lost in Forest area, but I had no idea where to link them.
This reflects one of the major mapping difficulties I’ve had in the past, not correctly drawing in new rooms, but connecting up rooms that get entered from an alternate direction. Both Empire of the Overmind and Kadath had this issue; Empire probably unintentionally, Kadath muddled with and played with the idea. The curious thing is that this seems to be a text-adventure only idea, I can’t think of any moment during a graphical adventure or 3D adventure where I had a similar issue.
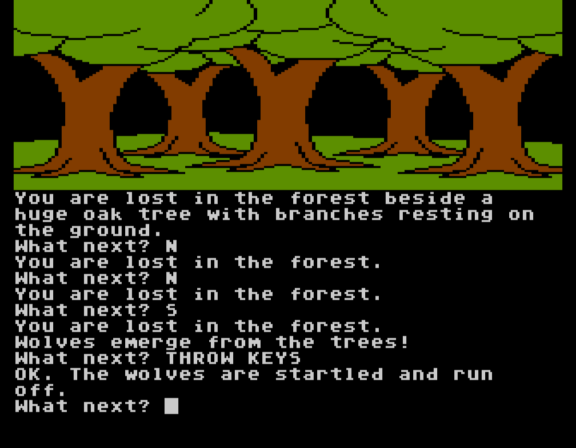
Amidst the forest I eventually found a tree I could climb which had a silver ball (see above). This got me the idea — due to 1.) silver + werewolves being a thing 2.) dogs + balls being a thing — to try throwing the ball at the wolves to see if anything would happen.
OK. The wolves are startled and run off.
This turned out to be “right solution for the wrong reason” because you can throw any item (or at least anything I’ve tried) and startle the wolves that way. So the wolves turn from a deadly enemy into an annoyance as (while in the initial forest area) you have to throw something every 10 steps or so.
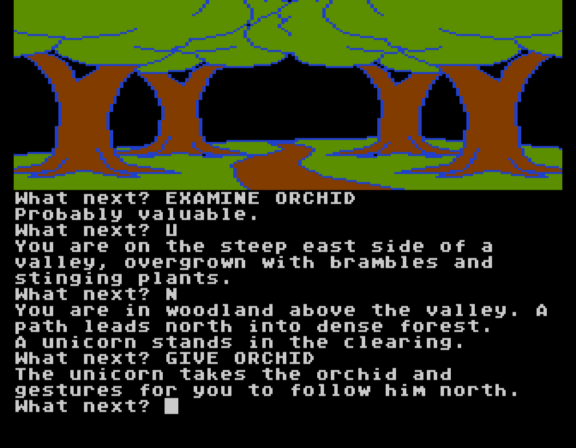
With the silver ball not actually being needed for wolves, I decided (given it is described as valuable) to try giving it to the unicorn instead.
The unicorn snorts disdainfully.
At least the action was acknowledged, suggesting giving the right item is the right action. The next most logical thing to try seemed to be the rare orchid (the one I could get by bringing in a table in order to stand on to reach high enough):
The ball is “very valuable”, the orchid is just “probably valuable”. This isn’t a Treasure Hunt but I still may need to keep an eye on this.
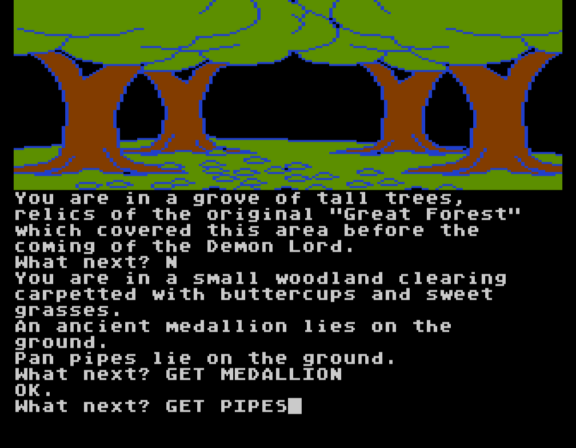
Following the unicorn, I found “a grove of tall trees” described as relics of the original Great Forest, a medallion, and some pan pipes.
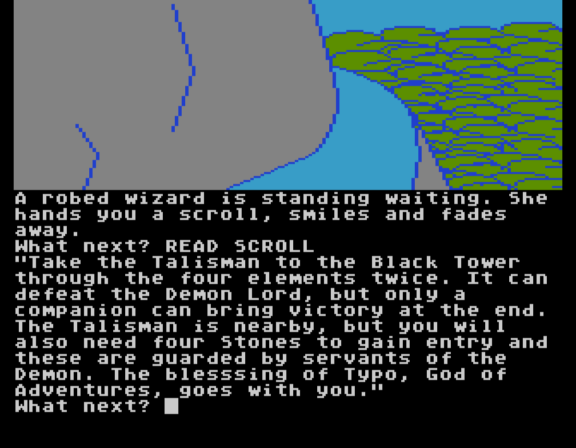
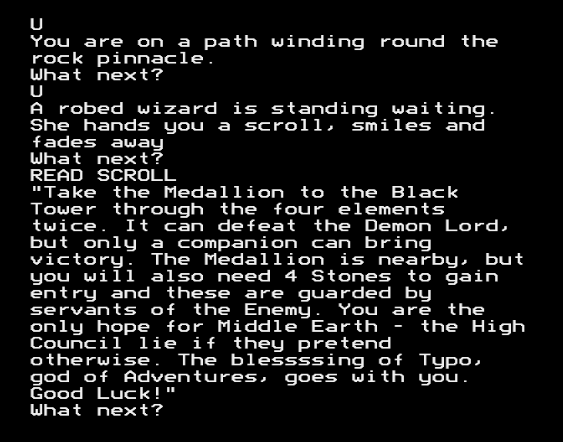
The medallion is the Talisman of Life spoken of in the scroll I received last time, and just as a reminder (to both you and myself, since it is clue-laden) I’ll quote the whole thing:
Take the Talisman to the Black Tower through the four elements twice. It can defeat the Demon Lord, but only a companion can bring victory at the end. The Talisman is nearby, but you will also need four Stones to gain entry and these are guarded by servants of the Demon. The blessing of Typo, God of Adventures, goes with you.
It appears the next phase is to find the four “servants” being spoken of, although to be honest I’m just bouncing everywhere the game lets me go. Here’s my mostly-complete map of the starting area:
I say mostly because there’s still the darkness going down in the building and there still may be something found, and of course it is always possible I’ve missed something (the cliff to the far south, for instance? … although I get the vibe it is just a barrier).
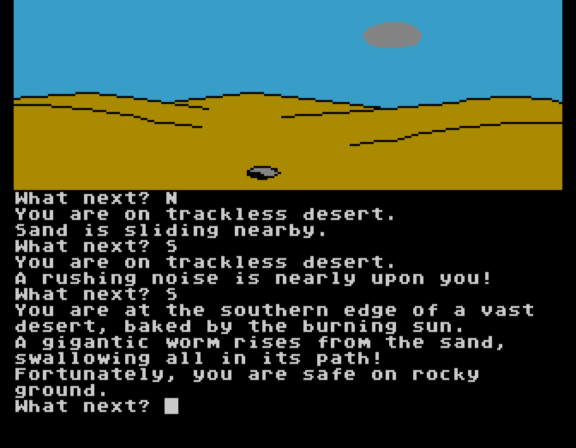
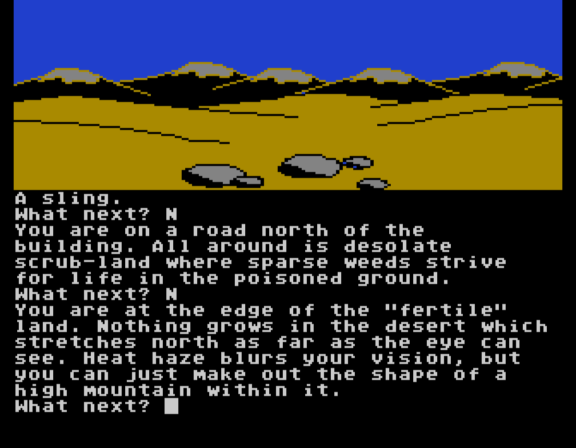
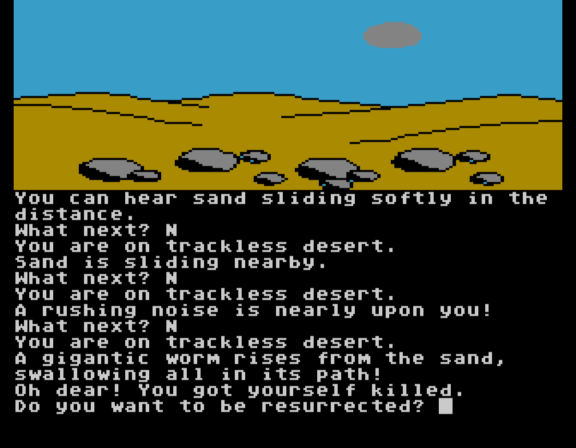
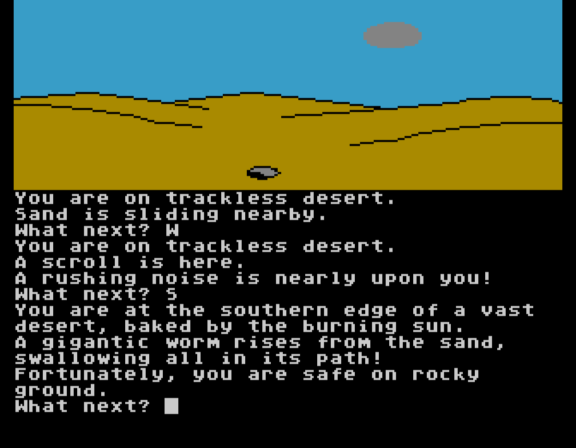
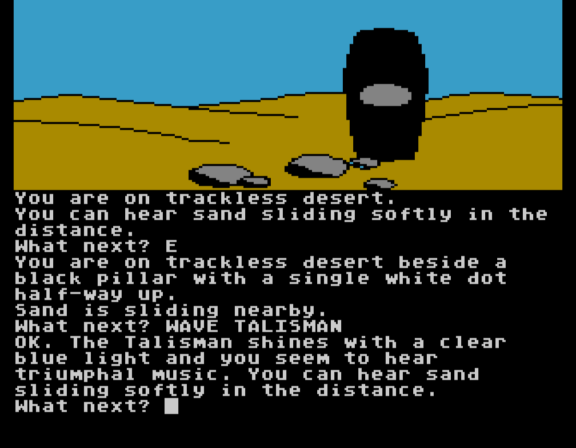
Moving on to the north is a wide trackless desert.
As the second screenshot implies, there’s a sandworm that prowls around. You hear sliding sand approaching and getting louder over a number of turns before you get eaten. One approach is to simply run back to the edge of the desert on rocky ground to be safe.
Of course this doesn’t allow exploration. I’ve found, rather oddly, that I can stall the worm a little bit if I WAVE TALISMAN — that Talisman of Life from the grove — which will give me an extra turn, but the worm still won’t leave entirely.
The desert also has scattered pillars, as shown. The white dot clearly matches the white dot at the building from the start of the game, but I haven’t gotten it to react to anything.
I have not entirely mapped the desert out but I did find if you go far north and then west enough steps you can go north one more step to arrive at a canyon. Following the path of the canyon you can finally go inside into safety, passing by a sphinx on the way.
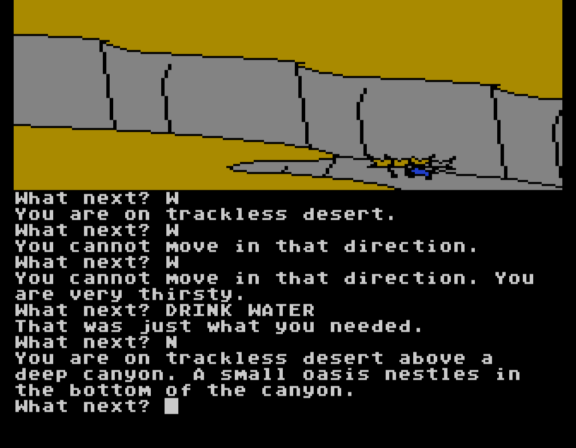
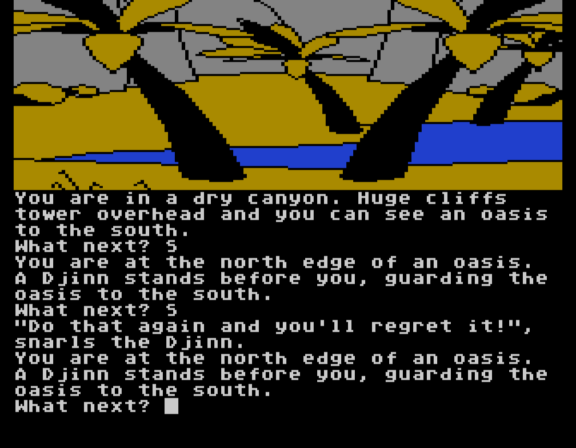
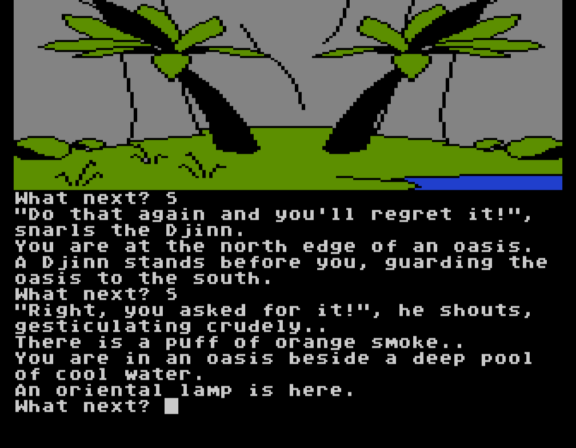
Once inside the valley the worm stops appearing, although you still have to deal with thirst. There’s a handy oasis but a Djinn who harasses you.
Weirdly, you can just go south again and the Djinn will teleport you to the place you are trying to go.
However, the Djinn will still threaten you for entering the oasis a second time. For example, if you go south in the water you can find a trident, but if you then go back north you’ll get teleported somewhere else entirely.
This second scene was after I had picked up the “oriental lamp” from the oasis and was carrying it, so it isn’t as if the Djinn is restricted to the lamp. I’m not fully sure what to do here, but this seems like a good moment to leave off.
While it wasn’t their first game (“their” being Pete, Mike, and Nick Austin), it was the first to bring them notoriety (eventually), and in the same year it was swiftly followed up by two games to make a trilogy. This was partly made easier because they came up with an “engine” known as A-code (similar to how Infocom had Z-code). Timeline-wise, they were advertising Colossal Adventure in an April magazine while already promising the follow-up by August, a month they managed to hit:
From Computing Today, September 1982. By the rule of magazine publication months this was available in August.
One important detail that I didn’t mention last time is that the three first A-code games (Colossal, Adventure, Dungeon) were dubbed in late 1982 the Middle-Earth Trilogy. Colossal Adventure didn’t include any Tolkien elements but the follow-ups do (see “marching to conquer Middle Earth” from the tape cover). The references were removed from the later Jewels of Darkness version, I assume because copyright issues started to get scary. Well, most of the references; according to the Tolkien Gateway one reference to Amon Sûl was accidentally left in. I’ll keep an eye out for it.
I am sticking with the graphical Atari version for consistency but I will flip over to the 1982 BBC Micro version briefly to show off when the Tolkien comes up.
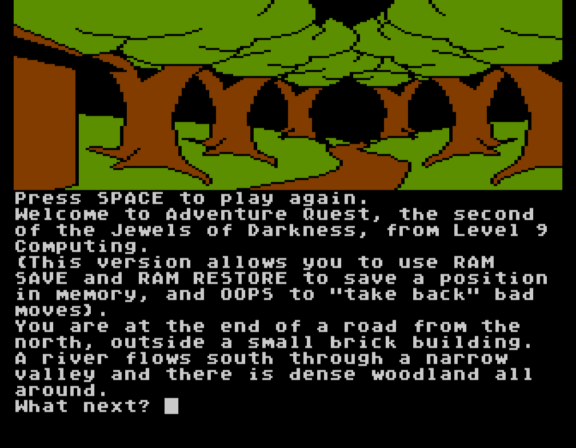
This time we’re meant to find and defeat the Demon Lord AGALIAREPT in his Black Tower. Switching from a Treasure Hunt plot to a Nemesis plot isn’t that much a shift but it does automatically give an end-game confrontation.
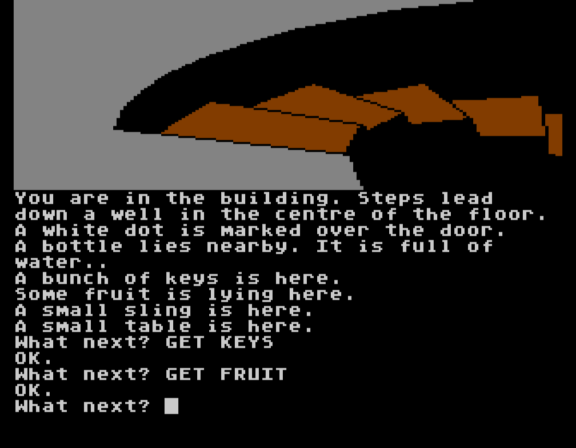
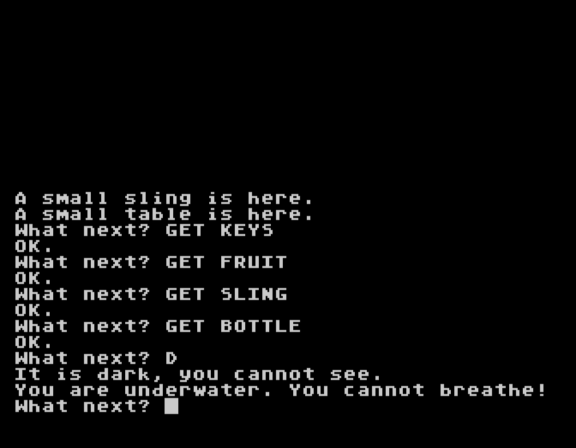
I’m fairly sure the white dot over the door is important, but I’m not sure for what yet. You can take the table but note this game keeps up the four-item inventory limit from Colossal Adventure.
This is based fairly closely in feel off original Adventure in that you start in by building in a forest and can grab some starting items. Going down the stairs leads to darkness.
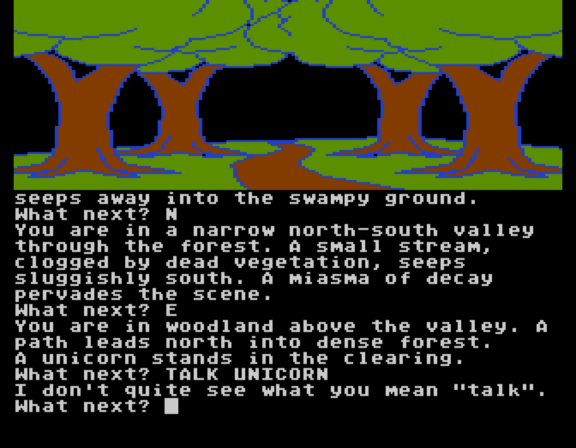
The overall mood is “Adventure, inverted to be more dismal”. There is a river running to the building but it is described as “clogged by dead vegetation”.
I have yet to be able to interact with the unicorn.
The stream keeps running south to dead land.
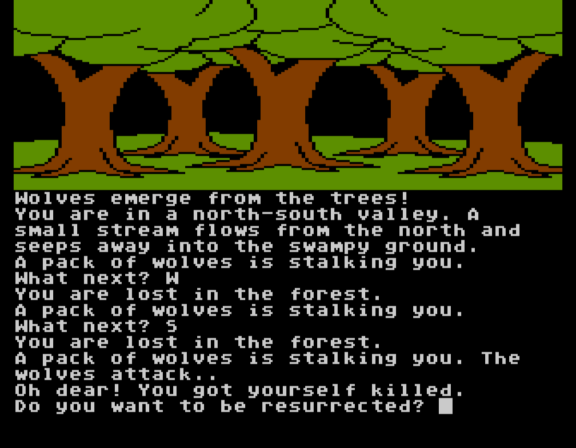
If you wander too long, wolves gather and attack.
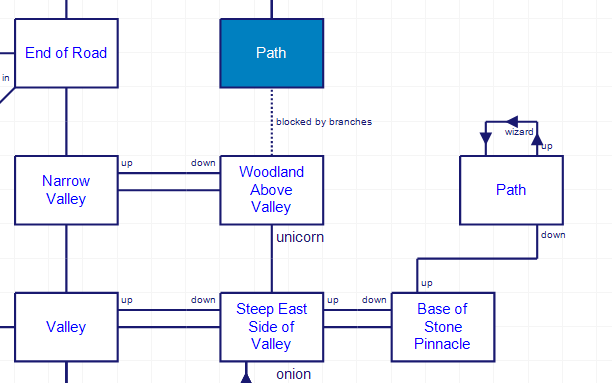
Other than the starting building items, I’ve seen an onion, a rare orchid out of reach (you can drag over the table to get it) and a stone pinnacle. Climbing the pinnacle gets a meeting with a wizard, who hands over our quest.
This is incidentally a moment that is different in Tolkien-alternate-world, where we are the only hope of Middle Earth.
I think that’s enough for now; it looks like Original Adventure with the darkness cranked up. I will try to map things out and report back if I’ve managed to outwit the wolves next time.
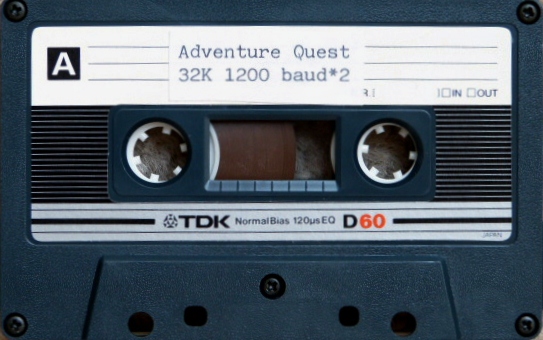
The actual tape from the original version, via the Museum of Computer Game History. I think this may be the first time we’ve had an adventure with such a home-made vibe that the original tape branding is visible.